October 17, 2026

Instruction

golf consistency shot pattern

Everybody wants more golf consistency. Defining that is sometimes hard and often unattainable in golf’s current form.

For most I would define it as making decent contact most of the time and hitting the ball within a relatively discernable area or pattern. That definition of consistency is definable, and if need be can be measurable.

Case in point: “I hit ten balls and eight of them felt relatively solid while nine of them went into an area of five yards left of the target to fifteen yards right of the target.” That would be absolutely fantastic instead of hitting fat or thin and left/right uncontrollably, right?

However, an important concept to grasp is that in the “inconsistency” that most golfers experience there still in lies a series of patterns.

One that I have seen quite frequently lately involves students perceiving that they are hitting up on the ball as they hit it fat or potentially top it. While that is certainly a possibility, I see far more of the opposite—a lot of very steep attack angles accompanied by the thought that they need to hit down on the ball more to A) hit the ball more solid and/or B) get the ball in the air.

Should I Hit Down on the Ball?

In general the answer is “yes” with an iron. However, the direct answer is not the whole story.

Let’s put a few things on the table and go deeper into why this is potentially a reason you keep hitting behind the ball or topping it.

golf consistency shot pattern

In the figure above there are three lines—yellow, blue and orange. The blue line represents where the golf ball launches, and the yellow line is the amount of loft that is presented to the ball at the moment of impact. The ball is placed into the air by deflecting off the loft presented to the ball. So, the launch angle (blue) will always be lower than the Effective loft (yellow).

There is also a relationship to be understood with the orange line, which is the Angle of Attack (AoA). If you make the orange line move down more, i.e., hitting down on the ball more; everything being equal it will drag the yellow and blue lines along with it.

This is where the true lesson really lies. We are humans playing a game and we have an input of information as well as preferences like where we want to see the ball launch in the sky. Our hypothetical situation is this:

golf milestones 4 break 100

The holidays. Less daylight and colder weather are now upon us, creating fewer opportunities to break through your golf milestones before the end of the year.

Don’t panic! You can still make this happen. Being patient and allowing your current skills to take you there will work.

But if you’ve determined that next year is the year to break through your Milestone, you can start working on that plan now.

golf milestones 4 break 100BREAKING 100

Set-Up—The First Cornerstone to Achieving your First Milestone

Without a great set-up, you’ll only advance as far as your current athletic abilities will take you. At some point, a proper set-up will be required for you to achieve any milestone.

Some of the greatest players in the game have used winter to their advantage to obtain improved and superior set-up positions that provide them the best possible start to the new season ahead. They see the golf set-up in the same way as setting up any machine you’re using before turning it on. If the machine is not properly set up and you turn it on, there’s a high likelihood the machine produces an unwanted result. Same goes for setting up to each shot you hit.

The basics of set up are:

  • Alignment — Be sure to aim to the target you intend to hit.
  • Balance — If you can’t balance, you can’t swing. Be sure to keep your weight evenly distributed between toe and heel, and from the belt down equally balanced between left and right.
  • Posture — Too much bend in the knees or bending forward will make you out of balance. Bounce in your knees and natural bend from the hip joint forward is all you need to get started.
  • Grip — Observe how your hands hang naturally from your shoulders to each side of your body and attempt to replicate the angle at which they hang as you grip the golf club. Use your fingers to hold the club, not the palm.
putting eye position

putting eye positionWhen I talk about putting with my students, I like to work on these top three skills:

  1. Ability to aim
  2. Ability start putt on the intended line
  3. Speed control

This tip will help you master the top two.

Everyone’s sights and visuals are different, so it is important to calibrate each player specifically and find out where they operate at their best.

The photo at right illustrates the position where my dominant eye is looking over the ball. I would like to see my players have their eyes directly over the ball, or inside their target line up to the width of two golf balls.

There is no exact, textbook eye position over the ball, but those are my parameters — however, I never want to see a student’s head and eyes outside the target line.

For players who have a very straight-back-and-through stroke with little amount of arc, I prefer to see their eyes sit directly over the ball. That will give them the truest indication of the proper line.

For players who have more arc to their stroke, I would like to see their eyes more inside the ball. Since the blade opens and closes slightly during the stroke, a slightly inside eye alignment can help  square the putter face at impact.

These are just some basic examples to help you identify where your eyes should be over the ball. It’s up to the golfer to practice and measure to find out where is the most optimal eye position for them to perform at the highest level.

Again, if you are able to aim your putter blade more consistently and start your putt on your intended line, you should make more putts — assuming that the read and the speed are correct also.

Nam Padung, PGA, lives and teaches in Augusta, Georgia


golf shots to practice putting

After teaching the game for almost 30 years I have noticed that there are several golf shots that people NEVER seem to practice, yet these are the exact shots that cost them strokes round after round.

Practice doesn’t make perfect in this case—it makes you prepared. If you don’t practice each of the shots below, you will have very little idea as to how the ball will come “out” or what your limitations are in general. If you want to play your best you must experiment and practice these shots!

golf shots to practice putting

Big-Breaking Putts

Now I won’t lie to you—most players tend to hit longer putts with break on the putting green each time they go out, but few hit the putts like I am talking about—thus they fail every time.

I want you to think of a situation where you have a ridge or an elephant buried in the green that you have to navigate. Do you have the feel and line in your mind? Can you putt the ball right to the precipice with the dying speed necessary for it to trickle down the slope gently to the hole? Of course not.

What about the big-breaking putt that’s super-fast or super-slow are these the ones you tend to three putt?

These are the situations that cause the poor lag putts, in my opinion—not the long, flat putts that 99 percent of the players practice when they go out.

This is called fine-tuning your feel—putting these putts on the highest line possible and the lowest line possible so you can find the perfect speed on the course.

wedge game featured

QUESTION: Are you struggling hitting your wedges the correct distance? Here’s how to get your wedge game in shape for those tricky shorter shots.

While playing college golf at Austin Peay State University and then on the professional circuit, I found that it was imperative to make sure that the distances I hit my wedges were on point. From there I created a method that not only helped me become more consistent with the strike, but also, a lot more consistent with how far the ball traveled in the air.

Using the words and images below, I hope to help you to dial in your distances.

THREE ARM SWINGS

We will look at three arm swings with the same wedge, a 58-degree Callaway MD4, to help produce three different distances.

The distance the hands travel will dictate the distance the ball goes, almost as if you had an elastic band—the further you pull that elastic band back, the further the ball will fly.

  • Arm Swing 1 – Hip To Hip – My distance: 50 yards
  • Arm Swing 2 – Chest To Chest – My distance: 70 yards
  • Arm Swing 3 – Shoulder To Shoulder – My distance: 90 yards

SET-UP KEYS

Step by step keys to the setup for all three swings:

  • Ball position slightly back of center – this will help produce a downward attack angle of the club head into the ball.
  • Hands are going to feel slightly ahead of the ball (left arm straight down shaft line)
  • Feet slightly open to target
  • Left leg will bear about 60 to 75 percent of the weight through-out the entire swing.

Again, it’s very important to remember that the setup will stay the same for the three swings we are producing.

wedge game 1-3

THE HIP-TO-HIP ARM SWING

 Once set-up is complete, the first wedge arm swing we want to pro-duce is one that goes from our right hip to our left hip.

In Photo 1 you can see that my hands are in line with my right hip — note that the toe of the club is pointing up, which will create loft at impact.

Note that the left arm, hands and club are extended away from ball, which will help to compress the ball and not just “scoop” it into the air.

From there you are in a good position to start the transition into impact.

Impact

Photo 2 is what impact should look like – note that just like set-up, the impact position is the same for all three swings — this will help with an improved strike.

  • Hands are slightly more forward than they were at address – this will make sure the club goes down into the ball
  • Weight of the left leg has increased from about 60 percent at set-up to about 75 percent at impact.
  • My chest and hips have started to open up and rotate to the target
  • My head is in the exact same position as address.

Follow-Through

The most important aspect to the follow-through is making sure that the club extends to the target – with the toe of the club in an upright position just like it was in the backswing.

In Photo 3, notice that my hands are in line with my hips and in a very similar position to where they were in the back swing.

wedge game 4-7

THE CHEST-TO-CHEST ARM SWING

In Photo 4, my hands are in the middle of the chest with a little more hinge of  the club.

The left arm, hands and club are extended away from the ball to produce a downward attack angle of the clubhead.

I have a little more chest and hip rotation than in Photo 1.

Note: Toe of the club is in an upright position to allow the club to have loft at impact.

Impact

See Photo 2 for same impact position

Follow-Through

The most important aspect to the follow-through is making sure that the club extends to the target — with the toe of the club in an upright position just like it was in the backswing.

In Photo 5 my hands are in line with my chest and in a very similar position to where they were in the back swing.

  • Hips and chest are fully rotated to the target.
  • My right knee, right hip and right shoulder are ahead of where the ball is on the ground.

THE SHOULDER TO SHOULDER ARMSWING

In Photo 6 my Hands are in line with the right shoulder, with a little more hinge in the club than in Photo 4.

Again, to make sure the hands and club travel further we need to make more hip and shoulder turn than in Photo 4.

  • Left arm and hands are extended away from the chest just like in the other images.
  • Toe of the club is up to create natural loft on the ball at impact.

Again, refer to Photo 2 for same impact position.

Follow-Through

The most important aspect to the follow-through is making sure that the club extends to the target — with the toe of the club in an upright position just like it was in the backswing.

In Photo 7 my hands are in line with my shoulder and in a very similar position to where they were in the backswing.

  • Hips and chest are fully rotated to the target.
  • My right knee, right hip and right shoulder are ahead of where the ball is on the ground.

Anthony Bradley is PGA Head Golf Professional at French Lick Resort in French Lick, Indiana. Reach him at abradley@frenchlick.com or visit the golf learning center at the Valley Links Golf Club at www.frenchlick.com


good putting featured

In any good putting stroke the hands, wrists and arms form a stable structure that stays intact during the entire motion (Photo 1).

The putter head is put into motion by the movement of the shoulders and the structure created at address should remain throughout the stroke…otherwise the structure breaks down and inconsistencies in the stroke are sure to pop up (Photo 2).

A simple alignment stick can help you to feel the proper structure as well as the proper movement of the shoulders in the putting stroke.

Just lift your arms and place the alignment stick across your upper chest and a lower your arms down to hold it in place (Photo 3). The alignment stick will now lock the structure of your wrists and arms in place and force you to move your shoulders to make the stroke (Photo 4).

Brandon Stooksbury is Director of Instruction at Idle Hour Golf Club in Macon, Georgia, and author of The Wedge Book. Visit him at www.brandonstooksbury.com

putting stroke chalkline photos

Every once in a while you get one of those “aha” moments. I had one when I was playing in the PGA Junior Championship at Bellerive Country Club. I had lost the tournament due to my exceptionally poor putting from four feet and in. I vowed I would never allow that to happen again. So I came up with a way to improve my putting stroke alignment, and build confidence, all with one drill: the chalkline.

Whether you have a straight back and through stroke or arc stroke, you can do this drill.

Look at the accompanying photos to see what I mean.

putting stroke chalkline photos

First, I find a straight uphill putt and snap a chalkline. I always pick an uphill putt so I have to put a little bigger stroke on it.

Next, I add a board just outside the toe line of the putter and a tee on the through path, just wider than your club head to enforce a good putter path.

Stroke your putt by swinging your shoulders back and through, keeping the “Y” created by your arms and putter constant. Your hands and lower body are quiet throughout the entire stroke. As you hit each putt, allow your eyes to go from the putter face to the hole, then back to the ball. Having your eyes trace the line to the hole and back helps ingrain what being “square” looks like to you. In this drill, the putter should swing back and through along the chalkline with the club face slightly arcing.

In the beginning, see how many putts out of 30 you can make. As you get more comfortable, go to 30 in a row, each time looking at the hole prior to each putt, ingraining alignment, and holding your finish. You will notice muscle memory of your stroke, perfectly swinging over the line, improved ability to line up to the intended target, and increased confidence seeing the ball go into the hole, putt after putt.

Note: I recommend using corn starch in your chalkline, so that when you are finished with practice you can pour some water on the line and it will disappear. This process saves the green from the damage of too many people standing in the same spot over and over again.

Vicki Goetze-Ackerman is Director of Instruction at Buckhorn Springs Golf & Country Club in Valrico Springs, Florida. Reach her at getzack2@gmail.com

In a golf lesson, nothing is more important to achieving success on the lesson tee than clear, concise communication between a student and his or her coach. And that includes letting a student know when he or she achieves a square clubface.

In life we use various media to communicate in a learning environment. We can verbalize, we can demonstrate, we can physically touch or move a person into a particular position.

In the golf swing, the most important juncture of communication in space and time is that instant when the club face comes in contact with the ball. That “moment of truth,” as the great teacher of the game, Dr. Gary Wiren, describes it, is only a blip in time. 

That said, during that instant the face is attached to the ball, it in fact tells the ball what to do. It communicates a variety of commands instantly. They hopefully include a properly delivered loft, center-face contact, and face direction.

[ngg src=”galleries” ids=”11″ display=”basic_imagebrowser”]Now, of course, other things are occurring (angle of attack, path, shaft lean), but the previously mentioned face-related transmissions are certainly critical to helping you achieve a successful on line golf shot.

To be successful delivering a great face condition at The Moment of Truth, one of the junctures I look at with great care with each of my students is the club face at the top of their golf swing. If the face of the club is flawed at the top, there is very little chance they will be able to manipulate it either successfully or consistently in the split second we call a downswing.

Many moons ago the late, great Jim Flick, one of golf’s legendary teachers shared with me a simple device that has become one of my all-time favorite training aids.

Through the years the Swingyd has helped hundreds of my students hit better golf shots. In particular it has taught each student how to control his or her club face throughout the swing. This has led to a much tighter-online ball flight pattern.

The Swingyd is extremely easy to use. It comes with great directions and it’s a no-brainer. Almost overnight you’ll gain a sense for exactly what it feels like to have a square club face at every critical juncture of your golf swing, particularly at the top.

Below you’ll find a great training aid resource to purchase your Swingyd. If you go online to this site to purchase one, use my last name, “Patri,” when they ask for a promo code during checkout and you’ll get a discount.

Go to  orders@golftrainingaids.com

By the way, Golf Training Aids is a great resource for thousands of different training aids ! Use my name “Patri” as your Promo Code every time during check out and receive a discount.

If after you purchased your Swingyd and you have any questions at all feel free to email me directly at tpatri@mindspring.com . I’d be happy to help you any way I can.

You are now on the way to better contact and certainly straighter golf shots.

VIDEO: TOM PATRI TALKS MORE CLUB FACE

Tom Patri is a Golf Tips Magazine Top 25 Instructor in America and a Contributing Editor. Tom is also a former Met PGA as well as South Florida PGA Teacher of the Year. Tom is the Director of Instruction at The Hawthorns Golf and Country Club in Fishers , Indiana, May-October, and November-April he is based at The Esplanade in Naples, Florida. You can reach Tom via email tpatri@mindspring.com Text 239-404-7790 Visit him at www.tompatri.com

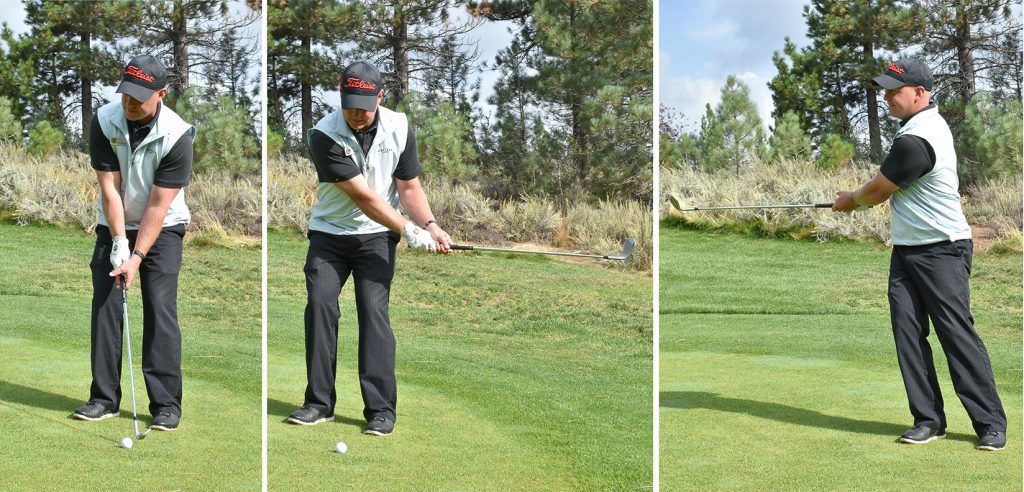
vga-chipping-photos

Having good fundamentals in chipping is so beneficial to creating solid contact.

The two tendencies I see a lot of amateurs’ struggle with when chipping is using their hands to much and feeling like they need to lift the ball in the air. By creating some awareness in your chipping set up and motion, your chipping can drastically improve, thus lowering your scores.

Vicki Goetze-Ackerman ChippingAt Address

  • Stance should be square to slightly open to target
  • Weight should be 70% on your front leg
  • Hands should be slightly in front of the ball……arms and club form a lower case “y”

The Takeaway

  • Rotation of swing on front leg axis……no weight shift in backswing
  • Swing low to the ground in pendulum like motion

Impact

  • Strive for same positions as at address
  • Maintain wrist angle through shot
  • Remember the loft of the golf club is what lifts the ball

 Finish

  • Hips and chest turn through the shot
  • Hands finish higher than club head
  • Club finishes at target

Vicki Goetze-Ackerman is Director of Instruction at Buckhorn Springs Golf & Country Club in Valrico Springs, Florida. Reach her at getzack2@gmail.com

uphill and downhill pitches up

Playing mountain golf, a lot of times you can find yourself in tricky situations, with uphill or downhill lies. A lot of players tend to set up a little bit “off.” Let the golf course tell you how and where to stand for uphill and downhill pitches.

uphill and downhill pitches upUPHILL

Here I have an uphill lie so I’ll set the ball back in my stance a bit. The key is, I will get my shoulder plane going the same direction of the hill I’m standing on. Being a lefty, I want my right shoulder higher than my left; for a righty you want your left shoulder higher than your right. Make a nice shoulder turn toward your target without manipulating the club, and don’t sway off of the ball — let your club do the work and the results will be quite a bit better.

uphill and downhill pitches

DOWNHILL

Here we have a severe downhill slope. Again, set up according to what the course tells you. My left shoulder will be higher than my right here, and I use a bit wider stance on these shots, and keep the ball in the center, or just back of center. Again, make that good shoulder turn with soft hands, and the club will do the work to get you on the green, with a great chance to save par.

Caleb Olsen is Head Golf Professional at Grizzly Ranch Golf Club in Portola, California

See Caleb’s tip on playing tricky par 5s

0
0
Your Cart
Your cart is emptyReturn to Shop