October 17, 2026

Instruction

pre-shot routine 1-4

If you polled a combined group of PGA Tour Players and a deep list of the very best golf instructors, asking them to list the top 30 Golf Swings from 1970 to present, the great Jack Nicklaus might not make their list. Poll the same two groups as to the greatest Pre-Shot Routine of all time, and Jack would easily be No. 1.

The Pre-Shot Routine is a cornerstone of my teaching, and I feel strongly it is a must-needed skill to teach and coach the recreational player. Let me be clear: to be a great player, an EXACT, repeatable, and clearly understood routine, every single time you attempt a golf shot, is an absolute must.

The Pre-Shot Routine can be individual in design to fit the needs of a specific player. However, there are definite fundamental and essential things it should in fact address and accomplish.

Let’s discuss several of the things I like to I teach and coach every one of my students who need to establish a sound Pre-Shot Routine.

pre-shot routine 1-4

I believe one of the main purposes of a Pre-Shot Routine is to establish a solid cadence. This allows the player to stay in a rhythm never getting too fast or too slow. Untrained players often unknowingly speed up after a bad shot due to the anxiety they experience. Likewise, they sometimes speed up after an exciting shot or birdie. Conversely, they think that after a bad shot  they should “slow down.” In fact, neither is correct. Simply stay in your routine.

I remember being at The Buick Classic at Westchester Country Club one year, sitting in on a session watching David Leadbetter work with Nick Faldo – using a stopwatch and counting steps from behind the ball to establish a time formula to take to the course.

pre-shot routine 6-8I often ask my students what they think is the No. 1 most common trait among world-class players. Of course, I get a boatload of answers, mostly of the mechanical, in swing-type. After they have exhausted their thoughts as to the possible answers and I have continuously shaken my head, they then exclaim, “so what IS the most common trait?”

I look them straight in the eye and calmly reply, “they are boring …they do the same exact thing every time.”

pre-shot 9-11

Of course, I’m referring to their Pre-Shot Routine. In other words, the players I generally like the most are the ones you show up to watch midway through their rounds and you can’t tell if they are eight under or eight over. You watch them closely and their cadence from shot to shot is identical. Again, Jack was the master of this skill.

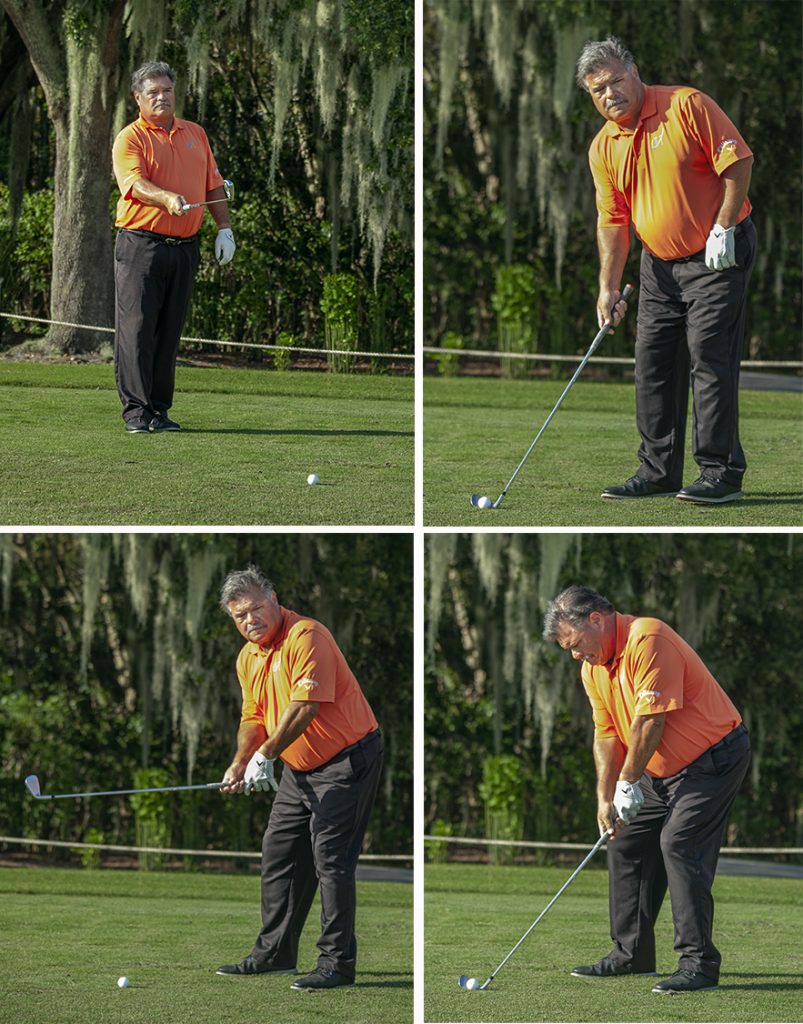
As you peruse the photos in the article and read the captions, these are the exact steps I have taken when preparing to hit a golf shot for the last 40 years of my life, without exception. I worked extremely hard at this during my playing days as both a college player and then during eight years playing professional golf.

In this regard, Jack was my model. It seemed his routine kept him in a protective cocoon, shielded from the surrounding pressures of professional golf. While players around him lost the rhythm, deviated from their less-structured routines and crumbled, Jack cruised on home to collect the hardware.

pre-shot 12-14

Now I want to be clear that we are all individuals, and no two routines are exactly alike – nor need be. That said, I want to dis-cuss that one part of all routines that I refer to as “The Critical Juncture.” This one area of the Pre-Shot Routine is in fact critical, because it is at the moment in time when so many parts of the “launching pad” are established and come together.

As you walk toward your shot and you turn the corner to first face the ball (making your body perpendicular to the target line), that’s when all of the following must instinctively fall into place:

  • The grip-club face relationship is established
  • The aim of the club face as it relates to the target
  • Your stance, its width and your ball position
  • Your distance from the ball
  • Your posture

I continually talk with my students, pleading with each of them to make one of their goals to become a set-up expert. Build a Pre-Shot Routine that is your very own, making absolutely sure it gets you into a sound launching pad condition. Own your routine and never, ever violate it.

Once you do, in fact, own a solid repeat-able Pre-Shot Routine, so many of those silly lost shots you hit during your round will simply go away.

Tom Patri, PGA, is a former Met PGA Teacher of the Year and South Fl0rida Teacher of the Year, and founder of TP Golf School in Naples, Florida. Reach him at www.tompatri.com

downswing hip slide 1

downswing hip slide 1One of the most prevalent issues that I see with my students is sliding the left hip (right-handed golfer) too far toward the target in the downswing.

Most of us, when we first started playing the game, were told to hit against a firm left side. When the left hip moves well past the left foot, there isn’t a whole lot of firmness. There isn’t a whole lot of rotation. And without rotation, power is dramatically reduced.

Here is an analogy that might help put you back on track: Maybe you have a fenced-in back yard with a gate. If you don’t, humor me and just pretend that you do. If the post that the gate is attached to is straight up and down, the gate opens and closes perfectly. If the post is tilted, good luck with the gate.

downswing hip slide 2Same with your golf swing. At impact, if the left hip is over the left knee and left ankle and forming a straight, vertical line, your right hip will rotate perfectly, just like the gate. If the left hip slides past the left foot, rotation is diminished – along with power and accuracy.

Here is a drill to help you get the hang of it: stand in a doorway with the outside of your left foot touching the door jamb. Cross your arms across your chest. Make a backswing turn and then a through swing turn. During the latter, allow your left hip to move laterally, just enough to make contact with the jamb. That amount will put you in a vertical left leg position, the perfect place for maximum hip rotation.

Hip rotation translates to more power, which we all want.

John Marshall, PGA, has been voted one of the top instructors in Georgia, is a two-time American Long Drivers Association super senior national champion and five-time RE/MAX World Long Drive finalist.

better chips 1

better chips 1Occasionally, newer and seasoned golfers alike get nervous over the ball when faced with a tough lie, forced carry or tight pin. But if your knees are knocking over every short shot, this tip is for you and better chips are on the way.

Next time you miss a green, let the thumb and index finger of your trail hand go along for the ride.

better chips 2-3We’ve all heard “quiet hands” when it comes to chipping. What that really means is the muscles in your arms should be more active than the muscles in your hands. The easiest way to feel this separation is to take the thumb and index finger of your trail hand off the club when practicing chips. Using the muscles in those fingers are great for writing or throwing, but are very often the culprits to miserable chip shots. By removing these fingers from the grip you’ll take the flip move out of your swing, create a wider – more forgiving – impact area, and get up and down more often.

Mike Metz is Director of Instruction at Simi Hills Golf Club, Simi Hills,  California

goldstein-putt

Clearly, when it comes to putts from 20 feet or less, we have one goal. Hole it! Make the putt!

From 50 feet, getting it close and two putting is fine. Well done. BUT if you are not trying to make every putt inside 25 feet, you will lose to someone who is.

The worst miss from this distance is short. Ugh! Even thinking about leaving a makeable putt short hurts. There are four misses: Long, left, right, and short. We don’t love any of them, but short is the worst.

goldstein-putt

This great drill will assist your feel with feedback so you avoid leaving those putts short.

Lay a mid-iron down two and a half to three feet behind the hole. Use three balls and your normal routine for each putt. Simulate playing conditions just like you are on the course. The goal: You can’t leave any putts short. You must get every putt either in the hole, or past the hole, yet short of the golf club behind the hole. This is feedback. Practicing without it just gets you sunburned. Practicing with feedback can make you great!

As you can see in the first photo, no good. I left it short. In the second photo, I was able to roll the balls with good speed and not leave them short. I know this drill will help you make more putts.

Challenge yourself: In time, practice this drill until you make nine putts and leave nothing short. The penalty for leaving a putt short? Fetch it and start over at 0. Not easy, but it will 100% make you a better putter, with great speed control.

Barry Goldstein is Director of  Instruction at Inverrary Country Club in Lauderhill, Florida

golf fit artwork

golf fit artwork

Take a guess: what is the No. 1 thing 99% of the recreational golfers come to my lesson tee asking for?

If you said distance, you’d be correct.

Now, certainly a good coach can help you to some degree if there is a mechanical flaw that is causing a power leak. Power leaks are common among the amateur golfer. That said, if one were able to make the needed changes mechanically but the true motor of the motion wasn’t in order, the changed mechanics might, in fact, be useless. 

In my book The Six Spoke Approach to Golf (available on Amazon), my very first Spoke is “The Body.” The true motor of your golf motion is your body. If that motor is not in a sound working order (strength and flexibility), I wouldn’t bank on additional yardage. 

Let’s all start 2020 off the right way. Let’s get fit. Life fit, golf fit! Let’s lose those pounds that are slowing down our rotational skill and, of course, not good for our general health.

Let’s get toned. Let’s work on our core, legs, hands, wrists, and forearms. Let’s get more cardio fit. Let’s increase our general stamina/ endurance. Let’s just plan feel better about ourselves. 

I promise: If you present me a sound golf machine, we can program it to hit longer, crisper golf shots.

Tom Patri, PGA is founder of TP Golf Schools based at The Esplanade in Naples, Florida. Visit him at www.tompatri.com.

straight golf shots grip

One of the most common full swing mistakes amateur golfers make is leaving the right side (trail side) of the body “behind” through impact and the follow through, with no release. This is why many players feel the need to strengthen their grips in order to square the clubface and hit straight golf shots, even though the results are usually poor.

Here’s why: the squaring action of the club face has to be performed by the turning and pivot action of the whole body as opposed to “throwing” your hands at the ball. This is also why, no matter how strong a player might grip the club, he or she can slice the ball terribly by sliding on the downswing.  And if body releasing does happen to occur, the dreaded duck hook is the result.

straight golf shots grip

The first thing to do is to make your grip more neutral by letting both hands face each other when you grip the club, as I’m doing above. You want to see a 2.5-knuckle grip of the front hand, and a two-knuckle grip of the back hand.

The key here can be equated to the simple act of walking. Think about the physical act of advancing with your feet and legs: you simply impulse your body weight without stopping it. You let it go. If you do not do this, then you are not moving dynamically. It would be like  walking on stones to cross an arroyo, making sure the next stepping stone is firm enough for secure footing. This is not dynamic. You don’t walk on pavement like that, right?

straight golf shots downswing

The golf swing is no different. You have to let go with that same “free-transporting-ride” from the top of the swing all the way through to the finish.  And the key is the rounded motion of the trailing knee, hip and shoulder.

A good check point is to get onto the big toe of the trail foot with no effort, in one single motion, from the top of the backswing to the finish.

straight golf shots finish

If you focus on the rounded motion of your right side, you can now swing as far left as you want from the top of the backswing and fully release the club with confidence. You will find your body performing the much-desired “forward body weight shift” in the correct way.

Antonio Reynante is Head Golf Professional at Quivira Los Cabos in Mexico. Visit the resort at www.quiviraloscabos.com.

milestones breaking 70 2

Here we are on the cusp of not only a new year, but a fresh decade (at least as it’s commonly defined; technically the decade doesn’t begin until 2021, but we’ll go with it). Definitely an apt time to churn up those golf resolutions that nag us every time the calendar flips.

Let’s tackle them in two sentences or less and back them up with links to some of Golf Tips’ favorite lessons and equipment pieces from the last decade.

The best part: We’ve got 10 whole years to actually pull them off.

  1. Practice more, and practice better, even like a Tour player. Enough said.
  2. Practice short game more. From 100 yards in is where most scoring takes place, so why keep mindlessly banging balls on the range when you can hone those wedges and putter to a fine point?
  3. Sign up for a series of lessons from an accomplished, well-trained and passionate pro – a coach – that you know and trust.
  4. Play with purpose, every time. That doesn’t mean getting stressed and putting undue pressure on every shot, or chewing yourself out when things go wrong, but taking it just seriously enough to approach and enjoy the game as the ever-beguiling craft it is.
  5. Get your golf clubs fit, and keep them fit, including replacing the grips every year if you play a lot, every other year if you’re a more casual golfer. That goes for your putter, too.
  6. Get your body golf-fit with exercises and routines, including yoga, actually designed for the purpose.
  7.  Introduce a non-golfing friend, or better yet, a kid, to the game, get him or her proper lessons, and watch your own joy for golf increase mega-fold.
  8. Study, learn and abide by the new and improved (again, we’ll go with it) Rules of Golf, even the ones that seem capricious or just plain nonsensical. It’s a dimension of the game that far too many of us amateurs ignore or downplay, to our deep detriment.
  9. Set realistic scoring goals that take into account your current ability, the time you have to play and practice and level of commitment. Then conquer them, and feel free to puff up your chest a bit.
  10. On that note, for goodness’ sake, play more, in whatever form possible — join a club, play par 3 courses, six holes at sunup or sunset, set up a standing tee time at your local muni (which deserve our undying support, by the way) … whatever. Make the 2020s your ultimate golf decade.

Got some resolutions of your own? We’d love to hear them. E-mail editor Vic Williams at vwilliams@madavor.com or comment on Twitter or Facebook.

John Hughes Golf Tips October 2019

It’s time to get started with your plans to reach or exceed your golf milestone goals for 2020. Breaking through your barriers this year starts now, no matter what the weather conditions.

BREAKING 100

Is Your Pre-Shot Routine Ready?

Whether you realize it or not, you routinely do the same things each time you execute a golf shot. From pulling the club out of the bag to all the gyrations you make before starting your swing, this sequence of events may not be as efficient as you need to break 100. And if it is disrupted in any way, you’re less likely to come close to breaking 100.

golf milestone 2020 1 break 100

Let’s get your pre-shot routine consistent. Doing so breeds consistency in your swing.

  • Always take a deep breath as you exit the golf cart or stop at your ball while walking. Doing so sends extra oxygen to your body and relaxes you.
  • Assess the lie you have. Is a perfect lie or do you have some variables you need to think about? Take each variable one at a time, starting with a flat or uneven lie. Then move on to how much turf you have. Understanding how to balance and how to swing is more important at your current skill level versus whether grass or no grass behind the ball will affect your shot.
  • Determine the total carry distance of the shot. You can only control how far the ball carries, not how far the ball will roll.
  • Choose the correct club for the lie and the distance you will need to accomplish.
  • Stand behind the ball for practice swings. Practice swing should not be how you’ll swing at your current skill level. Practice swings are about maintaining the relaxation you started with the deep breath you took. Making practice swings behind the ball also allows you to:
  • Look down range at your intended target. Taking another deep breath, envision your shot traveling to your target, from behind the ball. You’ll have a better chance of setting up correctly if your eyes and brain can make the connection of how straight the intended target line really is and how the ball can fly there.

Three Wood Stinger It doesn’t matter how great or poor you’re playing, any given round requires at least one spectacular shot to win a skin, save a much-needed stroke or, in some cases, avert a disaster. We like to call these “money shots,” as opposed to “miracle shots,” because we believe that with practice, these types of shots will be your go-to plays when the game is on the line.

Better yet, learning a few money shots will not only help you lower scores, but your overall game is likely to improve, thanks to a newfound confidence in knowing you can face anything that comes your way.

1. Stinger 3-Wood

Hitting the 3-wood stinger requires a different approach to weight shift because, basically, there isn’t much of one. This swing is all about the turn! Set up, just as you would with a normally played 3-wood. Flex at the knees, stay centered and position your hands over the golf ball. With a light grip, choke down on the shaft one inch. As you take the club up to the top, try to limit the shift of weight to your rear foot as much as possible. This will encourage a de-lofted stroke through the ball and a lower, more penetrating ball flight.

When hitting a 3-wood stinger, notice how low my hands are immediately post-impact. This is because my weight never made it over to my back foot and I’m ahead of the ball. Many golfers think the stinger requires a three-quarter swing. That’s incorrect! To hit this money shot, one must turn harder to make up for less weight shift.

Agressive Putting2. Aggressive Putting

To make putts, sometimes you have to be aggressive. But it’s just as important to remember that it’s better to play it safe and avoid disaster.

Put it this way: When below the hole, you should always be aggressive. The adage “Never up, never in!” always applies, so make sure you get the ball to the hole if you want any chance of making it. Putting from downhill positions is a bit trickier. Some putts call for a more aggressive stroke, while others demand a delicate touch to avoid a lengthy comebacker for par. To learn how to be aggressive, you have to become an expert green reader. First, evaluate how much slope there is behind the hole. If the green slopes away, heed your speed and play it safe. If there’s an uphill slope or the green flattens out, consider a run at the hole.

Secondly, you have to become proficient at reading grains. Take a look at the grass and note which way the grain is going. If it turns out that your downhill putt is with the grain, then know it’s going to be extra-slippery. If you’re putting into the grain (the grain is facing away from the hole), this is your green light to make a more aggressive stroke. If the green is going either left or right of you, note that the putt will break more in the direction of the grain.

The best putting stance is the one that matches your stroke. If you swing open to closed, standing more upright will help. If you have a more squared stroke, address the ball in a lower position, but allow the arms to hang freely. Always assess the slope before you putt and don’t forget to look at the grain.

Southpaw Swing 3. Southpaw Swing

If you really want to impress your foursome, practice this shot for an amazing recovery.

It happens—a tree, bush or frankly any kind of obstacle blocking you from addressing the ball. In this case, my ball is up against a tree. When faced with this predicament, before you take an unplayable lie penalty and get relief, first consider if you can at least move the ball forward or into the fairway for a shorter approach than you would have with a penalty drop. Take your pitching wedge, and set up as you would a left-handed shot, only invert the club head so the toe is pointed down.

To hit this shot, make an abbreviated swing and expect the ball to sharply roll to your right, hopefully back toward the fairway. If that shot sounds too daunting, try the backhanded chip. Turn facing away from the target and with your right hand, swat at the club in a straight up and down manner. Even if the ball moves just a few yards, you’re at least one club length closer than you would have been had you taken a penalty drop.

Keep the head steady and know that the key is to move the ball back into the fairway, not to hit the green.

Divot Blast 4. Divot Blast

Hitting from a divot isn’t as hard as you think. It’s all in the know-how. Instead, factor this scenario as you would a simple knockdown shot. Position the ball in the rear portion of your stance and take a stronger grip than usual. Be sure the club face is square, since it’s likely to try and open at impact. The important factor in this shot is to keep your hands ahead of the ball well into the impact position to ensure a crisp, downward blow through impact.

Also, concentrate on the back side of the golf ball. This will prevent your body from rushing too far forward and hitting it too fat or thin. Since you’re essentially hitting a knockdown shot, the swing will be abbreviated, so don’t forget to add at least one more club than DH Greenside Chipusual. Remember, don’t force the shot, but do expect a low trajectory with some roll.

Always grip the club before you set up to the ball, not after. This will keep things  consistent.

5. Severe Downhill Greenside Chip

No doubt a tough shot, the downhill chip requires a good read of the green.  When facing a downhill greenside chip, it’s critical you pay attention to how the green breaks. Reason being, from a downhill position, the ball is going to roll more than normal, thus you’re going to need to factor break and speed to have any chance of getting the ball near the hole. Begin with choosing the most lofted club in your bag and address the ball with an open stance. Try and adjust your weight to the slope of the hill, meaning align your club as perpendicular to the ground as possible. This will force most of your weight forward, which is where it should be.

Play the ball in the back of your stance, hands forward and club face aiming at the desired spot on the green or fringe where you want the ball to begin rolling. As you begin your backswing, swing along the ground and keep your hands low, well into the finish. Don’t try to scoop it!

Keeping the hands low and club face open is key, as is choosing a club with a lot of loft. Also, on tight pins, don’t hesitate to land the ball in the fringe since the ball will have some roll to it. Also, hold the club face open as long as possible.

What Trees? 6. What Trees?

Negotiating a shot around trees is a matter of first deciding what shot gives you the highest percentage for success. If there’s a tree blocking your view from the green, decide whether the smart play is to try and go over it or punch a shot below it. Going over will require crisp contact and a lot of carry, making it the option if you need to get it close to the pin with little roll or if there’s a bunker guarding the front of the green. A safer play is to hit under the tree, barring any hazards near the green that could get in the way. To hit it high, position the ball forward in your stance, open the face and keep your weight on your back foot. As you take the club back, make a full backswing with a swift wrist cock.  Begin the downswing by turning and not shifting forward, and keep the face open well through impact.

To hit it low, take a long iron and choke down. Position the ball in the middle of your stance, with your hands and weight on your forward foot. With minimal cock in the wrists, make a sweeping motion through the ball and concentrate on ball-first contact.

Fairway Bunker Recovery 7. Fairway Bunker Recovery

In case you thought it wasn’t possible to hit a fairway wood from the bunker, think again.

If you face a fairway bunker and a fairway wood is necessary to reach the green, consider going for it as long as the bunker features a shallow lip. If not, take your medicine and move on to the next money shot. If you do have clearance, here’s how to do it. First, make sure your feet are secure; dig into the sand to prevent slippage. Position the ball slightly back of center but with your weight more over your forward foot. Choke down and aim left of the intended target. Because your ball is slightly back from center and your weight is toward your front foot, the flight path will steer right, so account for a low fade.

As you take the club back, expect your swing to be a little more upright than usual. This is due to the fact that your feet are planted and your weight is slightly forward. So despite the steep backswing, don’t feel the need to stab down at the ball. Instead, swing freely and make ball-first contact. The ball will fly low with lots of roll—hopefully enough to get you on the green.

This shot is also effective with a hybrid club. Just be sure you have a decent lie and there isn’t a big lip in front of you. Even with a hybrid, you’ll still get a low ball flight.

Always be sure your hands work together for every shot. In this case, you don’t need a strong grip so allow your hands to stay loose, but remain connected.

Sidehill Lie 8. Sidehill Lie Into Green

Okay, you have a shot and you must hit the green. Don’t forget to factor the effects of a sidehill lie.

Sidehill lies can be challenging, but not if you know what to expect when you encounter one. For starters, when the ball is above your feet, it’s going to hook. Below your feet, the likely shot will be a fade. With longer irons, the ball will hook or fade more than it will with shorter clubs.

In my case, the ball is above my feet. This means the ball will launch right of the target and draw back toward the pin. However, since I’m in the rough, there won’t be as much draw spin had I been in the fairway, so I can take a more aggressive line at the target. I start by addressing the ball with a slightly closed stance, a centered ball position and my weight evenly distributed over both heels. Since I’m on a slope, I’m going to take the club back on an inside-out path that will produce a drawing trajectory. The key is to not force a straight-back backswing into the slope. The opposite is true for a fade. Just allow the slope to dictate what swing path is best.

Let the slope determine the shape of your swing and allow for the necessary side-spin needed to hit the green. In the rough, expect a straighter shot than from the fairway.


Rough Removal 9. Rough Removal

Hitting it close from the rough is critical if you want to stay in the game. Playing your short irons from the rough requires a strong grip and a descending blow to avoid getting caught up in the turf. The key lies in the ability to retain the right angle formed by the club and your left arm at the top of your swing. Holding this angle will help generate the additional clubhead speed as well as encourage a more descending blow because it prevents your arms and hands from releasing too early. And when you release early in the rough, you’re going to hit a lot of grass and, sometimes, no ball. Make sure your hands are in front of the ball at address and the ball is slightly forward in your stance. Add more club, choke down and be ready to hold that right angle as long as you can to generate a whip effect through impact. The ball may fly lower, but that’s a whole lot better than a short, flubbed shot.

Strength is key from the rough, and no better place to find it than in retaining wrist cock through the swing for as long as possible. Tiger woods is a master at this, hence his amazing power.

Hit The High Draw 10. Hit The High Draw

When it comes time to win the long-drive contest, knowing how to hit the high draw is key to milking a few extra yards. 

Begin by using the left side of the tee box and position the feet and body more closed than normal. Concentrate on your rear shoulder and make sure it’s lower than your forward shoulder at address. Second, tee the ball high—you want to catch the ball in the “hot zone,” just above the sweet spot. The hands should be slightly back behind the ball, which is positioned just off the inside of your forward heel. Square up the club face to the target.

As you begin your backswing, follow an inside-out path, and on the downswing remember to rotate and not slide. Rotating will keep your body behind the ball, allowing for an upward, inside-out path. Presto! You have a high draw in your arsenal.

When playing a high draw off the tee, my hands will release sooner, resulting in a high, drawing ball flight. 

Paul Ito and Todd Stewart are both Hawaii-based teaching professionals

Editor’s Note: This story was updated December 2019
circle drill featured

One of the most important things I can do as a coach and instructor is to help my students understand why they hit the ball well—and what they are doing when they are not hitting it well. I always feel that their poor shots give the teacher and student the greatest opportunity to learn. Often, it’s the student’s concept that is off. This is a great visual that I use to help the student understand both path and face: It’s the Inner and Outer Circle drill.

There are two semicircles we deal with in the golf swing: The inner that the hands are on, and the outer that the club is on. In the accompanying photos, I’ve drawn “inner” and “outer” lines on the turf with red paint to illustrate how they  work together.

Address: Hands establish the inner circle and club is on the outer

In the photo above I show how my hands match the inner circle and the club matches the outer circle at address.

circle drill photo 2
The proper backswing: Hands on inner circle, club on outer

In the backswing, the hands stay on the inner circle and the club head stays on the outer. Often, players’ faults are caused from this relationship getting off, right from the start.

circle drill photo 3
The ideal downswing: The hands drop back down on the inner circle and club head moves outward to the outer circle

The key move is on the downswing. The hands need to come back down and inward and get on the inner circle, while the club head needs to come out slightly and stay on the outer circle.

circle drill photo 4
Impact: Hands and club stay on their proper circles

Where instruction tends to stop is at impact, which I’m re-creating in the photo above.

The forward part of the swing and arc is not explained enough to students. They need to understand that the hands and club don’t break away towards the target—they stay on those circles.

circle drill photo 5
Forward part of the arc and swing: Hands still on inner circle around body and club has moved around to the left. Face square to the path

As I demonstrate in this photo, the hands move inward toward the front hip/heel and the club head moves quickly left of the target line. By maintaining this relationship, the club face stays square to the path, which minimizes excessive opening and closing. This also creates a much lower rate of closer resulting in straighter shots and less need to time up the face.

Players can hit half shots with these circles on the ground as well.

Faults and Fixes

circle drill photo 6
Fault: The club and hands are both on inner circle
  • In the downswing, if a player has both the hands and the club on the inner circle, their impact will tend to be shallow and path to the right, re-sulting in hooks, pushes, fats and thins.
circle drill photo 7
Fault: The club and hands are both on outer circle
  • A player whose hands and club both go out on the outer circle in the downswing will be too much above the plane, resulting in pulls, slices, chunks, and tops.

This concept gives my students a clear understanding on how to correctly deliver the club to the ball. Again, explaining to them why they are not hitting it well is one of the many keys to great instruction—and learning.

Krista Dunton is Director of Instruction at Berkeley Hall Resort in South Carolina, LPGA Top 50 Teacher and 2006 Carolinas PGA Teacher of the Year.

0
0
Your Cart
Your cart is emptyReturn to Shop