October 17, 2026

Driving

big miss tee shot 1-3

One of the biggest disappointments in golf is to look up and see your tee shot heading not just off-line, but way off-line! It can ruin your round, not to mention your day.

In fact, hitting the driver off the planet on every hole far exceeds the aggravation caused by missing a short putt, or shanking the ball around the green. This, in my opinion, is the worst thing that can happen while you are playing.

So, what causes the big miss with the driver, and how can one go about curing it once and for all?

There are a few aspects that work against you when it comes to hitting drivers:

  • Length of the driver
  • Loft of the driver
  • Clubhead speed of the driver
  • Gear effect with woods
  • Correlation between the face and the path

The Length of the Driver

The biggest reason players struggle with drivers is the fact that the longest club in the bag is the hardest to control, basically due to its length. This extra length exacerbates the swing flaws you have within your swing and, coupled with the other items above, can drive you out of the game.

Golf companies started to make drivers longer and lighter in efforts to raise the swing speeds of the average player, and while this works for most players, no one thought about the negative impact this would have on accuracy. To make it simpler, the longer the club, the bigger the miss, with all things being equal. Couple this with a club that is too long for you to handle, and you have a recipe for a big miss.

big miss tee shot 1-3

I have always been an advocate of playing a driver that is long enough to for you to produce speed, but not so long that you can’t find the face. So, here is a simple test:

Hit 10 drives and chart your clubhead speed, as well as your impact point (you can use Dr. Scholl’s on your home range, spraying it on the driver face as I’m doing in Photo 1, then hitting the ball (Photo 2) and audit the results (Photo 3).

Next, choke up half an inch and repeat, etc. After you do this a time or two, you will find the length that works best for you and produces both speed and a consistent impact point—this is what you want to  find out.

The Loft of the Driver

As we know, ego plays a big part in the lofts most people use, as everyone wants to use a loft that is lower than all your buddies.

However, what we’ve found out is that your launch conditions are vital to making sure you have the right loft. If you tend to hit the ball high on the face, you can use lower loft, but if you hit the ball lower on the face, you will need more loft. Many drivers are adjustable, so be sure to experiment with this technology.

Why? This is due to the vertical gear effect on the driver— high face impacts add dynamic loft to the driver and the low face impacts reduce dynamic loft.

Once again, go to the practice tee and make sure you find the loft setting (Photo 4) that fits in with your typical impact location, and also fits in with the conditions you play at home.

If your course tends to play wet, you need more loft to ensure more carry; if you play a more firm golf course, then you can get away with a touch less loft.

The Clubhead Speed of the Driver

As we stated, more length (to a point) creates time for more speed, and we know that the more clubhead speed you have, the more off-line your missed tee shot will be versus a player with much less speed.

Think of the misses of Mr. Havercamp, your oldest lady member, versus Troy Mullins (the long drive champion). Mrs. Havercamp does not possess enough speed to hit the ball that far off-line, thus she hasn’t missed a fairway since 1972.

Sadly, the big miss is greatly affected by speed. Because of this, you must find a speed that is around 70% to 80% of your total speed. So, find out your max speed on the range and scale it back a few MPH, and you will have a speed that you can play with – but if you smash it, you will have to go find it!

The key is to go to the range and find the speed that you can control. You can audit this by charting the landing dispersion.

big miss tee shot 4-5Gear Effect with Woods

We have talked about vertical gear effect, which can change your launch conditions, but what about horizontal gear effect, which can make your misses much worse if you hit the wrong part of the face?

Let me explain: most manufacturers have built gear effect into the toe and the heel of the club, which means that a heeled tee shot will tend to slice and a toed tee shot will tend to hook. Couple this with a funky path and face combination, and you have the recipe for the big miss.

If your path is left of the target, you hit the ball on the heel (like I’ve done in the Trackman image, Photo 5), and your face at impact is pointing right of the target, then you have a ball that is going right to right with the blinker on! Why? Because you have both the face and path, plus the gear effect, working against you.

You must focus on hitting the ball in the center of the face, as I’ve done in Photo 6, no matter what the path. This is a fundamental that must be focused on as much as anything else.

big miss tee shot 6-8

The Correlation Between the Face and the Path

TrackMan has shown us that the ball mostly begins where the face is pointing at impact and curves away from the face. Thus, when you have the face and the path pointing in radically different directions, you will have huge misses.

The key is to make sure your face and path are only separated by a few degrees in order to eliminate the big miss. The face-to-path comparison in Photo 7 illustrates this optimum situation on the left, while the right image shows a big problem.

So, if it’s this easy, how can we make this happen?

In my opinion, the biggest reason for big face-to-path variances is lack of attention to where the target is, and where you are trying to swing the club. Ninety percent of all golfers come over the top, which is the root of the average player’s big miss.

So, to shift the path back into the correct position, I would suggest setting up a practice station like I have done in Photo 8. By placing an alignment stick a foot or two outside the ball’s targetline and just a touch on the left side of the ball, you are forcing yourself to make a swing that is more from the inside. This, coupled with some relaxation, and you have the chance for the club to release naturally. The ball should drift slightly more right to left.

Once you can hit nice, tight draws, the final step is to spray the face and ensure you’re hitting the ball on the face where you should be in order to find the optimal impact location for your swing.

Remember, eliminating the big miss takes some time, but it’s as simple as that. Now go and work on it!

Tom Stickney, PGA, is Director of Golf at Punta Mita Resort in Riviera Nayarit, Mexico. Reach him at tom@tomstickneygolf.com

Weight Shift Driver

When a student is hitting their irons well and having trouble with the driver, I am reminded of a comment a colleague mentioned to me straight from one of the finest teachers ever, Harvey Penick. He said that a golfer can hit his irons pretty well without shifting his weight, but to drive the golf ball well, the golfer must shift his weight.

I imagined that Harvey realized that the golfer’s hands and arms can swing the shorter club in sync with the turning body, but not as easily with the longest club in the bag. The body usually gets too far ahead of the club in the downswing.

When you transfer your weight with the swinging of the club (happens more “naturally” than you might imagine!) at the beginning of the takeaway, you will set up a right side axis…a one-legged balance which now frees the left side to turn outward behind the golf ball. This not only gives more time for the club to get to the top of the backswing but also permits a good shoulder turn. It is as if the body is now “unlocked” and capable of turning when you are loaded on the right side—the ball/socket joint of the hip can now work easier.

drive the golf ball brooke henderson
LPGA star player, Brooke Henderson, demonstrating dynamic weight shift in her swing | Photo by New Zealand Golf Digest

Now, as it is in the backswing, it is in the forward swing. A change of axis and weight shift from the right foot to the left foot starts the forward swing with the swinging of the club for the same reasons.

Turning the body “first and only” would not allow enough time for the club to return to the golf ball, and would likely create a bottom of arc off of the right foot, behind the ball—the dreaded fat shot.

Creating the left side axis not only produces speed (thus distance!), but a bottom of swing opposite the left armpit. The left axis, a one-legged balance, also frees up the right side (shoulders and hips) to finish up on the right toe and even with the left side.

drive the golf ball cowan
Olivia Cowan of Germany at the Australian Ladies Classic Bonville | Photo: Tristan Jones for the Ladies European Tour

This critical transitional movement is a feeling of going heel, toe, heel, toe. The weight at the top of the backswing is felt on the right heel (certainly acceptable to sense that your right hip is slightly outside your outer right heel over your ankle bone…this is not a sway!) and towards the ball of the foot/inside left big toe. To start the forward swing, the golfer plants his left heel, allowing the weight to shift with the right foot rolling and releasing to the inside right big toe/ball of the foot. An appropriate, kinetic chain sequencing is therefore established for a good hit and photo finish.

The club and arms will start down at the same time the heel is planted…you are one flow, not a bunch of segmented pieces in this blended swing motion. It likely is noted and possibly felt that the first move down “feels” like your weight shifts first. This is a good thought, similar to the sensation of “stepping” before you “throw”. Sam Snead was notorious for planting his left heel in long driving contests…in fact, he said he slammed his left heel down with such great force to start his downswing to hit it long that he tore his Achilles tendon. He then continued to do this to play professionally, just not as aggressively.

drive the golf ball ochoa
Member of the World Golf Hall of Fame, Lorena Ochoa making the ‘first move down’ as part of the weight shift in her swing

There are several ways to “get” this weight transfer ideal. Some like to think of shifting their center of gravity to the right and left and others think of a lower spine shifting from right to left in a “wrecking ball” kind of image. This will not be a “sway” as long as it is a right-side load with a turn and a left side load with a turn, both done with minimal head movement. The sequence of shift-turn on the backswing and shift-turn on the forward swing should help you “get your shift together”!

In many sports, throwing and striking actions incorporate the same sequencing…continue this athleticism with your golf swing and you will be on your way to more consistent (not to mention longer) drives! Perhaps more “body friendly” too!

LPGA Master Professional Deb Vangellow teaches at Riverbend Country Club in Houston, Texas. She is the 2012 LPGA National Teacher Of The Year, a US KIDS GOLF “Top 50 Master Kids Teacher” and a GRAA “Top 50 Growth Of The Game Professional”. Deb is former president of the LPGA Teaching and Club Professionals Membership and is a longtime lead instructor in the LPGA Global Education Program. An educator/coach who offers wellness based developmental programming integrated into her “student centered” philosophy, Deb can be reached at 281- 277-4653 or followed online at www.debvangellowgolf.com, and on Facebook and Twitter.

left arm straight 1

Let’s discuss a big golf myth: Keep your left arm straight (or right arm for lefties).

It’s one of Five Old Wives Tales in Golf.

  1. Keep your head down
  2. Keep your left arm straight (front arm)
  3. Shift your weight/turn your shoulders
  4. Hit the ball
  5. Follow through

I don’t believe you should try to bend your elbow, but I do not want you to try to lock it either.

left arm straight 1

The mission of golf is to start the face square, sitting behind the ball (Photo 1), swing the club to the top of the backswing, and return the club back to the bottom of the arc as close as possible to where it started. If you do that, the ball will go straight.

When you swing the club to the top of the backswing, the club head will always travel farther than your hands due to its length. If your front arm is straight and you try to get the club back to the bottom of the arc, the face will be way behind your front arm. As you can see from Photo 2, the hands will get back to the ball first because your arm is pulling. If you do this, the face will be WAY behind the grip. The face is pointing WAY right. That is where the ball will go. 

left arm straight 2

I suggest you allow your front arm to hang straight. Relaxed. Like a piece of cooked spaghetti.  If you do this, you will allow your arms to swing the clubhead, and will feel the weight of the club head in your hands. The head of the club is like a pendant on the end of a chain. You need to allow it to swing. If you do, and keep your body still, the face will always come back to the bottom of the arc and square up. If the face is square, the ball will go straight.

Cindy Miller, LPGA, teaches at several clubs and golf centers in western New York. Visit her at www.cindymillerinc.com


better tee shots photo 1

Better tee shots mean hitting the ball straight.

There’s nothing worse than standing up on the tee setting up for your “normal” shot shape, then hitting the deadly double-cross! So now you are left picking up the pieces of a shot that went left to left or right to right…not fun!

Here at Punta Mita we have a hole where this can happen quite often: No. 18 at Pacifico. The hole design bends gently left to right with out of bounds left and the ocean to the right. There’s plenty of room to move the ball left to right or right to left, depending on your “normal” shot pattern, but if you double-cross it, you’re back on the tee hitting three, or dropping the ball out of the hazard and hitting three as well. Neither situation is a great option.

Now that we understand what a double-cross is (playing for a fade and hooking it or playing for a draw and slicing it), it’s now time to figure out how and why it happens!

So, let’s set up for each shot shape.

better tee shots photo 1

In Photo 1 I am set up for a left to right shot where I am on the right side of the tee box and aiming down the left side of the fairway.

For the right to left shot pattern I am setting up on the left side of the tee box and aiming down the right side of the fairway (Photo 2).

better tee shots photo 2

These two alignments will give us the best opportunity to use the entire width of the fairway so we can hit it in the short grass. Now let’s investigate what each shot shape player tends to do when they hit a double-cross.

better tee shots photos 3-4

FOR THE LEFT TO RIGHT PLAYER

The main reason you will double-cross your fade is when you fail to get off of your back foot on the way down. When you hang back as shown in Photo 3, the body stops and the arms and hands fling by closing the club face through impact (Photo 4). As we all know, when the face angle is left of the path, the ball will start left and hook with a centered hit.

To make sure you do not allow this to happen again, you must make sure you move through the ball, allowing your weight to move into your forward foot earlier. For this I have a simple drill.

Place another tee (the same height) about three to four inches in front of your current golf ball on the same target line (Photo 5). Your goal is to hit the ball and the top of the second tee with the clubhead on the way through.  This will help you to move the weight into your lead foot earlier, thus keeping the face right of the path, and you will see the ball move left to right.

better tee shots photos 5-7

FOR THE RIGHT TO LEFT PLAYER

The main reason why you will double-cross your draw is when you lose your posture through impact, standing the club shaft upwards and opening the face.  When you stand up as shown in Photo 6, the hands also raise; when this occurs the face of the club will stay right of the path (Photo 7). As we all know, when the face angle is right of the path, the ball will start right and then move further right with a centered hit.

better tee shots photo 8

Now that we understand what is happening, how do we make sure it won’t happen again? Find an alignment stick and place it in the ground as shown in Photo 8 (which is just a touch in front of the ball.)  If you stand up and raise your hands, you will be the first to know! By keeping the club shaft closer to its address angle you will find that the club has an easier time closing, which will help the face to be slightly left of the path during impact, causing the ball to gently move right to left.

Understanding the double cross is the first key to stopping it for good. The second step is to use the appropriate drill to stop you from either hanging back or standing up. Alleviating these issues will go a long way to helping you have more confidence that the ball will indeed move in the direction you want — and stop you from hitting the ball left to left or right to right, causing you headaches.

Tom Stickney is Director of Instruction at Punta Mita Resort, Riviera Nayarit, Mexico.

best driver 1

I’m a huge believer that awareness is half the battle when it comes to improving one’s game. We’d all like to our best driver — to drive the ball as long and straight as top PGA Tour players.

Most of us will never be able to achieve the overall distance of a Dustin Johnson, Cameron Champ, or Bubba Watson, but that doesn’t mean we can’t become our own best version of these players.

We all have the ability to improve our distance, as well as accuracy, no matter the level of golfer you may be. Improving things such as one’s clubface, turns, tilts, ground reaction forces, and wrist angles are all things that help gain an extra 15-20 yards off the tee.

Everyone can go about achieving their best driving differently; in fact, most golf coaches will have their own way to go about getting you to hit it further and straighter, which is the beauty of the art of coaching and teaching. As long as your coach makes your game better, that’s all that matters!

I mention this because of what we’re about to get into: There’s a reaction to every position, force, and torque throughout the golf swing. Everyone will have their best “swing ID” based on who they are, as none of us are created equal.

I’ve provided two positions that the majority of high-level professional golfers all achieve. These positions come in the transition to begin the downswing as well as half way through the downswing. Pro golfers achieve these positions with different postures, arm planes, clubface orientations, turns, and tilts in the backswing. If you’d like to drive the ball your furthest while adding in accuracy, focus on these two positions.

best driver 1

LOWER BODY LEADS

First, to begin the downswing, the lower body, not the chest, is the first big segment to move.

In fact, the lower body actually begins shifting forward before the shoulders complete the backswing. This move allows for the professional to have the thighs parallel to the target line by the time the lead arm is parallel to the ground in the downswing.

If you look at Photo 1, you’ll see the knees driving forward and the trail elbow below the lead arm at this point. This is the first position to emulate.

best driver 2

CHEST AND SHAFT PARALLEL

If one can achieve the position above, it will be much easier to then achieve the next ideal position at “shaft parallel” in the downswing.

At this point, the best drivers in the world have a chest that is parallel to the target line once the shaft is parallel to the ground. The hips are open to the chest, the trail arm has bend in it, and the clubface is slightly toe down to toe up.

A tip for the slicers out there: Make sure the clubface is slightly toe down with the clubhead behind the hands at this position. If done properly, the lead wrist will be flat to slightly bowed! Not much can go wrong if one can achieve these positions. Photo 2 shows what I’m talking about.

At first, I recommend rehearsing these positions off the ball with visual feedback if possible. Face a mirror and get into your regular stance. Go to the top of your backswing and pause, then let your eyes drop so that you’re looking at your knees. Slowly begin the downswing with the knee action. Pause again when you see your knees parallel to the target line. Your lead arm should be parallel to the ground at this point with the trail elbow bent and underneath the lead arm. Pay attention to the “feels” you get when attaining the new positions. This is critical as the feels should turn into verbal cues for effective practice habits.

When the shaft of the club gets to the parallel position, pause again and check your body. Your torso should be parallel to the target line, your lower body will have turned open to that same line, and your trail arm will still have some bend in it. Keep making slow swings with these checkpoints in mind. After a number of reps, it will feel much more natural, and you can add a ball.

It’s very important that you hit balls very slowly to start. Don’t get caught up on the result at first, but pay more attention to the feels. Ask yourself if the slow swings with the golf ball feel the same as your off-the-ball training. If the answer is yes you can progress with the speed in 10 percent intervals.

Work on getting to the final pause mentioned above, then make a small turn back again for some momentum and hit gentle shots.

This is a great stepping stone to becoming your best driver of the golf ball.

Bill Schmedes III is Director of Instruction at Forsgate Country Club in Monroe Township, New Jersey. Visit him at www.BS3Golf.com

towel drill sequence

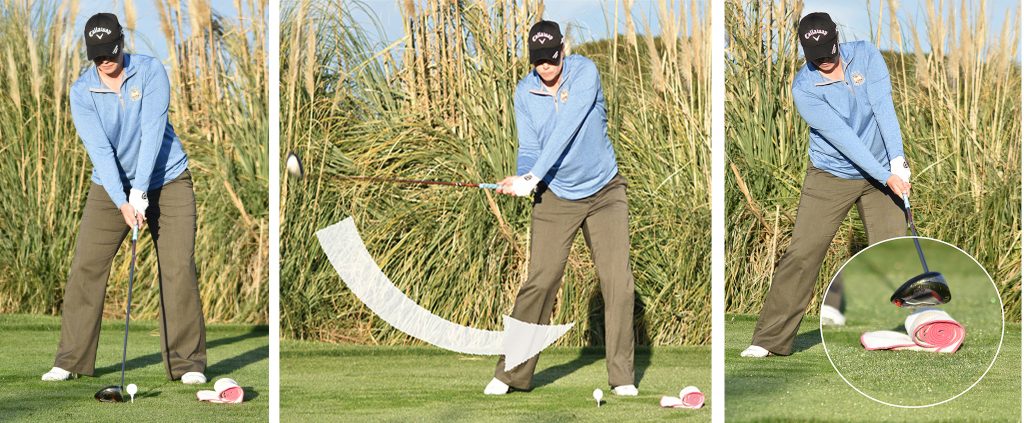
Unlike most of the clubs in your bag, where hitting down on the ball is crucial for good contact, the driver demands a strike on the upswing. Unfortunately, many amateurs do the opposite, catching the ball when the club is still moving downward — leading to pop-ups and serious lack of distance. That’s where the towel drill comes in.

This tip has been around for a while, but it’s a good one. When you’re practicing your tee shots, place a rolled up towel a few inches in front of the ball. This visual will cause you to hit more “up” on the ball at impact to avoid hitting the towel.

The benefit is clear: Hitting up on the ball several degrees (otherwise known as “angle of attack”) will create optimal launch conditions for the ball furthest flight. The ball will stay in the air longer to increase distance.

Based in Southern California, Alison Curdt is a PGA Master Professional and 2015 LPGA National Teacher of the Year. Contact her at www.alisoncurdtgolf.com

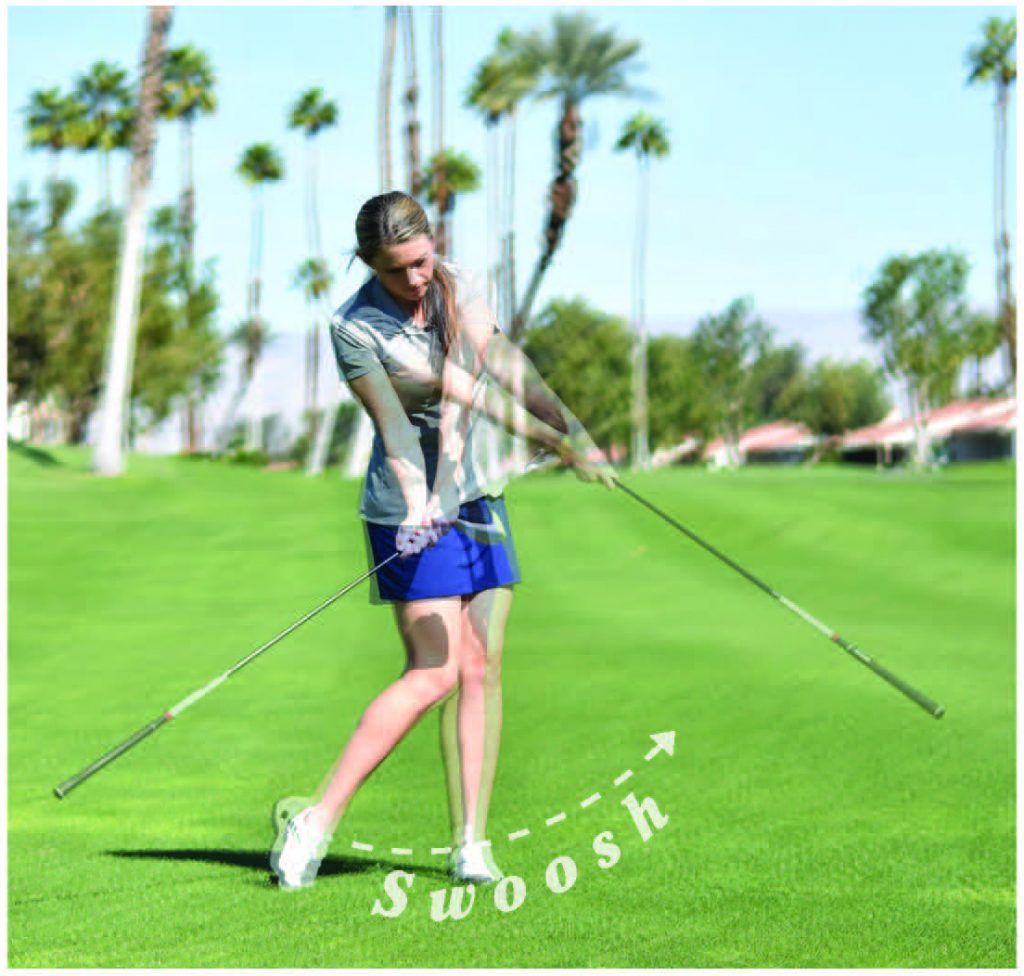
driver swoosh drill

The “Driver Swoosh Drill” is a popular way to get rhythm back into your swing. Take out your driver and flip it around so you are holding more of the club head rather than the handle. Take a normal swing a few inches from the ground and listen for that “swoosh” sound. The accompanying image shows where that sound should occur. The swoosh should happen at and just after impact. If you hear the swoosh anywhere else in your swing, there is a chance your hands are taking over, which is not what you want. Keep your hands very light. The right rhythm is a huge factor in a golf swing — you can’t get too quick with it, your body can’t move that fast!


blast your drives opener

In 2018 we are all obsessed with how to blast your drives farther. We have watched over the last 20-25 years the evolution of this game before our very eyes from a shot maker’s game to one dominated by raw power.

Every day you turn on the TV, open a golf magazine or go online, it seems like the first thing you see is either an advertisement for a golf ball or driver that hits the ball farther. One thing I understand as a coach is, hitting it far is fun

In this article I will discuss a variety of topics that will greatly assist you in climbing the mountain we call distance. However, before I begin that discussion I’d be doing each of you a great disservice if I didn’t make one brief statement: Don’t ever neglect your short game, and sleep with your putter.
Before we get into the X’s and O’s of distance I consider critical, let’s have a brief discussion about equipment. Yes, it is vital to have the correct equipment in your hands. The driver, the shaft in the driver and the ball you play are what I call the triangle of power. Don’t wait to stumble upon the answer. Today we have the technology readily available to get fitted properly. By using a launch monitor you can dial in without doubt the ultimate combination of clubhead, shaft and ball. Why wouldn’t you? Keep in mind one thing: club fitters are like doctors, lawyers, and golf instructors. Some are extremely talented at their craft and others are butchers. If you need a recommendation for your area please feel free to contact me at tpatri@mindspring.com. My network is nationwide and I’d be happy to assist you find a talented fitter.

I’d be remiss if I also didn’t at the very least touch on the fitness of your actual Golf Machine, your body — your flexibility, your physical strength, your ability to balance yourself. In today’s world there is an abundance of both information and resources available to you. Start by learning as much as you can about TPI —Titleist Performance Institute. Again, if I can assist you in that journey feel free to reach out.

One final note: the golf ball doesn’t know how old you are! Never give up the dream of better health or game improvement. NEVER!

Let’s talk X’s and O’s. I’m simply going to discuss areas of your golf swing that need to be optimized.

driver power 1-3

driver power 1-3For most clubs in your bag, hitting down on the ball is key. You work to make contact just before the bottom of your swing, compressing the ball against the turf and sending it toward the target with plenty of force and a slight backspin. But for the big stick, that all changes. For great driver power you want to contact the ball on the upswing, just after your swing has bottomed out.

For this drill we use a ramp — almost like an old Evel Knievel jump (Photo 1). It shows that you’d like to have the club working up the ramp rather than down the ramp. Everyone wants to hit it farther, and there’s a huge correlation between how far the ball goes and angle of attack, or descent. In Trackman, we try to get the positive angle, which means the club is traveling upward at impact (Photo 2), instead of downward (Photo 3). The ramp helps you see that you need to get the right shoulder lower than the left, with the ball played close to the forward foot, putting the majority of your body behind it.

The key here is the spine tilt to the right (Photo 4). I’ll see a lot of people set up with the spine tilted the wrong direction (Photo 5). So once you get set up the proper way and hit a few golf balls, you’ll start hitting it with an upward strike. The idea is to miss the ramp. You start at slower speed until you get comfortable with the ramp. We track your attack angle. The shoulder tilt and a wider stance helps shallow out the takeaway and forward swing, which also leads to a better attack angle (Photo 6). It’s also easier to get the club face square to the target with the club head is traveling up. That leads to less backspin, so the ball stays in the air longer and doesn’t climb. You want a high launch angle with low spin. Master that without doing anything else to your swing, develop that feel of hitting upward, and you could see 20 to 25 yards of distance gain on your driver, without swinging hard.

driver power 4-6

TO THE TRACKMAN

Back in our indoor facility, let’s go to the numbers from my on-range Trackman. The positive number shown below means the driver is traveling upward. Nearly 90 percent of golfers hit down on the ball with the driver. They think they’re hitting up on it, but they’re not — and that affects where the ball hits on the face, and with the bulge and roll of the driver face, and a heel hit, it’s going to slice a lot more.

drive power trackman

For more instruction from Brian O’Neill, including video, visit www.brianogolf.com


Lisa Longball Power Game Setup

Lisa Longball Power Game SetupEditor’s Note: Lisa Vlooswyk, affectionately known in golf circles as Lisa Longball, is an eight-time Canadian Long Drive Champion. She competes at the World Long Drive Championships and will tee it up in September on the Golf Channel to vie for the World Title. A veteran in this sport, Lisa has been competing for nearly 19 years and has learned many tips and techniques that can help all golfers add distance not only to their driver, but to their whole game. In this article Lisa gives simple easy to implement tips to help you hit your ball longer, straighter and better.

SET UP FOR SUCCESS

In Photo 1, The ball is off the instep of the lead foot, the lead foot is slightly fanned to allow greater ability to turn and take pres-sure off the lead knee. The lead shoulder is slightly higher than the trail shoulder to promote hitting the ball on the upswing. The key is the relaxed arms and shoulders. Arms simply hang from the shoulders no tension in the set up. Hold the club on a scale of 1 to 10 about a 2 or a 3 — with the same pressure you would hold an open tube of toothpaste or open pop can.

KILL THE TENSION

In Photo 2 it’s the same set up but this time the grip pressure is off the charts. Often when golfers want to hit a long drive, especially on a par 5 or a prize hole for Long Drive in a corporate or charity tournament, golfers put a “death grip” on the club. It creates tension in the hands and forearms. Tension is a club head speed killer! Long drivers focus on soft supple hands. Speed cannot come from tense muscles. It also causes the shoulders to often lift and get tense which again contributes to inhibiting club head speed.

Lisa Longball Power Game BackswingTURN, DON’T LIFT!

Eighty percent of women cannot hit the ball over 200 yards. I believe every woman can. Women tend to be arm lifters. Because women are often more flexible then men it is easier for them to get into what they think is a “proper position.” If you look at Photo 3, an average golfer might think that is a great position at the top of the back swing. The problem is the arms have simply been lifted. There is no turn. Turn is what creates coil and torque which leads to power, club head speed and distance. Arms lifting is a big reason why many women complain that their 8, 7 and 6 irons all go the same distance. In Photo 4 you can see a turn. You can see my back facing the target. You can see that my lead shoulder is directly under my chin versus my bicep in Photo 3 being under my chin. A great swing thought to promote the turn is to initiate your back swing with your lead shoulder versus your hands or arms.

Lisa Longball Power Game Follow-ThroughWEIGHT FORWARD

Photo 5 reveals a common swing fault for all golfers. I often see a lot of people with a baseball/softball background finish their swing like this. You are losing minimum 20 yards with this swing and probably have an issue with slicing. The weight ends up com-pletely on the back foot which causes your club face to remain open, which in turn leads to a slice. It also robs you of distance and general accuracy. Meanwhile, Photo 6 shows a proper finish. All the weight is on the front side over the lead foot. If you finish properly you should be able to lift your back foot as you hold your finish. As you can see in the pho-to the entire sole of the shoe on your trail foot should be visible. Virtually no weight is on that foot. Your belt buckle should be at least at the target and ideally past the target. A great swing thought to get to this position is to swing through the ball. Accelerate! Your club head should be moving fastest after you’ve hit the ball, not at the ball. This will literally pull you to your front side. When you slow down your swing at impact or after that is a huge contributing factor to finishing in the incorrect position on the back foot.

Lisa “Longball” Vlooswyk is based in Calgary, Alberta, Canada. She just released an instructional video and is also a teacher, speaker and golf and travel writer. Visit her at www.lisalongball.ca

Check out Donald Crawley’s tips for driving the ball straighter.

0
0
Your Cart
Your cart is emptyReturn to Shop