September 15, 2026

Shotmaking

Three Wood Stinger It doesn’t matter how great or poor you’re playing, any given round requires at least one spectacular shot to win a skin, save a much-needed stroke or, in some cases, avert a disaster. We like to call these “money shots,” as opposed to “miracle shots,” because we believe that with practice, these types of shots will be your go-to plays when the game is on the line.

Better yet, learning a few money shots will not only help you lower scores, but your overall game is likely to improve, thanks to a newfound confidence in knowing you can face anything that comes your way.

1. Stinger 3-Wood

Hitting the 3-wood stinger requires a different approach to weight shift because, basically, there isn’t much of one. This swing is all about the turn! Set up, just as you would with a normally played 3-wood. Flex at the knees, stay centered and position your hands over the golf ball. With a light grip, choke down on the shaft one inch. As you take the club up to the top, try to limit the shift of weight to your rear foot as much as possible. This will encourage a de-lofted stroke through the ball and a lower, more penetrating ball flight.

When hitting a 3-wood stinger, notice how low my hands are immediately post-impact. This is because my weight never made it over to my back foot and I’m ahead of the ball. Many golfers think the stinger requires a three-quarter swing. That’s incorrect! To hit this money shot, one must turn harder to make up for less weight shift.

Agressive Putting2. Aggressive Putting

To make putts, sometimes you have to be aggressive. But it’s just as important to remember that it’s better to play it safe and avoid disaster.

Put it this way: When below the hole, you should always be aggressive. The adage “Never up, never in!” always applies, so make sure you get the ball to the hole if you want any chance of making it. Putting from downhill positions is a bit trickier. Some putts call for a more aggressive stroke, while others demand a delicate touch to avoid a lengthy comebacker for par. To learn how to be aggressive, you have to become an expert green reader. First, evaluate how much slope there is behind the hole. If the green slopes away, heed your speed and play it safe. If there’s an uphill slope or the green flattens out, consider a run at the hole.

Secondly, you have to become proficient at reading grains. Take a look at the grass and note which way the grain is going. If it turns out that your downhill putt is with the grain, then know it’s going to be extra-slippery. If you’re putting into the grain (the grain is facing away from the hole), this is your green light to make a more aggressive stroke. If the green is going either left or right of you, note that the putt will break more in the direction of the grain.

The best putting stance is the one that matches your stroke. If you swing open to closed, standing more upright will help. If you have a more squared stroke, address the ball in a lower position, but allow the arms to hang freely. Always assess the slope before you putt and don’t forget to look at the grain.

Southpaw Swing 3. Southpaw Swing

If you really want to impress your foursome, practice this shot for an amazing recovery.

It happens—a tree, bush or frankly any kind of obstacle blocking you from addressing the ball. In this case, my ball is up against a tree. When faced with this predicament, before you take an unplayable lie penalty and get relief, first consider if you can at least move the ball forward or into the fairway for a shorter approach than you would have with a penalty drop. Take your pitching wedge, and set up as you would a left-handed shot, only invert the club head so the toe is pointed down.

To hit this shot, make an abbreviated swing and expect the ball to sharply roll to your right, hopefully back toward the fairway. If that shot sounds too daunting, try the backhanded chip. Turn facing away from the target and with your right hand, swat at the club in a straight up and down manner. Even if the ball moves just a few yards, you’re at least one club length closer than you would have been had you taken a penalty drop.

Keep the head steady and know that the key is to move the ball back into the fairway, not to hit the green.

Divot Blast 4. Divot Blast

Hitting from a divot isn’t as hard as you think. It’s all in the know-how. Instead, factor this scenario as you would a simple knockdown shot. Position the ball in the rear portion of your stance and take a stronger grip than usual. Be sure the club face is square, since it’s likely to try and open at impact. The important factor in this shot is to keep your hands ahead of the ball well into the impact position to ensure a crisp, downward blow through impact.

Also, concentrate on the back side of the golf ball. This will prevent your body from rushing too far forward and hitting it too fat or thin. Since you’re essentially hitting a knockdown shot, the swing will be abbreviated, so don’t forget to add at least one more club than DH Greenside Chipusual. Remember, don’t force the shot, but do expect a low trajectory with some roll.

Always grip the club before you set up to the ball, not after. This will keep things  consistent.

5. Severe Downhill Greenside Chip

No doubt a tough shot, the downhill chip requires a good read of the green.  When facing a downhill greenside chip, it’s critical you pay attention to how the green breaks. Reason being, from a downhill position, the ball is going to roll more than normal, thus you’re going to need to factor break and speed to have any chance of getting the ball near the hole. Begin with choosing the most lofted club in your bag and address the ball with an open stance. Try and adjust your weight to the slope of the hill, meaning align your club as perpendicular to the ground as possible. This will force most of your weight forward, which is where it should be.

Play the ball in the back of your stance, hands forward and club face aiming at the desired spot on the green or fringe where you want the ball to begin rolling. As you begin your backswing, swing along the ground and keep your hands low, well into the finish. Don’t try to scoop it!

Keeping the hands low and club face open is key, as is choosing a club with a lot of loft. Also, on tight pins, don’t hesitate to land the ball in the fringe since the ball will have some roll to it. Also, hold the club face open as long as possible.

What Trees? 6. What Trees?

Negotiating a shot around trees is a matter of first deciding what shot gives you the highest percentage for success. If there’s a tree blocking your view from the green, decide whether the smart play is to try and go over it or punch a shot below it. Going over will require crisp contact and a lot of carry, making it the option if you need to get it close to the pin with little roll or if there’s a bunker guarding the front of the green. A safer play is to hit under the tree, barring any hazards near the green that could get in the way. To hit it high, position the ball forward in your stance, open the face and keep your weight on your back foot. As you take the club back, make a full backswing with a swift wrist cock.  Begin the downswing by turning and not shifting forward, and keep the face open well through impact.

To hit it low, take a long iron and choke down. Position the ball in the middle of your stance, with your hands and weight on your forward foot. With minimal cock in the wrists, make a sweeping motion through the ball and concentrate on ball-first contact.

Fairway Bunker Recovery 7. Fairway Bunker Recovery

In case you thought it wasn’t possible to hit a fairway wood from the bunker, think again.

If you face a fairway bunker and a fairway wood is necessary to reach the green, consider going for it as long as the bunker features a shallow lip. If not, take your medicine and move on to the next money shot. If you do have clearance, here’s how to do it. First, make sure your feet are secure; dig into the sand to prevent slippage. Position the ball slightly back of center but with your weight more over your forward foot. Choke down and aim left of the intended target. Because your ball is slightly back from center and your weight is toward your front foot, the flight path will steer right, so account for a low fade.

As you take the club back, expect your swing to be a little more upright than usual. This is due to the fact that your feet are planted and your weight is slightly forward. So despite the steep backswing, don’t feel the need to stab down at the ball. Instead, swing freely and make ball-first contact. The ball will fly low with lots of roll—hopefully enough to get you on the green.

This shot is also effective with a hybrid club. Just be sure you have a decent lie and there isn’t a big lip in front of you. Even with a hybrid, you’ll still get a low ball flight.

Always be sure your hands work together for every shot. In this case, you don’t need a strong grip so allow your hands to stay loose, but remain connected.

Sidehill Lie 8. Sidehill Lie Into Green

Okay, you have a shot and you must hit the green. Don’t forget to factor the effects of a sidehill lie.

Sidehill lies can be challenging, but not if you know what to expect when you encounter one. For starters, when the ball is above your feet, it’s going to hook. Below your feet, the likely shot will be a fade. With longer irons, the ball will hook or fade more than it will with shorter clubs.

In my case, the ball is above my feet. This means the ball will launch right of the target and draw back toward the pin. However, since I’m in the rough, there won’t be as much draw spin had I been in the fairway, so I can take a more aggressive line at the target. I start by addressing the ball with a slightly closed stance, a centered ball position and my weight evenly distributed over both heels. Since I’m on a slope, I’m going to take the club back on an inside-out path that will produce a drawing trajectory. The key is to not force a straight-back backswing into the slope. The opposite is true for a fade. Just allow the slope to dictate what swing path is best.

Let the slope determine the shape of your swing and allow for the necessary side-spin needed to hit the green. In the rough, expect a straighter shot than from the fairway.


Rough Removal 9. Rough Removal

Hitting it close from the rough is critical if you want to stay in the game. Playing your short irons from the rough requires a strong grip and a descending blow to avoid getting caught up in the turf. The key lies in the ability to retain the right angle formed by the club and your left arm at the top of your swing. Holding this angle will help generate the additional clubhead speed as well as encourage a more descending blow because it prevents your arms and hands from releasing too early. And when you release early in the rough, you’re going to hit a lot of grass and, sometimes, no ball. Make sure your hands are in front of the ball at address and the ball is slightly forward in your stance. Add more club, choke down and be ready to hold that right angle as long as you can to generate a whip effect through impact. The ball may fly lower, but that’s a whole lot better than a short, flubbed shot.

Strength is key from the rough, and no better place to find it than in retaining wrist cock through the swing for as long as possible. Tiger woods is a master at this, hence his amazing power.

Hit The High Draw 10. Hit The High Draw

When it comes time to win the long-drive contest, knowing how to hit the high draw is key to milking a few extra yards. 

Begin by using the left side of the tee box and position the feet and body more closed than normal. Concentrate on your rear shoulder and make sure it’s lower than your forward shoulder at address. Second, tee the ball high—you want to catch the ball in the “hot zone,” just above the sweet spot. The hands should be slightly back behind the ball, which is positioned just off the inside of your forward heel. Square up the club face to the target.

As you begin your backswing, follow an inside-out path, and on the downswing remember to rotate and not slide. Rotating will keep your body behind the ball, allowing for an upward, inside-out path. Presto! You have a high draw in your arsenal.

When playing a high draw off the tee, my hands will release sooner, resulting in a high, drawing ball flight. 

Paul Ito and Todd Stewart are both Hawaii-based teaching professionals
Editor’s Note: This story was updated December 2019
golf shots to practice putting

After teaching the game for almost 30 years I have noticed that there are several golf shots that people NEVER seem to practice, yet these are the exact shots that cost them strokes round after round.

Practice doesn’t make perfect in this case—it makes you prepared. If you don’t practice each of the shots below, you will have very little idea as to how the ball will come “out” or what your limitations are in general. If you want to play your best you must experiment and practice these shots!

golf shots to practice putting

Big-Breaking Putts

Now I won’t lie to you—most players tend to hit longer putts with break on the putting green each time they go out, but few hit the putts like I am talking about—thus they fail every time.

I want you to think of a situation where you have a ridge or an elephant buried in the green that you have to navigate. Do you have the feel and line in your mind? Can you putt the ball right to the precipice with the dying speed necessary for it to trickle down the slope gently to the hole? Of course not.

What about the big-breaking putt that’s super-fast or super-slow are these the ones you tend to three putt?

These are the situations that cause the poor lag putts, in my opinion—not the long, flat putts that 99 percent of the players practice when they go out.

This is called fine-tuning your feel—putting these putts on the highest line possible and the lowest line possible so you can find the perfect speed on the course.

wedge game featured

QUESTION: Are you struggling hitting your wedges the correct distance? Here’s how to get your wedge game in shape for those tricky shorter shots.

While playing college golf at Austin Peay State University and then on the professional circuit, I found that it was imperative to make sure that the distances I hit my wedges were on point. From there I created a method that not only helped me become more consistent with the strike, but also, a lot more consistent with how far the ball traveled in the air.

Using the words and images below, I hope to help you to dial in your distances.

THREE ARM SWINGS

We will look at three arm swings with the same wedge, a 58-degree Callaway MD4, to help produce three different distances.

The distance the hands travel will dictate the distance the ball goes, almost as if you had an elastic band—the further you pull that elastic band back, the further the ball will fly.

  • Arm Swing 1 – Hip To Hip – My distance: 50 yards
  • Arm Swing 2 – Chest To Chest – My distance: 70 yards
  • Arm Swing 3 – Shoulder To Shoulder – My distance: 90 yards

SET-UP KEYS

Step by step keys to the setup for all three swings:

  • Ball position slightly back of center – this will help produce a downward attack angle of the club head into the ball.
  • Hands are going to feel slightly ahead of the ball (left arm straight down shaft line)
  • Feet slightly open to target
  • Left leg will bear about 60 to 75 percent of the weight through-out the entire swing.

Again, it’s very important to remember that the setup will stay the same for the three swings we are producing.

wedge game 1-3

THE HIP-TO-HIP ARM SWING

 Once set-up is complete, the first wedge arm swing we want to pro-duce is one that goes from our right hip to our left hip.

In Photo 1 you can see that my hands are in line with my right hip — note that the toe of the club is pointing up, which will create loft at impact.

Note that the left arm, hands and club are extended away from ball, which will help to compress the ball and not just “scoop” it into the air.

From there you are in a good position to start the transition into impact.

Impact

Photo 2 is what impact should look like – note that just like set-up, the impact position is the same for all three swings — this will help with an improved strike.

  • Hands are slightly more forward than they were at address – this will make sure the club goes down into the ball
  • Weight of the left leg has increased from about 60 percent at set-up to about 75 percent at impact.
  • My chest and hips have started to open up and rotate to the target
  • My head is in the exact same position as address.

Follow-Through

The most important aspect to the follow-through is making sure that the club extends to the target – with the toe of the club in an upright position just like it was in the backswing.

In Photo 3, notice that my hands are in line with my hips and in a very similar position to where they were in the back swing.

wedge game 4-7

THE CHEST-TO-CHEST ARM SWING

In Photo 4, my hands are in the middle of the chest with a little more hinge of  the club.

The left arm, hands and club are extended away from the ball to produce a downward attack angle of the clubhead.

I have a little more chest and hip rotation than in Photo 1.

Note: Toe of the club is in an upright position to allow the club to have loft at impact.

Impact

See Photo 2 for same impact position

Follow-Through

The most important aspect to the follow-through is making sure that the club extends to the target — with the toe of the club in an upright position just like it was in the backswing.

In Photo 5 my hands are in line with my chest and in a very similar position to where they were in the back swing.

  • Hips and chest are fully rotated to the target.
  • My right knee, right hip and right shoulder are ahead of where the ball is on the ground.

THE SHOULDER TO SHOULDER ARMSWING

In Photo 6 my Hands are in line with the right shoulder, with a little more hinge in the club than in Photo 4.

Again, to make sure the hands and club travel further we need to make more hip and shoulder turn than in Photo 4.

  • Left arm and hands are extended away from the chest just like in the other images.
  • Toe of the club is up to create natural loft on the ball at impact.

Again, refer to Photo 2 for same impact position.

Follow-Through

The most important aspect to the follow-through is making sure that the club extends to the target — with the toe of the club in an upright position just like it was in the backswing.

In Photo 7 my hands are in line with my shoulder and in a very similar position to where they were in the backswing.

  • Hips and chest are fully rotated to the target.
  • My right knee, right hip and right shoulder are ahead of where the ball is on the ground.

Anthony Bradley is PGA Head Golf Professional at French Lick Resort in French Lick, Indiana. Reach him at abradley@frenchlick.com or visit the golf learning center at the Valley Links Golf Club at www.frenchlick.com

Tom Patri Golf Tips Instruction 2019

As I begin this critically important instructional piece that I call Target Line USA (more on that in a moment), I’d be highly remiss if I didn’t give full credit to the late great Coach Bill Strausbaugh. Bill was a PGA of America National Teacher of the Year, my primary mentor, a father figure to literally thousands of PGA Professionals, and a dear friend I miss every day.

Bill instilled in me a strong belief in Target Line awareness and its importance if you want to play this game at a higher level. Thank you, Bill.

As a golf coach (coach first, teacher second), I feel it is critical during every practice session with my students to establish a strong target line awareness. Bill used to call this “Target Line USA.” It’s important to establish as many visual references as possible to cue the students’ eyes, therefore then their brains (The Control Center) to our final destination, the target. After all, this is a TARGET GAME.

To many of the golfers I work with who have made golf a ball game: Baseball is a ball game. In baseball you get three chances called strikes and three fields to hit toward — left, right, and center. In golf you only get one strike and only one field, center, which is optimal! It’s best our focus stays there. 

sand shots opening photo

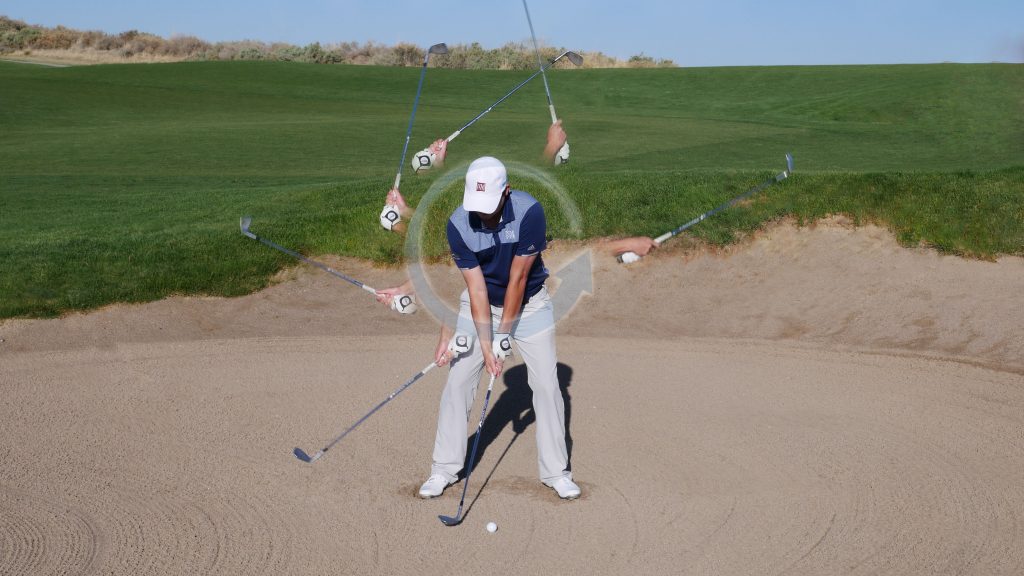
Golfers need to be proficient at two types of bunker or sand shots: from fairway bunkers and from greenside bunkers. Here’s a simple plan for each.

The Fairway Bunker Shot

The main priority here is to make solid contact between the club face and the ball.  This can be accomplished by using a similar setup and swing as you do when your ball is on grass.

sand shots fairway bunker

Setup for Fairway Bunker Shots

  1. Position the ball an inch or so back in your stance.
  2. The clubface should be square to the intended target line.
  3. Your weight should be evenly distributed on both feet.

Note: Playing the ball an inch or so back in your stance ensure that you will contact the ball first.  Just be sure to plan for a lower trajectory.

The Greenside Bunker Shot

The main priority here is for the clubhead to contact the sand instead of the ball.  When done correctly, sand builds up on the clubface and pushes the ball out of the bunker.  The clubface never comes into direct contact with the ball. It can be accomplished by using a similar setup and swing as you do when your ball is on grass.

sand shots greenside bunker

Setup for Greenside Bunker Shots

  1. The club should be in the center of your stance.
  2. The clubface can be played square or open, and may vary based on the firmness of the sand. I prefer to play most of my greenside bunker shots with an open club face.
  3. You should widen your stance, work your feet into the sand, or a combination of both. This will lower the center of your swing, allowing for the clubhead to contact the sand instead of the ball.
  4. Your weight should be evenly distributed on both feet.

Note: The sole (bounce) of the golf club is responsible for keeping the club from digging into the sand. When the club is place in the middle of your stance with shaft perpendicular to the target line, the sole of the club is exposed to keep the club from digging. Setting the club this way gives you the best chance to utilize an important design benefit (bounce) of the golf club.

sand shots swing thought

Bunker Shot Swing Thought

Once setup, the key is to remain balanced while swinging the golf club in the direction of the target.  An effective way to swing with enough speed is to visualize the ball rolling up to the hole.  Hold that image during the swing and you’ll have great distance control.

Henry Stetina, PGA is responsible for Player Development and Golf Instruction for the NMSU PGA Golf Management Program and is the Director of Instruction at Red Hawk Golf Club in Las Cruces, NM.  Henry’s approach to golf instruction is to focus on the intended use of the golf club, as opposed to the intended movements of the body.  Henry can be reached by visiting www.henrystetinagolf.com


three crucial golf shots 1-3

The Rules of Golf allow every golfer to carry up to 14 clubs in their bags during a live round or competition, and most of us take full advantage of that longstanding rule. But no matter your level of play, 65 to 70 percent of the shots you hit during a round of golf are done with just three clubs. If you can focus on those three critical golf shots when you do get to the range, you’ll have the best chance to play a good round and have more fun doing it. The three most important shots in golf are driving, pitching and putting. Following are a few tips and drills for these three key shots. We’ll start on the green and work our way back to the tee.

GET A GRIP ON PUTTING

three crucial golf shots 1-3I like to give all my students a good set-up routine for putting. I believe that if you have a good putting grip, good posture and are the right distance from the ball every time, you’ll have a better chance of making a solid stroke and having fewer putts.

I have created a simple 4-step system to get you set up correctly. It starts with the grip.

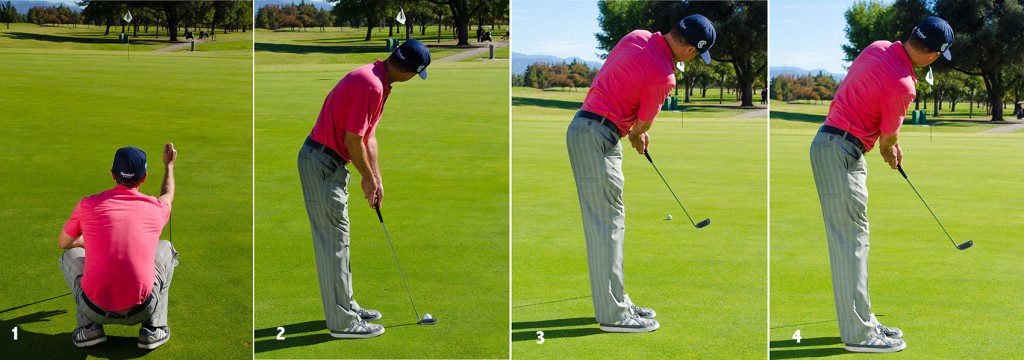
  1. Pick the putter up so that the shaft is level with the ground. Place the handle in the “lifeline” of your left hand (if you’re right-handed), so the shaft is lined up with your left forearm, as in Photo 1.
  2. Starting with your right hand on the shaft (Photo 2), pick up your left hand index finger and slide your right hand up until it touches the left hand. Lay your index finger over one or more fingers of the right hand. Now you’ve got the “reverse-overlap” grip that most Tour Pros use (Photo 3)
  3. Now that your grip is set, start with yours arms bent and your elbows touching your sides (Photo 4).
  4. From here, simply bend over from the hips until the putter hits the ground. Now you’re in the correct putting stance with the eyes directly over the ball (Photo 5), provided you have the correct length putter.

PERFECT PITCHING POLICY

There’s some new information that we didn’t have a year or two ago about the pitch shot:

  1. Thanks to new force plate technology, which measures weight shift and ground forces during the swing, we know that Tour Pros start with 60 percent of their weight on the left leg at address on a pitch shot. And their weight stays on the left leg during the backswing (Photo 6)
  2. The pitch shot’s kinematic sequence is different from the full swing. On a full swing, the lower body starts the down-swing. But for pitches, the upper body starts the downswing sequence. That’s why you see Tour Pros hitting pitch shots with a more flat-footed swing—without a lot of weight shift, compared to their full swing (Photo 7).

Another way that the pitch shot swing is different from the full swing is with the release. On a full swing, we want the arms to cross over after impact so that the face closes (pointing down half way through the fin-ish). But on a pitch shot the clubface should still be open or aiming more toward the sky, at the follow-through (Photo 8).

three crucial golf shots 6-9

There are several types of pitch shots—in fact, I have 9 or 10 different pitching mo-tions. But the basic pitch that I want you to learn is one with a fairly low trajectory. The key to this type of pitch is to have a forward shaft lean at address and impact (Photo 9). The forward shaft lean has a lot of positive benefits that will help you get up and down more often. A forward shaft lean will:

  • Eliminate the “bounce” of the club (the angle between the leading edge, trailing edge and the ground)
  • Move the ball higher up the face at impact
  • Reduce the loft which makes the ball go farther, allowing you to take a shorter and slower swing
  • Create a downward angle of attack, which produces backspin

What happens if you don’t have that forward shaft lean? If the shaft is reaching the ball in a more neutral position you are probably flipping the hands at impact. The result will either be a fat shot that dumps the ball into whatever bunker or hazard is between you and the green or you’ll bring that bounce into play causing you to skull the ball across the green.

DRIVING

three crucial golf shots 10-11The important distinction between approach shots and driving is the Angle of Attack (AOA). With irons, hybrids and even fairway metals, you want the clubhead to hit the ball on a slightly downward attack angle. But a driver needs contact the ball on an upswing. You accomplish this by moving the ball placement further forward with a driver, toward the front foot (Photo 10). It’s also important to keep your head behind the ball at address and during the swing. A left lean at address or sliding the head forward on the downswing will cause a downward strike.

However, when you move the ball for-ward, the shoulders tend to open at address.

And an open shoulder position will force you to take the club outside on the take-away, minimize your backswing shoulder turn and probably cause you to swing outside-in, across the ball at impact—producing an all too common slice.

To counteract that tendency, here’s a new pre-shot routine for you to try. Place the driver head seven inches behind the ball (at the swing’s low-point, as in Photo 11) and then set your feet. This will keep your shoulders square and make your set-up feel comfortable, just like an iron. Then slide the clubhead up to the ball to complete your stance. You’ll also notice in Photo 10 that I hover the clubhead above the turf so that I contact the ball without hitting the grass.

three crucial golf shots 12-13I have two more great tips to improve your driving:

  1. This may sound weird, but I want you to line up with the ball on the toe side of the clubface at address (Photo 12). Most golfers don’t realize that when the clubhead swings up to the ball, it will also move a little farther away from you. If you don’t compensate for that outward force, you’ll end up with a lot of drives hit off the heel of the club.
  2. Next, I want you to hit the ball slightly above the center of the clubface, because that will give you maximum distance (carry and roll). See Photo 13 for an example. The trick to making this happen is hitting the tee with the bottom of the clubface on every drive. After a correctly hit drive, the tee should be leaning forward or be knocked right out of the ground.

three crucial golf shots 14Here is a drill that will definitely improve your driving. Place a rolled-up towel one foot in front of a tee. Now take a swing and clip the tee but also miss the towel (Photo 14). This drill promotes the feel of that important upward AOA and also teaches you to hit the ball high in the face (by hitting the tee).

Keith Lyford is Director of Instruction at the Golf Academy at Old Green-wood in Truckee (Lake Tahoe) California. Lyford is one of the nation’s Top 100 Teachers and a 3-time PGA Teacher of the Year. Visit him at www.lyfordgolf.net

How you start a hole affects how you finish. Nothing derails a shot at par or better more than a wayward strike, no matter if you’re facing a wily short par 3 or any kind of par 4 or 5 — especially when the landing area is narrow.  Let’s take a look at how to manage tee shots in a variety of holes to help you not only hit better shots, but avoid trouble and set yourself up to have more birdie opportunities.

TEE SHOTS PART 1: SHORT PAR 3


Think of impact as a by-product of the rest of your swing. In other words, try not to think of impact at all! Hone in on your body and club position at the top of your swing, and again through the finish.

TEMPO IS ESSENTIAL

Short par-3s generally don’t intimidate most golfers unless there’s some sort of forced carry and/or a small green to contend with. To better manage short par-3s, focus on making solid contact and controlling your spin rate for better distance control. To keep things consistent, consider making your swing a mirror image of itself on the way back and the way through, i.e., swing “L to L” with the shaft and the left arm forming an “L” on the way back, and again with the shaft and the right arm forming a backward “L” on through to the finish.

Try not to get preoccupied with hitting it low, high, with a fade or draw. It’s a short hole anyway, so a nice, high, controlled ballflight is what you want. Swinging “L to L” will help improve your tempo and take your mind off impact, which will, in turn, help you hit more consistent shots with predictable amounts of spin.

TEE SHOTS PART 2: MID-LENGTH PAR 3


HANDS OUT FOR MORE FLOW

When was the last time you used too much club on a long par 3? If you’re like most of us, you probably tend to err more on the short side off the tee. When faced with a tricky yardage between clubs (especially on longer holes), use more club and choke down on the grip an inch or so. Less loft will launch the ball lower for more distance and choking up will prevent you from hitting it too far. Think of it as adding half a club’s worth of distance without having to swing any harder or softer. Just swing as hard as you normally do.

LONG PAR 3

SWEEP IT CLEAN!

Hybrid clubs are wonderful! If you know how to use them correctly, hitting a hybrid in the place of a hard-to-hit long iron can be a real lifesaver, especially on a long and demanding par 3.

Now, when it comes to angle of attack with your hybrids, I’ve heard some instructors advocate a sweeping motion, while others encourage a steeper angle of attack, much like you would have with a middle iron. The key, I think, is a matter of skill and swing speed. If you’re a higher-skilled player, and/or you have the necessary swing speed, hitting down (and actually making a divot) with a hybrid can yield some awesome results. But if you already struggle with a swing that’s steep to begin with, or you don’t have an aggressive swing speed, a flatter, sweeping angle of attack is likely the better choice for you. Granted, that doesn’t mean hitting up on the ball. You still should hit down on it, just not as steeply or aggressively as you would with an iron.

To start, use a tee whenever you can, and don’t be afraid to tee it up off the ground. I like to place the tee into the ground and leave the tapered part of the tee in the air. Next, play the ball slightly forward in your stance in roughly the same position you’d play a long iron. From here, swing with a “sweep some dew” motion and focus on a smooth, shallow, easy swing. To get a feel for this, take a few practice swings near the ball and imagine sweeping off the dew on the grass. Do this a few times until you feel confident, comfortable and ready to swing.

Remember, hybrids tend to look and feel more like woods than they do irons, and they’re usually longer clubs than your long irons and have lighter graphite shafts. That means there’s no need to swing aggressively with a hybrid, especially off the tee when you have a perfect, unencumbered lie.

Make a smooth swing and keep that “sweep the dew” mentality through to the finish. I also like to imagine swinging the hybrid more with my body and having soft hands. Soft hands prevent me from trying to lift the ball up, helping me to hit slightly down on it instead. Hybrids are designed with low and deep CGs, meaning there’s no need to try and lift the ball. They will do all the work you need to get the ball airborne. All you have to do is find the center of the clubface!

TEE SHOTS PART 3: SHORT PAR 4


ABOVE: Short par-4s are scoring holes. If you hit a good drive, odds are, you’ll be posed with a short second shot and a good chance at making birdie. Just don’t blow it by missing the fairway and trying to hit it too far. Rein it in, even if it means hitting a fairway wood. Sometimes, even if you’re farther back, it’s better to be at a comfortable distance than an awkward distance closer to the hole. Who wants a 40-yard pitch shot over a bunker?I like to choke down an inch, sometimes two, even on a 3-wood. This helps shorten my club and slows me down, resulting in more control without having to swing slower.

RIGHT: Solid contact is more important than hitting the ball a long way. Notice how my hips have turned open, my right shoulder is lower than my left, and the club and my left arm are on the same plane. This is an impact position poised for solidness!


The hole is shorter, but that doesn’t mean you can get lazy at the top! Collapse here, and you’ll hit some bad shots for sure.

That’s more like it! Using less club and choking down on the grip mean I can still swing at 100%.

 TEE SHOTS PART 4: SHORT PAR 4/5


TORQUE IT UP

Okay, so now you want to crush one! The best way to find some extra power is to better torque the upper body against the lower body, meaning the more resistance you have in the lower body, the faster you’ll uncoil on the downswing.
I like to use a plastic ball between my knees while practicing. The ball restricts my lower body turn considerably, helping me create what Jim McLean calls a bigger X-factor (the difference in rotation between the hips and shoulders at the top). In the photo to the right, it may look like I’ve made a big powerful backswing, but in reality, I’ve done little more than twist my whole body. Twisting doesn’t equate to power at all, and it’s also deadly for accuracy, too.

Limiting the lower body (not completely!) just enough and continually rotating the upper body on the backswing allow my body to build tremendous energy at the top of my swing. From the top, I first uncoil with my lower body as my hands drop. More on that on the next page….

TEE SHOTS PART 5: NARROW PAR 4/5


STAY UNDER IT

Long and narrow tee shots are as tough as it gets. The key to hitting your best drive that combines your fullest power and accuracy is to avoid trying to steer the golf ball from the top of your swing. When you try and steer, what usually happens is, the hands will move out and away from the body, causing the club to get off-plane and get very steep. To avoid this, you want to initiate the downswing by letting gravity pull the hands down before you start uncoiling the body. Notice the difference in how my hands and arms have stayed behind my body instead of outside my chest (like you see in the black-and-white photo). If you start the downswing with gravity pulling the hands down before you rotate, you’ll avoid steering the clubhead.

Also, notice that my hands have dropped to near shoulder-level, the clubhead is still well behind my body, and my hands are much lower than they are in the black-and-white photo. This all indicates that I’m swinging freely without any manipulations! By allowing the hands to drop, the clubhead moves on-plane and the body rotation will be what delivers the club to the ball, not by steering the club with your hands.

BE A HEAVYWEIGHT

A great way to work on swinging less from over the top is to use a heavy club. If you don’t have one, you actually can make one using an old iron and filling it with sand. Or, if your hands are big enough, hold two clubs and swing both at the same time. The key, again, is to swing down and through with the rotation of the body, not the flinging of the hands/wrists.

As for your actual driver or wood, sometimes a heavier headweight can help you avoid coming over the top. The quickest way to get a heavier headweight is to, well, add more weight via weight inserts or lead tape, if your driver doesn’t have adjustable weights. Also, sometimes opting for a lighter shaft will help you feel more weight in the clubhead and stop coming over the top.

POST IT UP

When it comes to impact, no matter what type of tee shot you’re faced with, hitting the ball with a solid left side is crucial. Notice the differences in these two photos. The upper-right photo shows a position I see with my students who struggle with both consistency and distance. My weight is well behind the ball and over my right leg. Often, this leads to topped shots that generally fly short and erratically.

The color photo indicates a better position at the moment of truth. At impact, most of my weight is stacked over my left leg. Because of this, I’m able to better post up my lower body and allow my upper body to whip through impact. If I lean away from the target, I lose my whip, robbing me of distance and also control. So stay posted over your left side
for better tee shots.

Alison Curdt, PGA/LPGA, is a Master PGA Professional and former LPGA Professional of the Year. Visit alisoncurdtgolf.com.

Editor’s Note: This story was updated March 7, 2018

Single-Axis An Easier WayMoe Norman was considered by many to be the best ballstriker of all time. Even Ben Hogan was once quoted as saying that, “Moe was the only guy that I would walk across the street to watch hit balls.” But anyone who’s familiar with Moe Norman knows that his golf swing was a bit unconventional. Compared to today’s popular techniques, Norman’s golf swing was called single-axis, not the two planes normally associated with the modern dynamic. Taking away and returning the club on a single plane fueled Norman’s consistency and correctness at impact by “de-complexing” the swing. Is a single-axis motion the best way to swing a golf club? The debate has raged for decades. At the very least, it effectively simplifies and helps improve the most important part of the swing—impact. A comparison of the single-axis technique and the modern swing shows how.

What Is Single-Axis?

The key difference between the conventional golf swing and the single-axis golf swing is the relationship between address and impact. At address, the conventional player sets up to the ball with his arms and hands directly below his shoulders, forming two separate lines that create an angle between the arms and clubshaft. Although this seems to make some sense initially, it makes no sense when you consider that the ball doesn’t sit below the shoulders. If you view the same conventional golfer at impact, you see that the club and arms have contacted the ball on a steeper or higher plane.

In contrast, the single-axis address position aligns the club on the same plane as the impact plane. In other words, the single-axis golfer starts the club on the impact plane. By beginning on the same plane as impact, the entire golf swing is simplified, and the likelihood of solid contact with the ball is multiplied. This was the secret to Moe Norman’s amazing ballstriking ability.

Address

Single-Axis Address

Unlike the conventional approach, the single-axis method mimics the impact position at address, negating the need for multiple planes. Arms extend from shoulder, not hang underneath.


Conventional Golfer — This view of the conventional golfer shows a narrow stance with the lead arm on a different line than the clubshaft. The trail hand is on top of the golf club and the hands start behind the clubhead. This position is significantly different from the one that will be attained at impact.

Single-Axis Backswing ConventionalSingle-Axis Golfer — The single-axis golfer begins with the hands positioned in front of the clubhead with every club. This establishes a relationship with the lead arm and clubshaft, which Moe Norman called the “rod.” This rod position is the same straight line that occurs at impact when the lead arm and clubshaft align. Once again, the single-axis position is establishing an easier starting position relative to returning to impact.

Backswing

Since the traditional golfer begins with two angles at address, he or she must hinge the wrists in order to get the club onto the impact plane. Why not start the club there?

Single-Axis BackswingConventional Golfer — Because the traditional golfer started with two angles at address, you can see that he has had to hinge his wrists in order to get the club onto the impact plane. Also notice the steeper shoulder plane created by the address position and the fact that the spine has somewhat tilted forward, away from the original spine tilt created at address. Proponents of the single-axis technique point to these many, varied movements as being unnecessary, adding only complication to the swing.

Single-Axis Golfer — At the midpoint in the backswing, the single-axis golfer has moved the club directly along the impact plane. This is accomplished by simply maintaining the relationship of the lead arm with the lead shoulder established at address, which allows the club to ride the single plane all the way to the top. This begins to illustrate how much easier it is to swing on plane with a single-axis motion. Notice the width of the arms and how the hands are hinging in a leveraged position. The hips have slightly rotated, keeping the spine tilt the same as it was at address, which is the same spine tilt you’ll see at impact. Also, by maintaining the spine tilt, the shoulders have moved on plane, following the arm movement according to the single plane of the arms and hands.


Top

Single-Axis Top ConventionalNo need to drop the arms into the slot with the single-axis technique—they’re already there.

Single-Axis TopConventional Golfer — The traditional address position forces a steeper, more vertical arm movement to the top of the backswing. You can clearly see the amount of shoulder rotation necessary to move the golf club to the top (right). You also can see how the spine has moved toward the target, almost in a reversed C position, which puts unnecessary stress on the spine. In addition, the right elbow also has been lifted and will need to drop in order to get the club back on plane in the downswing.

Single-Axis Golfer  — A key benefit of the single-axis address position is that it serves to simplify arm and shoulder movement to the top of the backswing while allowing the spine position established at address to be maintained throughout. Notice how the lead arm sits directly on the shoulder line, and that even this deep into the swing, spine tilt has not been altered (above, left). What has dramatically changed is the hinge of the wrists, which now are fully cocked and ready to deliver as much energy as possible into the back of the golf ball (the hands are the fastest part of your body, by the way). Unlike in the conventional swing, there’s no need to drop the right elbow because the straight line established at address has allowed the arms and shoulders to move on an ideal plane for square impact. Again, the single-axis technique works to simplify the swing.

Pre-Impact

Conventional Golfer — You can see the lower body rotating with the lead leg straightening and the back foot lifting, which is necessary to create room for the lifting of the clubshaft into impact. The trail elbow is slightly behind the trail hip, which often can lead to a trapping of the arm behind the body. This body rotation and trapping of the arms can be a major cause of inconsistency.

Single-Axis Golfer — Notice how the head remains behind the ball, the trail foot is on the ground, and spine tilt is maintained. The lead leg has remained flexed and stable, and since the single-axis swing started on the same plane as impact, there’s no need to move the body to compensate and make room for a steeper shaft.

Impact

Single-Axis Conventional ImpactWhile the impact positions of both the conventional and single-axis golfer will look very similar, the difference lies in how they arrived there—through multiple planes or on a single path.

Single-Axis ImpactConventional Golfer — You can see at impact that the shaft angle is steeper than it was at address. Because of this steeper impact plane, the conventional player has lifted his trail foot, lifted his spine angle and rotated his torso to be able to reach impact. However, check out the  straight line formed between the lead arm and clubshaft, with the trail arm bent. It’s the same arrangement as seen with a single-axis golfer, but it required two planes to get there.

Single-Axis Golfer — Because the shaft plane is the same at setup as it is at the point of contact, it’s often difficult to tell the difference between these two positions with a single-axis golfer. There’s no need for an upward or backward motion of the spine or an over-rotation of the hips. The single-axis golfer is able to maintain his spine angle and keep his trail foot on the ground. Throughout the swing, movement is minimal compared to traditional methods, which is the key to the swing’s consistency.


Release

Conventional ReleaseThe single-axis swing’s simplicity continues into the release, where the arms power past a flexed, yet posted, lead leg and move straight toward the target, almost like a pendulum.

Conventional Golfer  — The conventional swing requires a full release of the entire body, with excessive hip rotation and the need to lift the trail foot off the ground. Also, the forearms must cross in order to square the clubface.

Single Axis ReleaseSingle-Axis Golfer — The single-axis release position shows how the swing was based on a completely established lower body, with the lead knee flexed but stable and minimal rotation of the trail hip. Because there was no need to lift the torso into impact, the trail foot is still on the ground in the released position. The arms have essentially become an extension of the club. Easy.

The single-axis swing isn’t as odd as you once thought. If you struggle with consistency, it may be worth your while to investigate what is, at the very least, an easier way to achieve a solid impact position. For more information, visit www.swinglikemoe.com.

Many of the fundamentals of the single-axis swing can be seen in familiar Tour players from recent years. Craig Parry and Tom Lehman have similar address positions. Mike Weir has a similar mid-backswing position, with his trail foot on the ground at impact and a perfect extension of the club after impact. Mark O’Meara is almost a perfect image of Moe Norman in his release position. Also, many Tour players are beginning to shorten their backswings, stabilize their body positions and minimize rotation during the swing, all characteristics of the single-axis swing.

Todd Graves operates the Graves Golf Academy, with locations in Oklahoma City and Orlando, Fla. (866-377-2310).

This story was updated for clarity and readability in September 2017

carr golf portmarnock links

EDITOR’S NOTE: The original form of the game, links golf, takes center stage every July when the Open Championship rolls around. From Royal Portrush in 2019 to Royal St. George in 2020 and the Old Course at St. Andrews for the tournament’s 150th edition in 2021, the golf world will once again become engrossed with the creativity, variety and unpredictability inherent in the brand of golf played on those courses and all links layouts.

In this piece, originally run in 2006, a teacher from Dundonald Links — which hosted the 2017 Scottish Open — looks at the unique tests of technique and strategy that true links golf demands, in the form of three much-used shots.

Links Golf low shot

Any golfer worth his salt dreams of trying his hand on a true links golf course. Turnberry, Kingsbarns, Royal Dornoch, even Carnoustie — they all present challenges that inland courses, protected from the elements, simply can’t muster. The soft fairways that prevent errant drives from running into the rough don’t exist. Spongy, well-watered greens that receive approaches of all kinds just aren’t there. It’s a whole different style of play that favors putting over pitching and low, authoritative punch shots over high, spinning floaters. Above all, links golf demands imagination.

To understand how native players of links-style golf feel, one only has to listen to PGA professional David Thomson, who teaches at the Carnegie Club at Skibo Castle in Dornoch, Scotland. American-style golf doesn’t take anything up here, he says, pointing to his head. All you have to do is hit it on the fairway and hit it on the green. There’s not much to it.

Now, many of us would scoff at Thomson’s assertion that target golf is as easy as that, but in reality, he’s more correct than many would like to admit. Simply tee it up on a seaside track with 30 mph winds, firm, tightly mown fairways and rock-hard greens, and you’ll find out. Iron shots that aren’t hit cleanly will struggle to get airborne, and drives that balloon will wind up a good 40 or 50 yards shorter than expected.

Because the conditions are so much more challenging than those on most target golf courses, scoring on a links course demands a wider variety of shots. Trajectory control is key, particularly in scoring situations inside 100 yards.

In light of this fact, we retained the help of Guy Redford, who currently teaches at Dundonald, the newest course affiliated with the fantastic Loch Lomond Golf Club (designed by Kyle Phillips and located near the town of Troon). Redford is particularly well suited to provide links instruction, not only because he grew up playing in the brisk Scottish winds, but because he has been privy to many of the best traditional tips for scoring. Of course, these same techniques can be utilized anywhere the wind blows and where conditions are less than ideal.

THE LOW RUNNER

On target-style golf courses, approaches from 100 yards and closer generally demand a high, spinning sand- or lob-wedge shot. When it comes to windswept links courses, however, this type of shot can be extremely difficult to execute, if not impossible. Not only does the wind interfere with both trajectory and accuracy, but the tightly mown or dormant fairways (depending on the time of year) make nipping clean wedge shots a difficult task.


Links Golf High Shot

Instead, opt for a low-running shot that stays close to the ground and releases up to the green. This shot is one that target golfers probably don’t try very often because of the soft fairways and greens, which are often guarded by sand bunkers. Obviously, this type of shot isn’t appropriate in situations where the green is fronted by a hazard, but when the coast is clear, so to speak, it’s one of the highest-percentage shots in golf.

To execute this shot, select a club that has less loft, such as a 7-, 8- or 9-iron. Position the ball back in your stance, with the majority of weight on your front foot. It’s not necessary to hit down on the ball with a great deal of force, which will only add spin to the shot, making it more likely to be affected by the wind and the grass than a lower-spinning shot. Choke down slightly on the grip and take an abbreviated backswing. Then, simply concentrate on making solid contact with the ball, holding the clubface low through impact. This will help impart overspin on the ball, keeping it close to the ground and rolling hard toward the green.

The key to perfecting this shot, like any shot in golf, is practice. If you’re not accustomed to playing low runners, it can be difficult at first to pick a target and determine how hard to hit the ball. You must learn to let go of mechanical, distance-oriented thinking and allow yourself to visualize the shot as it rolls along the ground and up to the green. Feel the shot and let your body do the rest. Of course, with experience, you’ll better learn to judge the turf and wind conditions, which will make getting the ball close to the hole that much easier.

THE HIGH SHOT

Although high-approach shots aren’t normally associated with links golf, there are situations when it becomes necessary to loft the ball over a hazard. When confronted with this type of situation, there are several modifications to make that differ from the usual high-spinning shot normally played on target-style courses.

First, the wind must be accounted for. It can be coming from behind, in the face, right to left, or left to right. Each situation demands a different type of alteration in aim, which will be crucial to producing a favorable result.

For shots that must be started left or right of the flag, be sure to use the entire length of the green as a target. This way, if you misjudge the wind or the shot slightly, the ball will still land on the green. For downwind shots, be aware that the wind will tend to knock the ball down, bringing it in lower and harder than you might think. Be prepared to miss these shots long, and pick a target that will leave the easiest up-and-down possible.

Finally, when the wind is directly into the shot, don’t be tempted to hit the ball harder. Always remember that an easier touch will produce less spin and help the ball bore through the wind. Although this is a high shot, it’s still possible to hit the ball with a relatively low amount of spin.


Links Golf Chop Shot

To execute the shot, address the ball in the middle of the stance to promote a slightly lower trajectory, and grip the club in the normal way. Always take enough club to ensure you’ll clear the hazard, especially if the wind is directly into you. Again, it’s important not to hit down on the ball too aggressively, but instead to ease into the ball, keeping excessive spin off the shot. And don’t be overly afraid of landing in the hazard. Though it’s not the desired result, you should always play with a feeling of confidence, not trepidation.

THE CHOP SHOT

To execute this shot, set up as if to hit a bunker blast. Your weight should be favoring your front foot, and you should choke down slightly on the grip. It’s important to open the blade of the club slightly, as you might when hitting a bunker shot. The thick grass tends to close the clubface at impact, taking the loft out of the shot. You must also be sure to swing down on a relatively steep angle. Otherwise, the club will get caught in the grass and lose the power necessary to extricate the ball.

At impact, be sure to accelerate aggressively through the grass and the ball. Any kind of tentative pass will result in a poor outcome. Also, don’t release the club through the ball as you would on a full shot. Allow your left arm to chicken-wing slightly, which will keep the clubface square and moving toward the target.

Class A PGA pro Guy Redford teaches at Dundonald GC, located near Troon, Scotland.

This story was originally published in 2006


Bobby Hinds Lag Putting

What’s the best way to learn and practice the game of golf? Many teachers would say it’s from the hole back. Tough to argue the point: A three-inch putt counts just as much as a 300-yard drive, so why not get that shot down first, building confidence as the hole moves farther away and the margins of error get tighter? That will definitely lead to some great golf.

Here we’ll do just that thanks to these quick-read but indispensable tips from longtime Southern California-based PGA teaching pro Bobby Hinds. He knows his stuff and his straightforward style will have you dialed in for summer’s long days of play and practice. Enjoy.

Bobby Hinds Lag Putting

PUTTING PART 1: LAG TO GET COZY

I like to use the term long putt rather than lag putt. Whatever length of putt you may have, the goal is to make the putt!

I like to pick my spot by taking a look from behind the putt first (Photo 1). Taking a rehearsal stroke to get the feel for distance is always good to figure out pace.

Next is to take precise aim at your intended spot (Photo 2). Reading greens takes close attention to watching the ball roll rather than keeping your head and listening for the ball to fall. You never develop an eye for break if your head is stuck to the ground! My head is steady through the stroke but notice that I am watching the ball roll toward the hole (Photo 3). I think the most exciting part of putting is seeing the ball roll towards the hole then disappearing! (Photo 4)

Bobby Hinds Press Putting

PUTTING PART 2: PRESS TO RELAX

Making putts is the key to shooting low and staying positive on the course. When we miss putts we tighten up and get the yips.

Next time you’re on the practice green, address the ball as usual with your hands directly over the ball and the putter shaft pretty much perpendicular (Photo 5) Try a slight forward press of the hands just before pulling the trigger (Photo 6). This small movement helps eliminate tension and get the arms and putter swinging smoothly.

A few top players that use this as a trigger to start the stroke are Jordan Spieth, Rory McIlroy and Phil Mickelson.

Bobby Hinds Hybrid Chipping

CHIPPING: GO HYBRID TO GET TIGHT

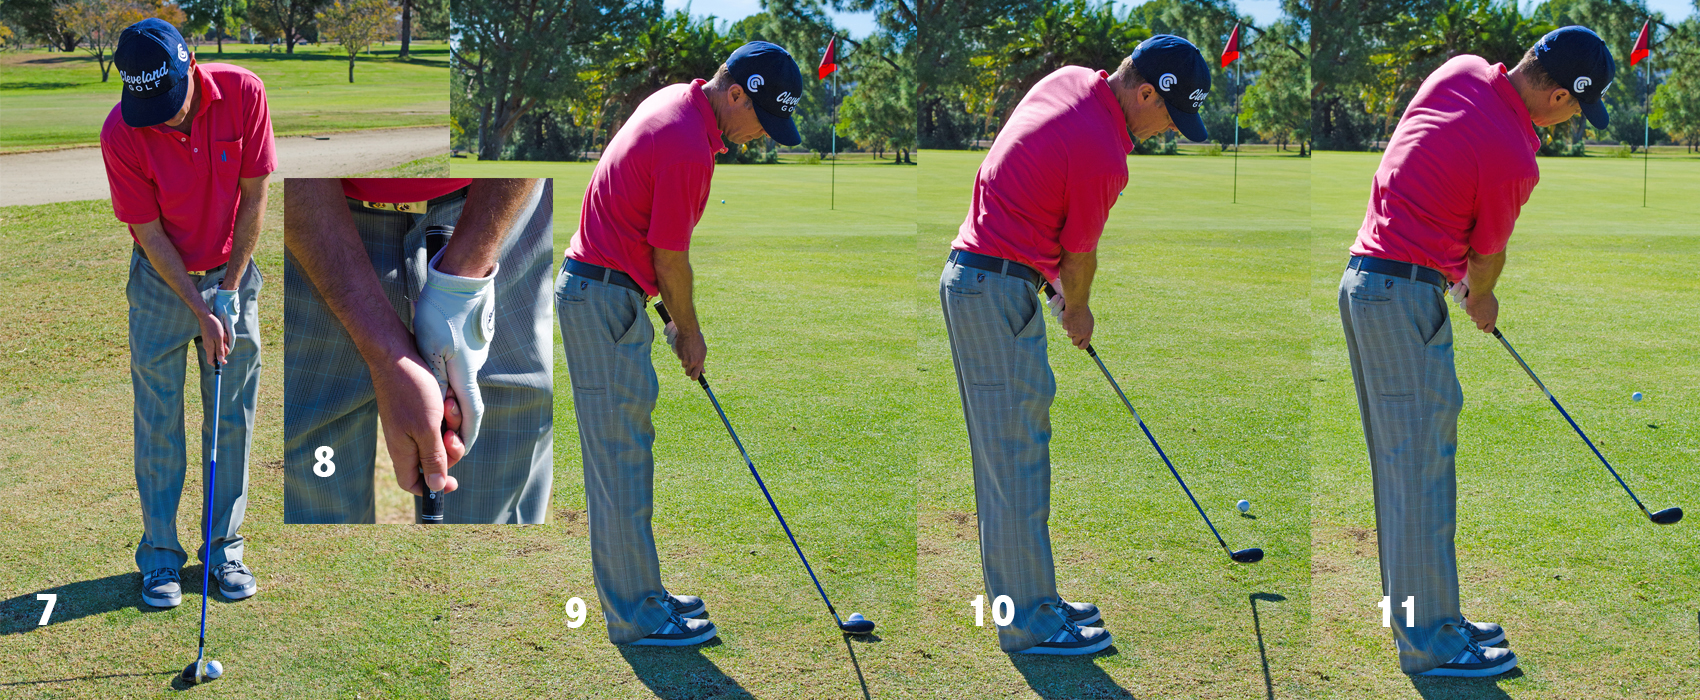
When you are close to the green and have a tight lie it is easy to chunk or blade the shot. Try using a putting technique with a hybrid for best results (Photo 7). I use a standard putting grip (Photo 8) and play it like a putt (Photo 9). The loft on the hybrid gets the ball in the air then it rolls out like a putt (Photos 10-11).

Bobby Hinds Pitching

PITCHING: HEADS UP TO SPIN IT

The greenside pitch is just a chip shot with a wrist hinge (Photo 12). Don’t feel like you have to stay down, as you can see that freezes up my body turn and causes my left wrist to break down at impact (Photo 13). Keep your head up so the body can turn and catch the ball with forward shaft lean (Photo 14) which gives you control of the distance and more backspin (Photo 15).

Bobby Hinds Iron Game

IRON GAME: COMPRESS TO APPROACH

Only by compressing the ball with forward shaft lean at impact can you control the distance and direction of your approach shots (Photo 16). In order to do this, the transition from backswing to forward swing must be initiated with a shifting of body weight from right side to left side (for right-handers, Photo 17). Using your legs and hips, not just your hands and arms, is the key to compressing the ball and getting that feel of solid contact (Photo 18). To help students get to the “pro side” on their downswing, I use a Smash Bag (Photo 19) and a Tour Striker iron (Photo 20) to get them to wake up their legs and learn the proper pivot — which automatically produces the feeling of proper impact position.

Bobby Hinds is a well-known PGA teaching professional based at Woodley Lakes Golf Club in Van Nuys, California. Reach him at bobbyhinds@aol.com.

0
0
Your Cart
Your cart is emptyReturn to Shop