October 17, 2026

Faults And Fixes

golf bag into a training aid 1-3

Having problems fixing your backswing issues? Well, your carry bag could be used for more than just holding your clubs and accessories. In fact you can turn your golf bag into a training aid.

Yanking the club too far inside on the take away? Too much hip sway on the back swing? Getting stuck on the inside transitioning from the top? Try this …

golf bag into a training aid 1-3

FIND THE PROPER PATH

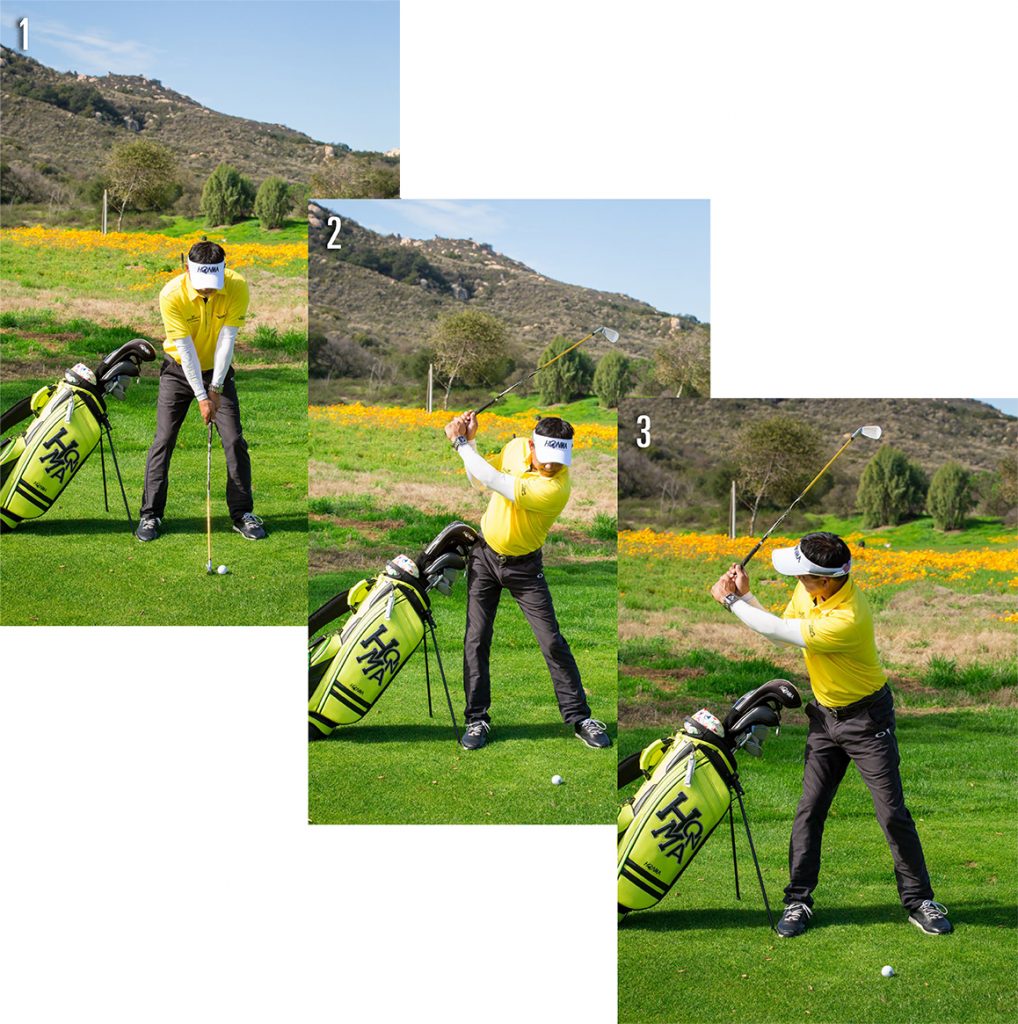
Place your stand bag parallel to your target line and on your foot line with your back foot up against the leg stand (Photo 1). If you take the club back too far on an inside path you will hit your bag. If you sway back, usually caused by trying to keep your head down too long, your hip will hit your driver (Photo 2).

Take a few practice swings watching your club go back without hitting your bag and make sure your hip doesn’t sway laterally (Photo 3). After a few practice swings, keep your eyes on your ball and see if you can feel the motion going back (Photo 4).

golf bag into a training aid 4-6

STOP GETTING STUCK

If you have problems with dropping the club too far on the inside and getting stuck on your transition from back swing to your finish, this drill will help you stay on path (Photo 5). Trust me, you will learn not to drop that club on the inside as you have too much invested in your clubs to damage them! (Photo 6)

For those who have the opposite problem of coming over the top, you can move your bag to your front foot line, parallel to your target line. Swing without hitting your new expensive swing aid and instantly cure your over-the-top, out-side-in swing path.

Randy Chang is Director of Instruction at Journey at Pechanga Resort & Casino, Temecula, California

weight shift 1-3

Let’s talk about the one crucial element of the golf swing to assure power and stability through impact: The weight shift forward.

Actually, the common phrase to describe the initial movement in the downswing is “weight transfer,” but I prefer to call it “pressure transfer.” You’re not moving your entire weight to the lead leg through and after impact; rather, it’s a small shift at first, followed by moving 70 to 80 percent of your foot-on-ground pressure to the outside of your lead leg as momentum carries you up and through the shot. The ball is long gone but what happened in that instant before it left determined which direction — and how far — you’ll head to find it and hit it again.

weight shift 1-3

This tip centers on players who pivot on the trail hip but don’t shift enough pressure to lead side, resulting in flipped hands (Photo 1) in an attempt to rescue the shot, followed by a top, chunk or weak ballfight..

Tee a ball up in line with the lead leg, as I’m doing in Photo 2. Take the trail leg and move it back so that just the toe is touching the ground (Photo 3 and Inset). Then take three-quarter swings off the lead leg to feel the sensation of what it’s like to finish more on the lead side (Photos 4-6).

weight shift 4-6

Start without hitting the ball if you’d like, then actually strike the ball. You’ll immediately feel that downward motion, lag and release of stored-up power that the pressure shift allows.

The benefit to this drill is clear. Players who struggle with getting to the lead side often hit behind the ball and lose potential distance as they swing with their arms. The body needs to move toward the target during the down swing, into impact, and to the finish position. Getting the feel of hitting shots off the lead leg will encourage the golfer to transfer more pressure left in a full swing.

Based in Southern California, Alison Curdt is a PGA Master Professional and 2015 LPGA National Teacher of the Year. Contact her at www.alisoncurdtgolf.com

golf club contact hip coil

All amateur golfers, women and men alike, sometimes struggle with their ability to make solid golf club contact through the bag. Catching the ball high or low on the club face means immediate loss of power and accuracy, and it’s usually an issue with one or more of three things — keeping your torso and arms connected; rotating your hips too much in the backswing for loss of the all-important “coil,” or resistance of upper to lower body; and not maintaining a consistent swing plane. Let’s take a look at how to quickly and effectively fix all three of these common swing faults.

golf club contact hip coilNo. 1:  Hip Coil for Max Power

FAULT: Hips 55-65˚

In the photo above left, all resistance is gone from my swing. My hips have over-rotated and I have lost the hip crease, resulting in a lift up and out of my posture. I have also lost the pressure point in my back foot. It has moved to the outside.

FIX: Hips 45-50˚

On the right, my resistance is maxed out. My legs are solid with a slight hip turn. I am bearing into the ground, and using this resistance to create the coil. The pressure in my back foot is driving deeper into the turf, helping me to create that resistance.

Key Point: It’s important to note that a good fitness and flexibility regimen is critical to get and maintain the swing torque you’re looking for.

golf club contact plane truthNo. 2: The Plane Truth

Elbow in to stay on plane.

Here’s a subtle yet critical set-up adjustment to keep you connected and on plane:

FAULT: A Disconnected Elbow

In the left-side photo, my elbow is disconnected at set-up. It is pointing away from my body. This position will make it more difficult for my elbow to fold in during the takeaway.

FIX: A Connected Elbow

In the right-side photo, my elbow is connected at set-up. It is pointing in toward my body. This position will allow my elbow to fold as I rotate into my backswing.

No. 3:  Keep the Connection

Lack of flexibility can easily lead to one of the most common swing maladies, especially for women: High, armsy AND disconnected!

If you are consistently hitting thin shots, let’s examine your takeaway into your back-swing. Disconnection is a biggie.

Here’s subtle yet critical set-up adjustment to keep you connected and on plane

golf club connect keep connect fault

FAULT: Loose And Leaky

In the photos directly above, there’s lots of arm disconnection from my torso. I am getting great extension, but my arms and shoulders are no longer one unit. I am disconnected from the start. This makes it very easy to rise up and out of my posture. As a result, there is minimal coil, or power in this backswing. I will most likely hit a THIN shot.

golf club connect keep connect fix

FIX: Compacted Power

A connected swing allows all the right things to take place, such as creating good wrist hinge and staying in your posture.

Great connection with my arms and upper body. No daylight in this takeaway. This connection makes it easy to hinge.

I feel a low center of gravity. My feet are driving in to the ground, creating a super-coil.

No. 4:  A Rigid Extension

We all hear about full extension, or a wide arc for lots of distance. This is true! However, be careful not to overdo it and get off plane.

A subtle yet critical set-up adjustment to keep you connected and on plane

golf club contact rigid faultFAULT: Too Tight

With a rigid takeaway, tension creeps in and at that point, it becomes a real challenge to stay in your posture, and stay connected into your backswing.

I have risen out of my posture. I call this the “elevator move.” I’ll need to come down a few floors to make contact with the ball.

golf club contact rigid fixFIX: Soft Arms

A soft right elbow coupled with a straight left arm provides plenty of extension. With soft arms, my back elbow (right for me) will begin to fold, allowing me to coil fully into a compact backswing.

As I continue to turn, notice how I am staying in my posture.

In fact, I squat deeper into my coil, so I can unwind aggressively into the downswing.

golf club contact off-plane 3No. 5: Off-Plane 3

The “left arm breakdown” can wreak havoc on your swing plane, and not to mention killing any chance for distance. The photos above show the fault and how to fix it.

FAULT: Bent Left Elbow

My hands are very close to my head because my lead arm has too much bend.

FIX: Extended Left Elbow

My hands are far from my head. This translates to a wider arc for more extension through the shot.

Christina Ricci is an LPGA Class A teaching pro, TPI Certified Golf Level 3 and a bestselling golf author. She has helped grow and promote the game of golf to women in her own unique way since 2008. Visit www.golfsurvivalguide.com to sign up for Christina’s weekly golf tips.

Better Ballstriking Photo 1

Better Ballstriking Photo 1Boiled down to its essence, golf comes down to the ball meeting the club face for a split second. That’s it. And as we all know, if either of those two elements is out of place or coming in at the wrong angle at impact, bad things happen. I’m here to help you build club face awareness, which will lead to eliminating one of the game’s most dreaded shots. Then we’ll take that better ballstriking confidence and apply it to planning where to land each shot.

BE CLUB FACE AWARE

Do you know if you made a good swing and hit a bad shot due to the impact location on the club face or if the bad shot caused by poor club face alignment at im-pact? In this lesson I’ll show how hitting the ball on different parts of the driver affects how it behaves in flight — and how you can hit fades and draws on demand. It all starts with face awareness.

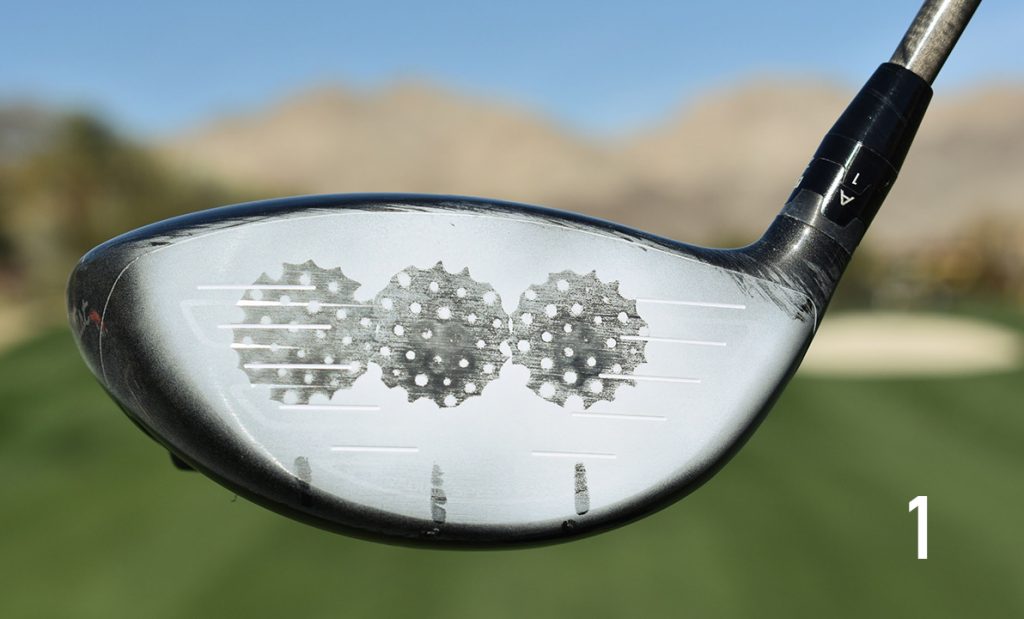
For better face awareness, try this drill: Spray the club face with Dr. Scholl’s Odor-X spray power or another similar spray that will leave a white residue. Try hitting three shots in this order, as shown from left to right in Photo 1:

  • Off the toe of the club
  • Off the heel of the club
  • In the center of the face
    With good club face awareness you should be able to hit three shots, one in each of the three sections on the club face on command.

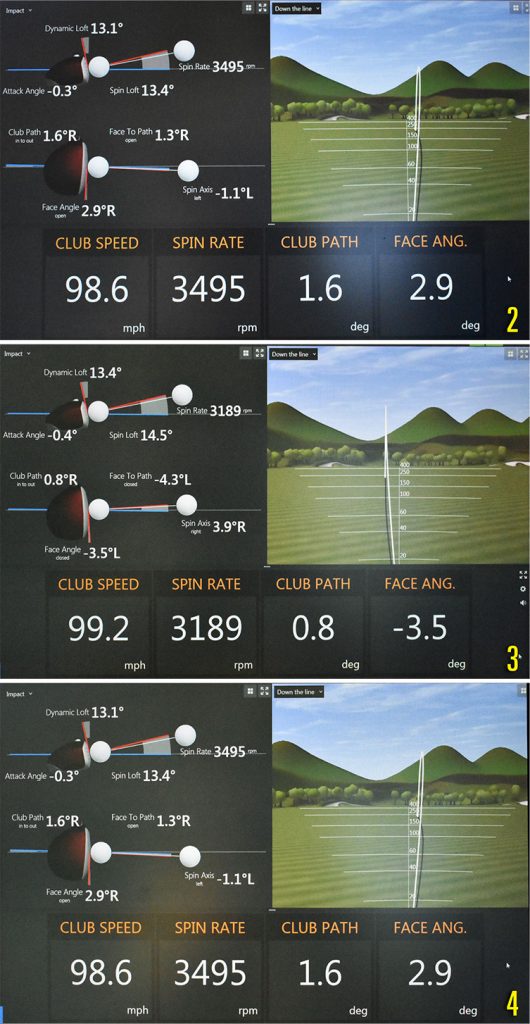
Better Ballstriking Photos 2-4Notice that in Photo 2, taken from the Trackman in the teaching facility at Bighorn Golf Club, a shot struck on the toe of the club will curve more to the left than an equal shot struck in the center of the club face, and a shot struck on the heel of the club will curve more to the right than an equal shot struck in the center. This curvature is due to the rotation of the club head at impact on all shots that are not struck at the center of gravity of the club head. This “gear affect” is even more pronounced with hybrids and fairway woods and is the most pronounced with the driver due to the added curvature of the club face. Did you know that the curvature of the driver club face from heel to toe (and its resultant diameter), is almost the same diameter of a basketball hoop? This adds even more gear affect than you would have on an iron shot and makes it even more important to know where you hit it on the club face.

Notice the gear effect in Photo 3. The club was swung inside-to-out or to the right with a very closed club face. If the ball was struck in the center of the club face, we would see a big hook. When you look at the dark line depict-ing the actual ball flight, you see a slight fade. This left-to-right ball flight is due to the contact point being well toward the heel of the club.

In Photo 4, you can see the gear effect of when the ball is struck on the toe of the driver. In this picture, at impact the club face was aimed more to the right than the club path. If this shot was struck in the middle of the club face we would expect a push slice. However, the ball started to the right of the target and curved to the left, a draw. This curvature is due to the ball being struck on the toe and the resultant gear effect.

STIFLE THE SHANKS

Most golfers don’t know why the hit a shank. In my experience, it is almost always caused by one thing, the golfers’ hands moving out away from their body and toward the ball during the transition from their backswing to downswing. To train the correct motion, try this simple drill:

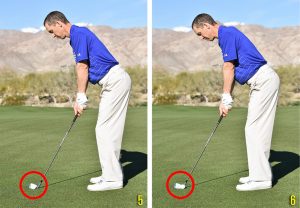
Better Ballstriking Photos 5-6Line up to the ball normally. Make sure your weight is on the balls of your feet or about where your shoelaces end, as I’m doing in Photo 5.

Once set up, you should have approximately one fist width from your left leg to the butt end of your grip (Photo 6).

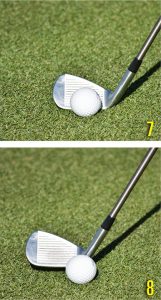
Starting at your normal address position (Photo 7), move the club head away from you so that the ball is now lined up off the hosel of the club, just as if you were going to purposely shank it (Photo 8).

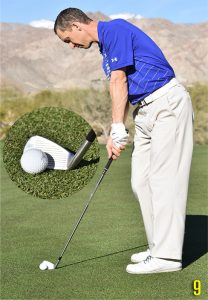
Better Ballstriking Photos 7-8Swing back and try to hit the ball off the toe of your club (Photo 9). This motion will reverse the hands moving away from you pattern that causes a shank. You can see that my hands are closer to my body then when they started. This further-away-to-closer motion will get rid of the shanks!

Better Ballstriking Photo 9Here’s another useful drill: place a line of tees in the ground just outside the club head and hit balls without hitting the tees, as I’m demonstrating in Photo 10.

Better Ballstriking Photo 10DECISION TIME

For each shot you play in golf, your objective should be to “hit/stroke the ball toward your selected target to the best of your ability at that moment in time.”

Picking specific targets will help you get focused on the positive aspect of what you want to happen rather than the negative outcomes that are possible. Your mind doesn’t register negatives, so it’s imperative to success that you focus on what you want to actually happen.

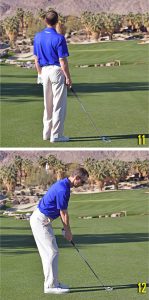
Better Ballstriking Photos 11-12In Photo 11, the majority of the trouble is short (water) and left (bunkers). If you tell yourself “don’t hit it in the water,” your brain registers the word “water” and figures out a way to hit it in the water 9 times out of 10. If you don’t want to hit it in the water, then you do want to hit it somewhere else. This somewhere else may be the opposite side of the fairway or green or, or to the right or the back of a green instead of the front part. No matter where that target is, select a target that is small enough that you can focus your eyes on it each time. In Photo 12 you can see that that I’m lined up straight at the pin, but I’m making sure to take enough club to take the water out of play and maybe even be a bit long. This will help you have a positive thought and clear picture of where you want to hit it before you step up to each shot.

More from Dale Abraham: Stop the Slice Forever

Dale Abraham, PGA, is Director of Instruction at Bighorn Golf Club in Palm Desert, California and Telluride Country Club in Telluride, Colorado

golf posture opener
golf posture opener
For this lesson you need a five-pound weight, your driver and hand weights.

I can’t emphasize enough how important a good golf posture is to the success of your golf swing. Grip, posture, stance and ball position are the cornerstone ingredients that determine how your swing will work, how it looks and where your shots will go. The effect of having poor posture can be damaging in so many ways. It can cause you to straighten up in your golf swing, referred to as loss of posture, it can also restrict body rotation, leading to an overly dominant arm swing, all of which can result in missing the ball, toe shots and hitting fat shots with club contact behind the ball. In addition, poor posture can have a major effect on the PATH OF YOUR SWING.

A CLOSER LOOK

There are three areas as it relates to posture: spine angle, arms and knee flex. For the purpose of this article, we will take a closer look at spine angle and arms. Only a slight knee flex is required and should easily be attainable.

Golf Posture 1-2GOOD GOLF POSTURE

Good Posture has the same spine angle you had while standing up straight, but hinged from the hips with a pelvic tilt. The pelvic spine tilt allows your arms to hang straight down naturally under your shoulders, Photo 1.

POOR GOLF POSTURE

Poor Posture has very little pelvic tilt from the hips. Instead, the hinging is occurring throughout the spine, creating a curve to the back. When this happens, the tendency is to reach forward with the arms, Photo 2.

POOR GOLF POSTURE = POOR PATH

Golf Posture 3Plane and Path

In order to see the effect that poor posture has on path, I have drawn a line from the golf ball through the top of my shoulders, Photo 3. NOTE: With good path, the shoulder plane line should never be broken with the club going outside this line at any time during the backswing, downswing or follow-through.

Golf Posture 4-5Backswing = Above the Plane

With the spine curved, hip and shoulder rotation is restricted. Now, the swing starts with arms in an abrupt upward fashion, Photo 4, causing the club to go above the plane in the backswing, Photo 5. At address, when the arms are reaching, they are tight. Tension in the arms will also promote the same, abrupt upward motion. The feeling is similar to picking up an axe to chop wood.

Golf Posture 6-7Over Top = Cut Across

Since the start of the backswing was predominantly generated with the arms due to restricted body rotation, the start of the downswing will be same, causing the club to stay over the top of the plane, Photo 6, with the club cutting across the plane line. Photo 7, This is similar to an out to in cut spin with a tennis shot.

THE RESULT:  Shots are hit off line with pulls, pull hooks and pulls slices, along with no velocity on the shot.

GOOD POSTURE = GOOD PATH

Golf Posture 8Plane and Path

In order to see the effect that good posture has on path, I have drawn the same shoulder plane line, Photo 8. This line will make it easy to see the effect good posture has on path in the golf swing.

Golf Posture 9-10Backswing = Under the Plane

Without the curve in the spine, hip and shoulder rotation is freed up. Now, the swing starts with arms and body rotation, with the club to going under the plane in the backswing, Photos 9 and 10. Also, when the arms are hanging at address they are free of tension. Tension-free arms will follow the path body rotation has created. The feeling is now rotary, like swinging around your body.

Golf Posture 11-12Down Under = Down The Line

Since the start of the backswing is rotary with tension free arms, the start of the downswing will begin with body rotation in an unwinding fashion with the drop of the arms, down and under the shoulder plane, Photo 11, with the feeling of swinging down the line in the follow-through, Photo 12.

THE RESULT:  Shots start off towardsyour target giving you the opportunity to hit more fairways and greens.

DRIVING NATURAL GOLF POSTURE with a little GRAVITY

In order to work on good posture, you’ll need a driver and a five-pound dumbbell weight, Photo 13. First, while standing straight up and in your golf stance, take the grip end of the driver and slip it between your belt and pants, Photo 14. If you do not have pants with a belt, simply put on a belt and slip the club between the belt and what you are wearing. An example are women’s shorts/skirts and gym pants if you are working on this at home.

Next, move the driver down until the club head touches your head, Photo 15. At this point, you should still be in a standing position and in your natural spine angle you would have as if you were holding a drink and talking to somebody in front of you, Photo 16. This “drinking position” is important for establishing your natural spine angle.

Now, pick up the 5 pound weight (Photo 17) hold the weight in both hands, in your drinking position (Photo 18). Finish by hinging from your hips, while letting your arms drop down with gravity from the five-pound weight (Photo 19). When you do this, move your feet to establish balance, while you keep the club contact point on your head.

GOLF POSTURE TRAINING

Golf Posture 17-19Photos 18 and 19 are your Posture Training photos. Once you have completed your posture, stay in this position for a couple seconds and then move back to the drinking position (Photo 18) and Repeat.

In order to get sufficient feel, repeat the process 5 to 10 times.

CLUB, WEIGHT and ROUTINE

Golf Posture Hand WeightsTraining with the driver and five-pound weight is important for acquiring the body feel of a good posture, but you’ll need to transfer this feel to the golf club with your routine, to achieve complete feel of good posture while you set up to the ball. In order to do this, you will need a pair of either 1-1/2 pound or 2-1/2 pound ankle weights.

Golf Posture 20-22First, put the ankle weights on both wrists. Then, take your club and begin in your standing, drinking position with the clubhead approximately eye level (Photo 20). Next, step and bow to the ball with focus on hinging from your hips (Photo 21), while allowing the ankle weights to assist with the natural dropping of the arms. Finish by completing your stance (Photo 22). Practice this without the club on your spine and then eventually without the ankle weights after you have achieved the feel of good posture.

Chris Johnston, PGA is the Senior Instructor at Twin Brook Golf Academy in Tinton Falls, New Jersey. He has also been a ‘master innovator’ of training tools for over 30 years with over 200 built throughout his teaching career.

Dale Shankland has been a PGA Golf Professional for over 30 years and was Instructional Editor for Golf magazine from 1972 to 1977. He also wrote Johnny Miller’s, Pure Golf, along with The Stroke Savers Handbook by his brother Craig Shankland, PGA


Swing Drills Ballgames 1-2

Swing Drills Ballgames 1-2Contrary to dysfunctional (albeit entertaining) “Tin Cup” mentality, when things start going sour you don’t need to practice with nine different swing aids hanging from various parts of your body. In fact, most swing aids – especially ones that require clips, carabiners, belts, engines, or dangling apparati of any kind – will likely only confuse you and make matters worse. (However, if your goal is to provide some laughter and an entertaining sideshow to everyone on the range, by all means, get a few rolls of duct tape and get at ’er.) Most golf instructors would agree: the simplest swing drills that are typically the most effective. Introduce too many moving parts — too many nuts, bolts, screws and straps – and you’re bound to go bonkers.

Interestingly, one of the best swing aids is something every driving range has thousands of. Golf balls. Besides their most obvious use (if you’re unsure, grab a couple pops, watch Tin Cup, and call your friendly neighborhood golf pro in the morning), golf balls can be utilized to stop a variety of swing faults. Here are a few of my favorite drills (using golf balls) that can help.

Swing Drills Ballgames 3Trail Foot Anchor

If you struggle with a lateral slide or sway (rolling over and getting weight on the outside of the trail foot at the top of the backswing – Photo 1), this drill can work wonders. I’ve used it to help students stabilize their trail side at the top of the swing and get into a better position behind the golf ball (Photo 2). Simply place three golf balls under the outside of the trail foot (right foot for right-handers – Photo 3) and start hitting half shots, working your way up to three-quarter and full shots as you get used to your new “anchor.” This drill will help stabilize your right side at the top of the swing and eliminate the dreaded slide by keeping the weight on the inside of the trail foot. It will also shorten your backswing (a good thing), and facilitate much more efficient use of the lower body.

Interestingly, golfers who slide laterally on the takeaway often develop a reverse pivot (sometimes called a “death move”). And this drill can also help you make a good turn to achieve the proper – and much more powerful! — upper body position behind the golf ball.

Swing Drills-Ballgames 4Standing on Golf Balls

Unnecessary motion — sliding, lifting, altering the spine angle, etc. — is the downfall of the average recreational player who experiences inconsistent contact. If you struggle with poor balance and way too many moving parts in your swing (especially altering the spine angle, as in Photo 4), try hitting half and three-quarter shots while standing on golf balls (Photo 5). I guarantee you will be forced to keep your body quieter as swing.

Swing Drills-Ballgames-5Hitting golf shots while standing on golf balls will also help you develop good knee flex, hip flex, and a consistent spine angle throughout your swing (Photos 6 and 7). You won’t be able to make full swings with a full weight transfer and finish. No worries. The point is to keep yourself in balance and to eliminate “extra” motion that will wreak havoc on your ball striking. If you can hit 10 solid shots in a row with this drill you pass with flying colors.

Swing Drills-Ballgames 6-7Three-Ball Drill

Achieving the proper path and plane is the ultimate goal for any student of the game. And this simple three-ball drill is as simple and easy as it gets. Simply place three golf balls in a row, approximately two inches apart, and swing at the middle ball (Photo 8). The goal is to only contact the middle ball (Photo 9). If your path is too much from the inside (a common fault of players who develop a hook) you’ll also strike the inside ball. If your path is too much from the outside, your tendency is to come too much from the outside (a common fault of slicers), and you’ll risk hitting the outside ball. This easy drill will help you develop a strong swing path — and a better swing plane — that will have you hitting it straighter and more solid in no time.

Swing Drills-Ballgames 8-9Bocce (With Clubs)

The ancient Italian lawn bowling game of bocce can be played equally well with golf balls and clubs. Not only does it make practicing social and fun, but it mimics the pressure-filled moments you encounter during every round. I’ve been playing this game with friends and students for years and it never gets old. (Perhaps that’s why it’s been around for hundreds of years!). And it can be played equally well on the practice putting green or with wedges in the short game area.

Swing Drills-Ballgames 10The premise of the game is simple. Simply putt out (or pitch out) “the jack” (the target ball that you take turns hitting towards) and alternately shoot for it. The traditional game is played with each team (two or four players) getting four balls each (each team should play different colored golf balls) that are played to the jack on each “round.” Only the closest team scores (Photo 10 – white is positioned to score one point and can add another if he/she putts it inside the nearest yellow ball. The bright yellow ball is the jack). The first team to 20 points (or whatever number you choose) wins the game. Regardless of the outcome, any weaknesses in your short game will be exposed!

Andrew Penner is a golf writer, photographer, and CPGA Teaching Professional at McKenzie Meadows GC in Calgary, Alberta.

Build A Golf Grip Intro

Build A Golf Grip IntroWhen most amateurs decide to play this game, they simply grab the golf club without any idea where their hands should be placed. From that point on, faults begin to affect their golf swing. There are countless variations of the “bad” golf grip that the beginner comes up with and an equal number of swing faults that happen because of it.

GOLF GRIP TRAINING TOOLS (See Photo Above)

  • Paddle
  • Hammer
  • 3/4” Square Molding
  • Black Erasable Marker

Build A Golf Grip 1-2

The most common is the “Under” grip. The Under grip, as show in Photo 1, has the hands off to the side and under the han-dle — the handle in the palms of the hands. A good grip will have both hands more on top of the handle with the handle more in the fingers, as in Photo 2. The Under grip will bury you with shots that are dead and out of play, while a good grip will keep you in the land of the living and in play.

Build A Grip 3-4

Although there are a host of swing faults that occur with a bad grip (Photo 3) the most common is the “bow and bend.” With the Under grip the wrists are not in position to hinge freely in the backswing. Because of this, there is a bowing of the top hand, followed by the bending of the lead arm with limited wrist hinge (Photo 4). This can cause the golfer to top shots, make contact off the toe of the club and even miss the ball.

Build A Golf Grip 5-6

Now, a good grip, as in Photo 5, results in the wrists being in position to hinge freely in the backswing. This gives the golfer a chance to hinge their wrists without the bowing of the top hand and in turn the lead arm has a chance to remain straight in the backswing, as in Photo 6. When this happens, the golfer hits the ball more consistently, with center face hits, resulting in shots hit longer and straighter.

SIMPLE PHILOSOPHY: Top Hand = Leverage and Bottom Hand = Square

Build A Golf Grip 7-9

GOLF GRIP ‘HAMMER’ HAND

As important as the position itself, understanding the role of the top hand is key to proper placement. You want to take the top hand and place it where the wrist is centered over top of the handle for the feel of leverage and support, just like you would hold a hammer (Photo 7). This will put the bottom of the wrist on top of the handle (Photo 8), giving you the ability to hinge your wrist while keeping the hammer head in control (Photo 9). As a training exercise, take a hammer and place it in your top hand and practice acquiring this feel. Note: Only modification is your thumb will be on top of the handle, slightly off to the side.

Build Golf Grip 10-11

GOLF GRIP ‘PADDLE’ HAND

The bottom hand’s position is square to the clubface, just like you would position the hand if you were holding a paddle or a racket, as in Photos 10-11. This will help you know where the clubface is in the golf swing and help you return the club back to square at impact, while promoting a proper release through impact. As a training exercise, take a paddle or racket and practice this feel.

Build Golf Grip 12-14

GOLF GRIP STICK TRAINING TOOL

‘IN LINE’ and ‘SQUARE’

The GRIP STICK training tool will help you get your grip IN LINE and SQUARE. I also suggest you work on your grip 5 to 10 minutes a day for at least a week, as the great Ben Hogan once recommended.

TOP HAND: Take a black erasable marker and make a spot on the top of the wrist, Photo 12, followed by a spot on the bottom, Photo 13.

BOTTOM HAND: Make a black line from the middle knuckle to the top knuckle, Photo 14.

Build Golf Grip 15-17

GOLF GRIP STICK — TOP

Take the 3/4 inch square molding stick and place a spot one inch from the end (Photo 15), followed up by a line and arrow one inch down from the spot (Photo 16).

GOLF GRIP STICK — BOTTOM

Make a black six-inch straight line ending about six inches from the arrow (Photo 17).

Build Golf Grip 18-20

BUILD YOUR GOLF GRIP

TOP HAND POSITION

Hold the very end of the Grip Stick with the thumb on top, just up from the spot, while the other end is on the ground (Photo 18). Then take the top hand and position the wrist with all three spots lined up (Photo 19).

Build Golf Grip 21-22‘IN LINE’ FOR LEVERAGE

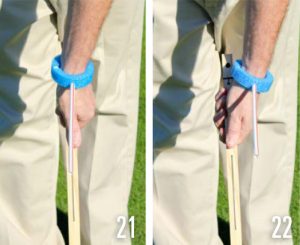
Lining up the wrist means connecting all three dots. Photo 20 is an important photo for understanding the placement of the top hand. Photo 21 helps to illustrate how the wrist lines up over the handle, while Photo 22 shows how it’s off to the side and under.

SQUARE = PARALLEL

When you fit the lifeline over the thumb, your focus will be on squaring up the finger line parallel with the centerline on the Grip Stick. This centerline represents the line that would be in line with the clubface, if there were a club on the end of the stick.

Build Golf Grip 23-25

Order of Play: The process when positioning the bottom hand is simply; Pinky, Fingers, Fold (Photos 23-24).

Once you have positioned your bottom hand, turn your focus to grip pressure. The hand should feel like it is “light” in pressure. In order for the wrists to work effectively during the swing, your bottom hand must be light, not tight. (Photo 25)

Priority: Get it right then make it light.

Build Golf Grip-26-30

BUILD YOUR GOLF GRIP ON THE CLUB 

Training with the Grip Stick is important for acquiring feel and understanding of the placement of both hands, but equal amounts of work is necessary for transferring feel to the golf club. The only modification that needs to be done is a placement of a black spot on the thumbnail of the top hand (Photo 26).

TOP HAND 

Start your grip routine by holding the very end of the club (Photo 26).

NOTE: Make sure the clubface is square. Follow this by placing the top hand in position by lining up the spots. Use the thumb nail spot as your third spot in place of the spot that was on your Grip Stick, Photo 27.

BOTTOM HAND 

Now raise the club and focus on the feel of support and leverage in the top hand (Photo 28), while placing your bottom hand square to the clubface (Photos 29 and 30).

Chris Johnston, PGA, is the Senior Instructor at Twin Brook Golf Academy in Tinton Falls, New Jersey. He has also been a “master innovator” of training tools for 30 years with over 200 built throughout his teaching career.

Golf Fundamentals Alignment Opener

Golf Fundamentals Alignment Opener

Over the years, there has been so much written, photographed, and videoed about swing positions, swing movements, and other items that can improve your golf swing. But they all hinge on one among all core golf fundamentals: Nothing works unless you are properly aimed to your intended target. If you set out this year to improve one thing in your game, make it alignment, for all shots, tee to green. Alignment and how your eyes see your intended target is what programs the brain to execute your golf swing. And it is this one set-up position that can make or break any golf swing, regardless of skill level.

You can’t turn on a golf telecast these days without seeing ALL the tour professionals using some type of device or golf club to ensure that while they warm-up or practice, they have one part of their swing absolute — their alignment to their intended target. They have figured it out, with the help of FlightScope and other technologies. So why will you not do the same? You buy the clubs they play, the apparel they wear, and drink the same drinks they like. So why are you not taking their lead and ensuring your alignment is absolute, consistent, and the most dependable part of your game?

Golf Fundamentals Alignment 1-2LET’S DO THE MATH

I had to bring out my 9th Grade Geometry book and once again look at theories about triangles and the old “Side-Angle-Side” theory to prove to you that alignment is critical to your golfing success. For our example, we’ll use a target at 150 yards.

If you are as much as four degrees aligned right of your target, and you hit a perfect shot every time, you will miss to the right of your intended target by as much as 10.5 yards, or 32 feet. Combine this fact with other variables and factors that affect the flight of the ball (wind and humidity, mis-hits, etc.), you could miss the target by a wider margin. And you must remember that if you hit the perfect shot 150 yards, it will not only miss right of the hole, it will be short, because of the arc created by the angle which you used to aim, four degrees.

This is a simple example of how a mini-mal amount of misaligning to your target can have you miss shots. In the almost three decades I have coached golfers, most are misaligning to their target 10 degrees or more on average, with most golfers aiming closed (right of target for the right-hander; left of target for the left-hander). Just look at my set-up in Photo 1 — I’m aimed right at the water!

IT’S MORE THAN JUST AIM

When not aiming, or aligning to your in-tended target properly, you are allowing your eyes to send signals to your brain, a triangulation algorithm per se, that dictates how the brain will program the body to swing the club. But to swing the club and make the ball go to its intended target, the brain must also set up the rest of the body to do so.

I worked with a tour player that loved to hit a power fade with his driver 300-plus yards. His typical alignment had him aligning properly, or a couple of degrees open to his intended target. He had a neutral grip and always stood tall to the ball. His swing path was almost perfect every swing, with a hint of an outside-to-in motion when he was looking for more curve on the ball.

One day he came to me and told me not to tell him how to fix the big looping draw/hook he was now hitting, but tell him what he was doing that made that swing pattern happen. It was obvious, he was now aiming right of his target. He was also hunching over a bit and his grip became abnormally strong. His swing path was a pronounced outside-to-in motion and much steeper than normal. I put a club down to his heels and asked him to come take a look. After a few choice words, he replaced the club on the ground in the direction he wanted to aim and started swinging. Within 10 balls, his grip and posture began to return to normal; within 15-20 balls the big “over the top” move was almost gone, and his power fade returned.

Moral to the Story – Poor alignment leads to many other poor set-up positions, and in turn leads to most in-swing flaws. And this is true whether you are hitting a driver or stroking a putt.

Here are just some of the effects of poor alignment:

Aiming “closed” to the target (as I’m doing again in Photo 2); the eyes see target to the left (right-handed golfer) and program the brain to:

  • Swing to the left, creating outside to inside swing plane
  • Place balance of body to the toes
  • Posture at address more stooped and moves to upright as swing progresses through impact
  • Body fails to turn toward target and leaves center of gravity (hips/belly button) finished right of target

The opposite, or “open” aim:

  • Creates inside-to-out swing plane due to seeing ball to the right of center (for right-handed golfers);
  • Balance tends to go toward heels at set up and remains there
  • Turn can be “reverse weight shift” because club moving too far right
  • Posture tends to stay down from hips to shoulders to counterbalance the heels

Golf Fundamentals Alignment 3-4A SIMPLE REMINDER FOR PROPER AIM

When I took up the game in college, I made sure I watched Jack Nicklaus’ “Golf My Way,” which was so abundantly simple in its time and is now erroneously under-valued. Within the video series was Jack’s way of taking aim to any target. His process today is even more relevant than when the series was produced, with FlightScope and other technologies recognizing that great aim is the No. 1 position you should instill within your game. Here is what was said years ago, with a few additional points of emphasis as to why aim is critical to your golfing success:

“Stand directly behind the ball with enough room between you and the ball to see the obvious line made from the target to the ball.”

The common errors I see is most golfers do not stand directly on the target line behind the ball, nor do they leave enough room between them and the ball to properly distinguish the target line. Most golfers stand to one side of the line or the other, causing them to not see the actual line they intend to aim to. Your two eyes need more room than you think to aim you to the ball, and the ball to the target, on one line. Ensure you are at least 8-10 feet away from the ball, as I am in Photo 3, and straddling the target line so you see the true target line and where you should aim. Also note that I’m using my club as an aiming tool.

“Aim to something in front of the ball.”

You must admit, aiming to something 2-3 feet in front of you is much easier than something 10-plus yards away. Most targets are double that length. So why do you continue to aim to the target so far away? I recommend 2-3 feet from the ball as the optimal distance to aim to, as illustrated by the tee placed in front of my alignment sticks in Photo 4. This allows your peripheral vision to see that object you are aiming to during your routine, preventing you from standing up or moving your feet to see the target far away.

Golf Fundamentals Alignment 5-6“Aim the club first, then your body, using only your bottom hand.”

The club hits the ball, not you. You swing the club. So why are you aiming your body first, then the club? Use the leading edge (the bottom) of the club to aim the club (Photo 5). Ninety-five percent of the direction and trajectory of each shot is determined by this edge and the first six grooves of the club. If you aim the club correctly, using only your bottom hand, chances are you’ll aim your body correctly too. Having both hands on the grip will prevent you from properly holding the club in the correct position at address. And holding the club with your top hand may cause you to close the club and aim right of your intended target.

Golf Fundamentals Alignment 7-8“Step into the shot and insure all body parts are on a line parallel left of your target line.”

After properly aiming the club, the rest is easy. Place your top hand on the club (Photo 6) and place both feet into the stance (Photo 7). Most of the time, your feet will now be “Parallel Left” of your intended target (Parallel Right for the left-hander). Feet are the most important parts of your body to be properly aligned because all great athletic moves are made from the ground up; golf is no different. But feet are not enough to ensure proper alignment. Every part of your body that creates a “hinge” in your stance, — your knees, your hips, and your shoulders — must also be parallel right of your target, on the same line as your feet. This pro-vide proper balance before, during, and after the swing as well as allowing your eyes to properly see the target.

I cannot overemphasize the importance of properly aiming to your target and its effect on the rest of your game. Technology backs this up, with some manufacturers insisting that its users always place an alignment rod on the ground to insure more consistent swing data, as I’m doing in Photo 8. I can show you countless swing videos of clients who significantly improved their ball striking, their chipping and bunker play, and their putting, by fixing nothing but their alignment. The before-and-after videos show a night and day difference, and so do their scores.

Make 2017 the year you invest $4 for alignment rods and use them! I guarantee it will be the best investment you’ll make in your game all year.

John Hughes is a PGA Master Professional based at Falcon’s Fire Golf Club in Orlando, Florida, and 2013 PGA of America Horton Smith Award Recipient. Visit him at www.johnhughesgolf.com
Golf body type-Hogan crash

I met Kathy Welsch in 2010. Kathy is a Class A tour player who played on the LPGA Tour from 1974 to 1976; she’s is currently a Class A Teaching and Club Professional and Lifetime LPGA member. Kathy has an easy, balanced swing and she explained her thoughts to me during our golf game. She took the approach that all of us can and need to enjoy the game through understanding our own body types and styles — in essence, develop our own golf swing and build what she calls our own “golf house.”

The basic premise is that different bodies and different body types require different approaches to the swing. Some of these changes are small but are essential to success and consistency on the range and the golf course. Our bodies are all different from birth, they age differently and we all suffer from injuries and the scars of life.

I don’t play enough and truly have much higher expectations than I should, even though I have studied the game almost as hard as I studied for my PhD. The real problem has always been that I am just plain inconsistent and cannot routinely delivery the club to the contact/strike area the same way again and again. The wrists, the shoulders, the right knee, the left knee, the club route, the club speed and the simplicity of Newtonian physics all are areas of the swing and impact that have been hashed and rehashed by nearly every golf instructor.

How do we get good solid, repeatable contact as our bodies change? Look no further than the great Ben Hogan for some clues.

Golf body type-Hogan crashHogan’s accomplishments after his injuries from a near-fatal car accident in 1949 are well-documented.  Indeed, he may have pulled off the greatest recovery and competitive “second act” in professional golf history, going on to win the bulk of his major championships from 1951 to 1957. Is there a way to use Mr. Hogan’s recovery to help all golfers enjoy their experiences? After his injuries, Mr. Hogan’s body was quite different and this forced swing changes — changes we must all admit as we age.

Hogan’s series of articles in Sports Illustrated — which became his seminal Five Lessons book — was a great first read that I recommend this to anyone wanting to learn about the five important lessons and aspects of the game. Hogan arguably was one of the best ball strikers and maybe the best golfer of his or any era. His lessons drive us to the conclusion that managing our golf swing and the human rotation used to make repeatable rotations contribute to lower scoring and more consistent contact.

Golf body type-Hogan swings
Ben Hogan’s swing before his 1949 accident (left) and after.

We can learn from Hogan and the myriad golf instructors and their swing planes, golf tools, analytical results to help us break 80 or just enjoy the game. The book Physics of Golf by Theodore Jorgensen does an excellent job of helping us understand the physics behind the golf stroke and the transfer of energy from the club head to the ball as integrated into our swings. One of the most important chapters is titled “Developing Your Own Golf Stroke.” Several articles by Jorgensen and others examine the elements of the swing as they relate to Newtonian Physics, and the more we know about the element of a golf swing the better we understand the difficulty of integrating these elements with our own bodies. I would recommend all go back and research Mr. Hogan’s swing and the changes he made that kept him playing great golf until his final competitive rounds in the 1970s. and if you want to understand the physics you can stay with Jorgenson’s book. For me, I want to understand why I can’t hit the ball consistently, which is, of course, the key for all golfers.

In this golf tip we work from the assumption that age, body types and changes, injuries to shoulders, hips, knees and legs have lead us to understand that the golf swing is a reflection of our body types and the history of injuries we have suffered over the years. This understanding will help you to capture energy and transfer that energy to the golf ball in a repeatable fashion.

Let’s start with a solid base called the Golf House.

The Golf House is indeed a construction analogy — the chain of command in construction and dynamic movement. It refers distribution of the height (H), width (W) and depth (D) for managing the double rotation in three dimensions. During a golf swing the area covered, or the “square footage,” is the result. Blue prints for building a Golf House are the same as building a real house, though there are only three “models.” Each must conform to the Laws of Motion and must be integrated into a “Human Rotational Model” that would include a free-falling club, much like a hammer throw. The Golf House shows why we must look at every swing from a different perspective and understand the integration of body typing into our swings.

To take advantage of the body, we must first understand our differences and how they define the three dimensions. The H, W, and D, locations hold the center of gravity in place and allow the golfer to convert potential energy into kinetic energy through rotational movement. Connecting the H, W, and D to the center of gravity sharpens the key angles required in skeleton placement. The skeletal placement distributes the “mass,” or weight, of the golfer to take the greatest advantage of our strength and our friend and nemesis, gravity. Proper mass distribution is a major part of the puzzle. In fact, the angle of each skeleton joint is predetermined by body type. We can introduce the three most common body types at the joints and use these points as the foundation for successful rotation. The dynamic movement of the golf swing is a double rotation followed by the free-falling action of the club head to the strike point. To have the best chance for repetition — where the distribution and management of mass is determined by the individual’s own body, strength and flexibility — all points must act in coordination.

Kathy’s theory/concept is simple: The golf swing is a “dynamic rotational movement” that travels — contrary to walking and/or running, which are default “vertical dynamic movements.” To achieve a repeatable golf swing we need to understand how to build the Golf House from the “inside out,” hewing to aero-dynamic absolutes while keeping in mind your own body type and any injuries over the years.

golf house-body types
The three body types that make up each Golf House.

A quick look at your body inside the golf house can help you understand your body type. The templates are simple and seen in the figures above. Red is given to the shorter legged longer torso template, Green is a neutral of equal template and Blue is the longer template. Simple measure from your hip joint to your ankle and repeat the measurement from your hip to your shoulder. An equal measurement results in a “Green” body type, where shorter legs results in a “Blue” body type and longer legs represent a “Red” body type. Once you have done the initial body type, you have started your journey on understanding your swing. The key for any biomechanical sports effort is taking advantage of the space between your ears and how your body type affects your swing and eventual transfer of energy to a golf ball. The figure below shows how to turn your body type into a solid structure. Otherwise you’ll end up with a weak foundation and inefficient structure, simply because you didn’t take full advantage of the tools you’ve been given.

golf house-swing dynamics

If you are passionate golfer and are fighting to find a reproducible swing that allows you to hit the ball like Jason Day or Jordan Spieth, you must realize that will never happen. The only way to swing like Jason or Jordan is to be Jason or Jordan. You need their height, their strength, their weight, have their torso length, leg length and center of mass. The perfect Jason or Jordan swing can then be used to deliver the club face to the ball again and again in the same motion. Since you’re not Jason or Jordan, you must understand your own body and how it affects rotations and the golf swing. It’s a life-long process that will continue in the coming years. For now, let’s enjoy and rejoice in our differences and not fight our natural structure. Swing Easy, Swing Balanced and Swing in Control.

Gary Clapp, Ph.D., is Director of Workforce Development & Grants at Western Institute and an avid golfer

Editor’s Note: At the 2017 Haggin Oaks Golf Expo in Sacramento, California, Al Geiberger — 1966 PGA Championship winner and the PGA Tour’s “Original Mr. 59” — was on hand to discuss his career as both a player and teacher. He also gave clinics on the short game, including plenty of discussion about the modern swing based on what was commonly known as “stack and tilt” — the concept of keeping one’s head and torso centered over the ball through impact, with weight staying much more on the forward side throughout the swing. Though he came up through the Tour ranks alongside the likes of Jack Nicklaus and Tom Weiskopf, whose swings were in the old school mold of a much more active lower body and swaying off the ball in the backswing, today Geiberger is a big believer in the stack-and-tilt model. He could be the one asking the question: Is your swing out of date? The following instruction piece, which was originally published in Golf Tips’ 2007 Instruction Annual, brings the elements of the modern swing into clear and comprehensive focus.
Is Your Swing Out Of Date? Modern impact

The trophy cases of the likes of Nicklaus, Irwin, Miller, Stewart and Trevino are full of championship hardware, but all had swings that would now be considered old-fashioned. Yesterday’s players used a significant amount of lateral lower-body movement, which placed a lot of undue stress on the neck, hips and back. The great young players of today strive for a more stacked position at impact, which is both more efficient and much healthier for the body.

In recent years, there has been a significant shift in the technique used by the world’s best players, and it’s pretty easy to spot once you know what you’re looking for. In Jack Nicklaus’ heyday, great players like Tom Watson, Hale Irwin, Lee Trevino and even the Golden Bear himself had swings that featured a tremendous amount of leg drive through the hitting zone and a lot of upper-body hang-back. The signature look of this “old” swing was a big reverse-C finish, which had the player’s spine bent backward and the hips thrust forward.

Probably the biggest single element that contributed to the development of this swing style was the general theory that you had to keep your head down and behind the ball through impact, a technique that basically forced the player to hang back with his or her upper body. Another major contributor to the old swing was the lack of video technology. Obviously, video cameras existed, but the use of video analysis in swing theory was basically nonexistent. In addition, most teachers weren’t well schooled in bio-mechanics, and didn’t really understand how the human body is supposed to work.

In contrast, the modern swing, which evolved in large part through the use of video analysis and a solid understanding of bio-mechanics, features a more stacked position through impact, with the upper body aligned with the lower body. Today’s players employ much less leg drive and lateral slide, instead using a more rotational move that powers the club and arms by pivoting the hips and turning the body. The result is a more consistent swing that’s significantly easier on the body. If you’re interested in learning this motion, take a look at my student Ben Fox as he demonstrates it to near perfection.

ADDRESS

Is your swing out of date? Modern addressThe modern setup features a neutral eye line and level head position, meaning the head isn’t tilted away from the target at address. This position is critical to eventually creating a stacked position at impact, meaning the upper body is directly over the lower without much lateral shifting of the hips or lean-back of the spine. Along with a neutral head position is minimal spine tilt, with the right shoulder (for a right-handed golfer) only slightly lower than the left, and hands that grip the club more toward the middle of the torso rather than too far forward. Square or slightly flared feet (as opposed to Hogan’s square back foot and flared front) encourage a free turn of the body on both the backswing and forwardswing, instead of just on the downswing. In addition, slightly rounded shoulders and a head position that’s more directly over the ball removes the need to drop the head over the ball and round the shoulders during impact, which further simplifies the modern motion. Finally, modern players tend to favor a neutral or weak grip, which helps to keep the shoulders more level.

A straight, flat back that’s tilted at the hips places the head more directly over the impact zone, adding more leverage and power. Notice how the right knee is comfortably flexed at address—this must be maintained all the way through to the top.

Placing the majority of weight toward the toes at address is a must for an athletic move away from the ball. Keeping the head in a neutral position, and not allowing it to tilt toward the right shoulder, encourages a more rotational forwardswing.

Although your body weight will eventually move into your back heel at the top of the backswing, it should start more toward the toes. This way, your weight will be forced to shift properly, preventing a move toward the ball during the backswing. This common mistake prevents extension and saps power.

TOE IT UP

The key to developing a modern setup position is to focus on athleticism. Forget all you’ve learned about tucking in the right elbow, locking the right knee in position, tilting the right side down, forward pressing and the like. Many old-school setup positions were full of obvious adjustments that created tension and attempted to immobilize certain parts of the body. In contrast, the modern setup attempts to free up the body to allow the player to pivot aggressively on the backswing and forwardswing. A major difference in the modern setup and old setup is the distribution of weight in the feet. While many old-style players placed more weight toward their heels, the modern player places more weight toward the toes. This is critical to facilitating the proper pivot of the body on the backswing where the weight should work into the right heel. When the weight is incorrectly placed toward the heels, the tendency is to have the weight move toward the toes during the backswing. This mistake generally moves the body closer to the ball during the swing, minimizing extension and power through impact.

Is your swing out of date? Lee TrevinoAnother important aspect of the modern setup is the angle of the upper body and head. Basically, you want to feel that your chest is over the ball, not straight up and down. To set this position, forget about keeping your chin up, and set your eyes and chest directly at the ball. In addition, be sure to avoid bending your head and neck toward your right shoulder.  Although this feels like a natural move, allowing your right ear to get close to your right shoulder will promote a hang-back in the downswing. Instead, concentrate on a neutral head position,  or one that slightly favors your left shoulder.

In the past, many of the world’s best players, like Lee Trevino, utilized a setup position featuring a head that pointed well behind the ball (notice where the brim of Trevino’s cap is pointing) and a significant degree of spine tilt, with the right shoulder well below the left. In addition, the old setup tended to place more weight in the heels. All of these elements combined to promote a Is your swing out of date? Top of backswingless-balanced position that often led to a reverse weight shift. Although Trevino is hitting a driver in the photo above, his right shoulder is still significantly lower than that of the modern swinger.

TOP

Many old-style swingers, like the late Payne Stewart, locked their right knee at the top of the swing and took the club well past parallel. Although this often gave the swing a long, flowing look, it required extraneous movement that made it difficult to manage for those who lacked world-class talent. Many amateurs take this a step further and allow their right hip to move laterally during the backswing while locking the rear leg, creating a nasty reverse pivot as illustrated in the picture at the bottom of the page (in red). In contrast, notice how Ben’s right knee remains flexed, his right hip and shoulder are rotated away from the ball with no lateral movement, which maintains the space between his knees. Unlike the old-style top that requires compensations in the transition, the modern position is ready to go.

Is your swing out of date? Payne Stewart To learn the sensation of a proper pivot on the backswing, flex your knees and place the palms of each hand on each knee. Keep your back straight and your head in a relatively neutral position. Then simply rotate your right hip pocket in a clockwise direction while maintaining your hand-knee connection. Turn, don’t sway.

Ben’s extremely compact and dynamic position at the top illustrates how athletic the golf swing can be. Many players in the past lifted the front heel, locked the back leg and swung the club past parallel. Conversely, the modern position at the top is strong, simple and without any slack.

During the takeaway and move to the top of the swing, the body should feel connected and synchronized. Keep your hands on your knees and turn back instead of swaying to help ingrain this feel.

Is your swing out of date Modern deliveryDELIVERY

To help instill the feeling of a proper transition and delivery position, try the following drill. Place your golf bag behind your rear end and assume your setup position. The bag should be just behind you, but not touching your body. At the top of the swing, the right portion of your butt should come into contact with the bag, and as you turn into delivery and impact, the left portion should immediately make contact, and maintain that contact through impact. Be sure to move your head along with your body, and rotate your hips instead of sliding them. The key here is to maintain the same distance from the ball all the way through the swing. If you do get closer to the ball, your arms won’t have room to extend.
is your swing out of date? Hale Irwin Notice how Ben’s left shoulder is closer to the target than is his left hip while his head is straight up and down over the ball. There’s no hang-back here, but rather a free-flowing rotation into the hitting zone. Remember, there’s a lot of power in the right side of your body—don’t leave it stuck behind the ball.

The old delivery style, as demonstrated by a young Hale Irwin to the right, featured a sliding of the knees and hips in a lateral direction, with the upper body and head stuck behind the ball. As a result, a lot of players like Irwin tended to hit high shots that hung in the air and didn’t have much penetration. A significant reason for this relatively weak position approaching impact was the old theory of keeping the head behind the ball. In contrast, note Ben’s stacked position approaching impact, with his upper body directly above his legs. Also, notice the position of his head—it’s not bent back behind the ball, but is clearly moving with his body.

CRITICAL DRILL

A proper pivot is critical to executing a proper delivery. To learn the sensation of a proper pivot, try the bag drill and concentrate on keeping your body away from the ball all the way.

Is your swing out of date-ImpactIMPACT

Obviously, impact is the most important moment in the golf swing, as it determines the quality of both ballstriking and shot direction. Below, you’ll notice Johnny Miller’s classic old-style impact position, with his knees and left hip slid well past the golf ball and his head stuck behind it (not to mention the pants). If you drew a line from Miller’s left shoulder straight down to the ground, it would pass well inside his left leg. In stark contrast, notice how Ben’s upper body and legs are in line, with almost no lateral sliding of any kind. His left hip has rotated (compare the position of Ben’s belt buckle to Miller’s)  and he has slung the club into impact by pivoting his body, not hitting with his arms. You’ll also notice that his head is moving with the rotation of his body, not holding it back. This movement of the head with the body and club (demonstrated by many of today’s modern players, including, most notably, Annika Sorenstam), not only frees up the release of the arms and club, but also allows the right side to turn into the golf ball without being impeded by the rest of Is your swing out of date-Johnny Millerthe body. Unlocking the right side is a great source of power that you need to tap.

This position is the essence of the modern athletic swing. The reason Ben’s back is so nice and straight, and his body is so stacked at the moment of impact, is because he’s powering the club with his core, not his hands and arms. This type of motion is much more rotational than that used by players in Johnny Miller’s era and, as a result, features much less lateral movement. You can imagine how much easier this position is on your back.

Johnny Miller’s U.S. Open victory at Oakmont was legendary, but his impact position is definitely “old school.” His legs have outraced his body by sliding toward the target excessively, and his head has hung back. Miller was still able to make great contact because he got his hands and arms in a fantastic position through the hitting zone.

IMPACT DRILL

To improve the quality of your ballstriking, you need to ingrain the proper position at impact. To do so, assume your normal address position, then move the ball slightly forward and a little closer to your body than usual. Once you’ve set up in this manner, simply concentrate on striking the ball with your body and head leading the club into the shot. The forward and slightly inside ball position will force you to get your upper body motivated to move forward and in a counterclockwise direction, which, in turn, will make hanging back impossible. Again, notice how Ben’s body is stacked at impact, not bent back, with his right side firing into the ball. There’s no lateral slide here, just a lack of tension and strong, rotational power.

Is your swing out of date-ReleaseRELEASE

The modern release features no hang-back or tension whatsoever. Instead, it’s free-flowing and relaxed, yet extremely powerful. Because the release is a product of a solid pivot motion in which the body—not the arms and hands—power the club through impact, you should see a natural and full extension of the arms almost as if they have been thrown out uncontrollably by the power of the pivot.

In Ben’s photo, you’ll see that the right side of his body, including his right shoulder and lat, is on top of his lower body in a high, stretched position. His right shoulder is now closer to the target than is his left, which is made possible by his hips and core, which are rotated in a counterclockwise direction with no indication of lateral sliding. Basically, he has slung his arms and the club with his core strength instead of with the muscles in his arms and hands. His head is clearly moving with the swing, as indicated by the way his body is working over and into the finish instead of  backward away from the target, as you can see in the picture of Jack Nicklaus below. The major key here is that there’s no backward bend of the spine and, as a result, there will be no reverse-C finish. The modern swing is more upright and less stressful on the body—a bonus for golfers both young and old.

Is your swing out of date-Nicklaus The Golden Bear is arguably the greatest competitive golfer of all time, but now he has an artificial hip. Looking at his release position, it’s not hard to see why Nicklaus has back and hip problems—his head is stuck behind the ball, and his hips have slid laterally, placing a tremendous amount of stress on his body.

RELEASE DRILL

To develop the proper release, take two irons and grip them together to form a weighted club. Assume your address position and place the clubheads on the ground, well behind your right foot. Using the pivot of your hips and the strength in your body’s core, drag the clubheads along the ground as you would a broom. When you approach the impact zone, use your core to heave your arms and clubs through impact and into the release and finish. Remember to keep turning your body in a counterclockwise direction all the way through.

PGA professional Brady Riggs teaches a number of top junior and aspiring professional players at Woodley Lakes GC in Van Nuys, Calif. Ben Fox was the 2006 Southwestern Amateur champion. Photos shot at Tierra Rejada GC (www.tierrarejada.com) in Moorpark, Calif.


0
0
Your Cart
Your cart is emptyReturn to Shop