September 16, 2026

golf swing

Adjust Your Swing, Equipment, and Strategy to Play Your Best Golf All Autumn Long.

As the humid haze of midsummer fades into crisp morning breezes and vibrant foliage, golfers everywhere face an annual crossroad. It is easy to view autumn as the sunset of the golf season—a time when clubs start gathering dust in the garage and tee times become an afterthought. Yet ask any seasoned player, and they will tell you the exact opposite: fall is arguably the absolute best time of year to play. The fairways are firm, the air is refreshing, and the courses offer breathtaking backdrops.

To make the most of this golden season, you do not need a complete swing overhaul. You simply need a slight shift in mindset, a few smart equipment adjustments, and a willingness to embrace the changing elements.

Riding the Momentum: Don’t Put the Game on Cruise Control

By late summer, most golfers have established a rhythm. Your tempo is dialed, your contact is consistent, and you have built up valuable course muscle memory over months of regular play. The biggest mistake players make right now is pulling back on their schedule just as their game peaks.

Vibrant autumn foliage frames a pristine green, showing off fall’s best scenic course conditions.

To keep that momentum rolling, rethink how you structure your golf week. If daylight savings time or cooler evenings cut into your post-work nine holes, shift your focus toward quality practice rather than full rounds. A brisk 45-minute evening session focusing on short-game touch or wedge distance control keeps your hands sensitive and your feel sharp. When weekend rounds do arrive, you will step onto the first tee feeling warmed up and ready, rather than trying to shake off a week’s worth of rust.

The Cold Hard Physics of Cold Weather Golf Balls

One of the most noticeable differences in autumn golf comes down to simple physics and ball compression. Cold air is denser, creating more drag on the ball in flight. At the same time, cold weather affects the golf ball itself: lower temperatures cause the core material of the ball to firm up, making it feel harder off the clubface and reducing core spring energy.

Switching to soft, low-compression balls maintains optimal feel and distance as temperatures start dropping.

How to Choose the Right Ball for Fall Conditions:

1. Drop to a Lower Compression Rating: If you normally play a firm tour-style ball (like a Titleist Pro V1x or TaylorMade TP5x), consider switching to a softer, lower-compression model (such as a Titleist AVX, Callaway Chrome Soft, or Srixon Soft Feel). A lower-compression ball compresses more easily under cold temperatures, helping restore felt feel off the club and maximizing distance when swing speeds naturally slow down slightly.

2. Keep Your Balls Warm Before Teeing Off: Keep a couple of golf balls in your pants pocket between holes. Body heat helps maintain the core temperature of the ball, ensuring optimal energy transfer at impact.

3. Expect Less Distance Overall: Combine denser air with firmer ball reaction, and you will lose about 2 to 3 yards for every 10-degree drop in temperature. Adjust your expectations and club selection accordingly.

Reading the Elements: Playing Smart in Cooler Air

Transitioning to fall golf requires accepting one fundamental physics rule: cold air is denser than warm air, and golf balls simply do not fly as far. Add in extra layers of clothing that slightly restrict your turn, and you can expect to lose anywhere from half a club to a full club in distance.

Wearing cozy layers maintains smooth swing tempo during a crisp autumn session.

Instead of trying to swing harder to force your midsummer yards—which usually leads to tense, off-center hits—club up generously. If you normally hit a 7-iron from 150 yards, pull a smooth 6-iron. Focus on a relaxed, effortless rhythm. Additionally, pay close attention to turf conditions. Autumn morning dew leaves fairways damp, meaning less roll on your drives, while afternoon leaves can hide a ball that strays just a few yards off the fairway. Playing target golf and favoring accuracy over raw distance will keep your scorecards clean.

Two Simple Fall Swing Fixes to Take to the Range

While you shouldn’t overhaul your mechanics mid-season, fall is the ideal time to refine a couple of low-effort, high-reward feel drills during your Sunday practice.

. The Low-Tee Stinger Drill: With breezy autumn weather rolling in, learning to control trajectory is a game-changer. Tee the ball low—just half an inch above the turf—and move it back an inch in your stance. Focus on finishing with your hands low around chest height on the follow-through. This naturally lowers your launch angle, keeping your ball flight penetrating under wind gusts.

. The “Two-Putter Cover” Contact Drill: Damp fall greens mean your putting stroke needs crisp, center-face contact to roll smoothly. Place two headcovers on either side of your putter head, leaving just half an inch of clearance on the toe and heel. Practice taking short, smooth strokes without clipping the covers. It instantly solidifies your stroke paths on slower autumn greens.

Embracing the Season’s Rewards

Ultimately, autumn golf is about enjoying the unique charm of the game when nature puts on its best show. Pack a lightweight windbreaker, swap in a slightly softer golf ball that responds better in low temperatures, and keep a micro-fiber towel handy for damp turf. With a few minor tweaks to your routine, the fall months won’t just mark the end of another year on the links—they might just produce your best rounds yet.

Are you choosing the correct side of the tee box for your swing?

If you’re guilty of trying to make a driver swing change in the middle of your round like most, you’ve probably realized that it isn’t the greatest way to play. Instead of trying to make mechanical changes, try playing with the shot that you have for that day and take advantage of your surroundings instead. Most tee boxes are wide enough to set up in a variety of locations, so let’s figure out which side is the correct side for you. In general, whatever side you fear hitting to, you will go to that side of the box.

Scenario 1

Let’s say that you are a player who absolutely hates missing the shot to the left. I would suggest that you set up on that side of the tee box to eliminate the left side. If you tee it up on that side, you will open up more of the right side of the hole.

To help avoid the left side of the fairway. Tee it up on the left.

Scenario 2

If the right side of the hole makes your blood boil, try teeing it up on the right side of the tee box, so you’ll be more inclined to aim out toward the left side.

Golfer who typically fade or slice the ball, you should tee it up on the right side.

Scenario 3

The middle of the tee box works best if your miss is minimal both ways and if you’re teeing off with a shorter club.

If you hit pretty straight then you are generally safe to tee it up in the middle.

Bonus Tip:

Did you know that you can set up with your feet outside of the tee markers? As long as the ball itself is teed up within the parameters of the markers, it is completely legal. As extreme as this may be, it comes in handy if the teeing ground is uneven or if there are divots all over.

As long as the ball itself is teed up within the parameters of the markers, then this is completely legal.

Summary:

Instead of making mechanical swing changes during a round, golfers should use tee box positioning to manage their ball flight and fear of hazards. Align on the side of the tee box that corresponds to the side you fear missing on, or use the center for minimal misses, notes instructor Cathy Kim

Tip provided by: Cathy Kim, PGA/LPGA Professional & Top 25 Instructor

Why Mastering the End of Your Swing Fixes the Start.

Welcome to the finale of our four-part transformation. Over the last three days, we’ve built a rock-solid foundation, wound your core into a high-tension spring, and mastered the “Gravity Drop” that delivers the club with professional sequencing. You’ve done the hard work of rebuilding the machine. Now, it’s time to learn how to stick the landing. Have you ever wondered why the best players in the world—from Tiger Woods to Nelly Korda—look like they’re posing for a bronze statue after every shot? They hold that finish, chest high and eyes on the ball, until it disappears into the horizon. It’s not vanity. It’s not for the cameras. A balanced, held finish is the ultimate “receipt” for a perfect swing.

If you find yourself stumbling forward toward the ball, “walking” after your shot, or falling back toward your heels, it is a definitive sign that your swing path was a mess long before impact. Your finish is the diagnostic tool for everything that happened in the previous two seconds. Today, we’re closing the loop. We’re going to focus on the end of the swing to fix the beginning.

The Finish as a Mirror: Diagnosing Your Faults

In golf, the “result” isn’t just where the ball goes; it’s how your body ends up. Your brain is an incredible compensation machine. If you swing too much from the outside (the slice path), your weight will naturally pull toward your toes to keep you from falling over. If you swing too much from the inside, you might find yourself falling back toward your heels.

By forcing yourself into a specific, balanced finish position, you are actually “reverse-engineering” your swing. When you commit to a pro-level finish, your brain subconsciously self-corrects your swing path and tempo mid-stream to make that balance possible. You cannot hold a perfect finish if your transition was violent or your path was crooked. To own the finish is to own the fairway.

The Drill: The “Three-Second Freeze”

This drill is the ultimate lie detector. It’s easy to fake a good swing for a split second at impact, but you can’t fake balance once the club has stopped moving.

The Mission: To prove your swing was in total equilibrium and that you used your “foundation” from Day One correctly.

1. The Setup: Head to the range or your backyard net. Grab a mid-iron, like a 7-iron, and go through your full routine: the Wall-Butt hinge, the Shoulder-to-Chin load, and the Step-In transition.

2. The Action: Swing through and make contact. But here’s the catch: You are strictly forbidden from moving your feet, dropping the club, or “stepping out” of the swing until the ball hits the ground (or for at least three seconds if you’re hitting into a net).

3. The Checkpoint: While you are “frozen” in your finish, run through this mental checklist:

. The Chest: Is your shirt buttons (or chest) facing directly at the target or even slightly left of it?
. The Weight: Is 95% of your weight on your lead leg? You should feel like you could stay there all day.
. The Trail Foot: Is your trail shoe completely vertical, with only the very tip of the toe touching the turf?The Spine: Are you standing tall, or are you “crunching” over?

4. The Payoff: If you can’t hold this for three seconds without wobbling, you’re swinging “out of your shoes.” It means you’re trying to generate speed with effort rather than with the sequencing we’ve built this week.

Did you notice any specific wobbles during your first few Three-Second Freezes, or were you able to stay rock-solid right away?

Efficiency Over Effort

The “Three-Second Freeze” teaches you the difference between forced power and efficient power. When you swing within your balance, you create a more consistent strike. A center-face hit at 80% effort will always out-drive a toe-hit at 100% effort.

The finish is where you prove you stayed “connected.” If your arms and body finished together, you’ll be as stable as a tripod. If your arms raced ahead or your body outran your hands, the “statue” will crumble. By mastering the finish, you’re training your nervous system to maintain control through the most violent part of the swing.

Summary: The Receipt of Success

The finish is where you diagnose your game. It’s the final grade on your four-day exam. When you commit to a full, balanced follow-through, you remove the “hit” impulse and replace it with a “swing” motion. You’ve now completed the circle. You started with a foundation that allowed for movement, you built a turn that created tension, you mastered a transition that used gravity, and now you’ve learned to hold it all together until the very end.

The Final Word

You’ve gone from a shaky, “Rubik’s Cube” setup to a pro-level finish. You have the blueprint in your hands: Posture, Load, Transition, and Balance. The instruction phase is over. Now, it’s time to stop reading and start swinging. The transformation won’t happen sitting on the couch; it happens in the dirt. Grab your bag, head to the first tee, and show your playing partners what a four-part transformation looks like. Your skyscraper is built—now go see how far the penthouse can hit it.

Need more help? You’ll find it here at golftipsmag.com

Often when you make a change in your golf swing, things feel weird. It’s only natural that when you have been doing something wrong for an extended period and you then make a complete U-turn, your brain is going to resist it. 

We often refer to this as “feel vs real.” What you feel as being correct typically isn’t what is really happening in your swing. Any change you make in your swing sometimes will be counterintuitive.

Recognizing key positions within the golf swing will go a long way toward taking full ownership of your golf swing and cultivating the correct feel when it comes to making changes. These key positions can be broken down into four points: setup, top of the backswing, impact and finish. 

Setup is obviously the starting point and foundation of the golf swing. Any imperfections in your setup will cause other parts of the swing to break down. Always make sure that your fundamentals are in order, including grip, posture and alignment. 

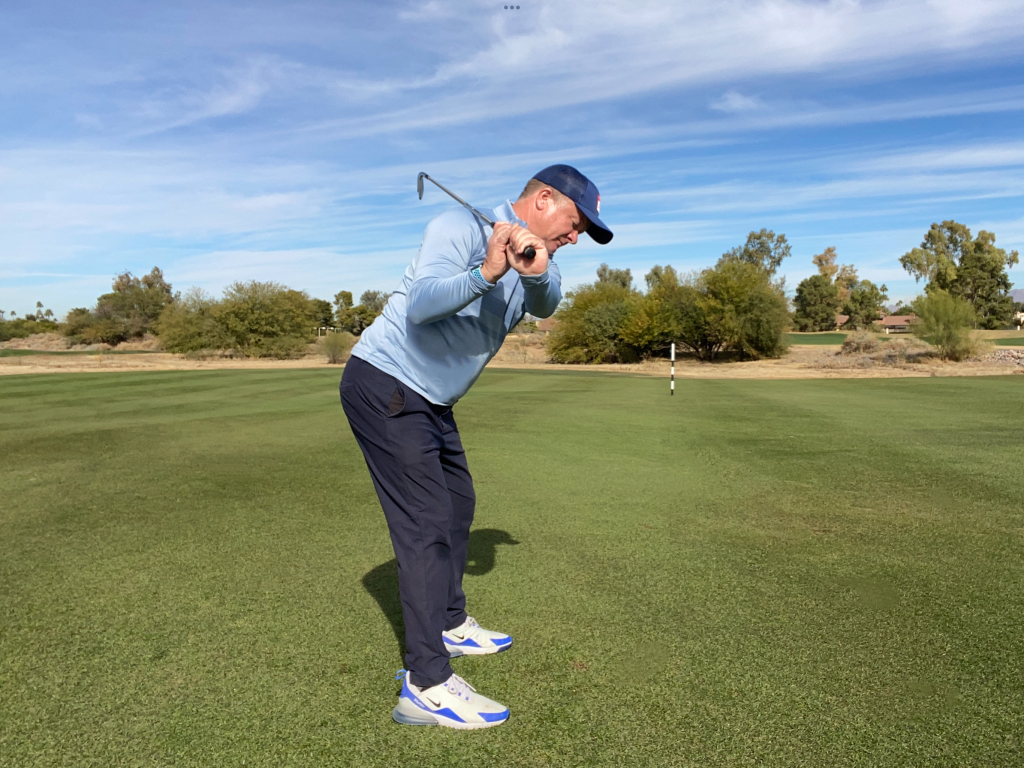
The true starting point of the golf swing, though, is the top of your backswing. Think of it as the starting line of your downswing, and there is a race between your hips, shoulders, arms and hands to get the club back to the golf ball. 

Often, though, golfers never complete their backswings, which throws off all the timing on the downswing. Most golfers don’t know what it feels like to make a full backswing. Depending on the body’s flexibility, your top backswing position might be longer or shorter than your playing partner’s. 

Don’t be concerned with how far the club goes back or gets at the top of the backswing. There are players we see on Tour who fully rotate their bodies but look like they are only making a three-quarter swing. 

On the opposite side of this, John Daly has had an amazing career taking the club past parallel on his backswing, which is credited to his flexibility. Is either one better than the other? No; if you maximize your body’s rotation, you can then start creating the right feel for completing your backswing.

Not completing your backswing doesn’t allow a golfer to sequence their downswing correctly back to the golf ball. Typically, the shoulders haven’t turned 90 degrees to a point where the left shoulder (right if you are swinging lefthanded) doesn’t get underneath the chin. The lead arm will also chicken wing, and the hands never get above the shoulders. This all will cause the body to pivot incorrectly and transfer the weight on the backswing.

To create the correct feel for a complete backswing, start by standing upright with your back straight and legs locked. Hold the golf club out in front of you and fully hinge the club head up toward the sky. The shaft of the golf club should be parallel to your chest while your left arm remains straight. This will help you feel what it is like to fully set the club with your hands and wrists.

While maintaining your wrist hinge, tilt your pelvis to create enough spine tilt that mimics a 45-degree angle. Your back should stay relatively straight. If you lean from your waist, your spine angle will curve, creating more of a slouching posture. Soften the bend in your knees at the same time so that you feel like your weight is on the balls of your feet. Keep the shaft of the golf club parallel to your chest by maintaining your wrist hinge. 

Rest the shaft of the club on your trailing shoulder. If you must let your left arm fold slightly to get the club there, that is OK. Rotate your shoulders as far back as possible. The goal is to get your left shoulder underneath your chin while maintaining your spine angle. A good feeling here is to make sure that your left shoulder is slightly lower to the ground than your right. If your shoulders are level, you have lost your posture and have not fully rotated.

Fully extend your hands away from the body and toward the sky while maintaining your spine angle and posture. A good indication of a complete backswing is where your shoulders have rotated twice as much as your hips, weight is on the inside of your back heel, and your hands have raised above your shoulders. Don’t be surprised if it feels like you are stretching more than you have before. 

Tip provided by: Alex Fisher, PGA & Top 25 Instructor

0
0
Your Cart
Your cart is emptyReturn to Shop