September 15, 2026

golf posture

The “Tough Two”: When the Ball is Above and Below Your Feet.

Think back to your last round—how many times did you actually have a perfectly level stance? If you’re like most golfers, you can probably count them on one hand. Golf is a game of slopes, yet we spend hours practicing on level ground. To truly take your game from the range to the course, you must understand how to work with gravity, not against it, by adjusting your setup for every incline. Understanding what may or may not happen from these uneven lies and making the necessary set-up adjustments are extremely important to executing the shot and minimizing the BIG mistakes.

When executing any of the uneven lies, use these three steps to help.

Step 1: Take several practice swings to get a feel for the slope
Step 2: Swing at 75% tempo
Step 3: Use a three-quarter length swing

Here we’ll discuss the two toughest uneven lies: Ball above your feet and ball below your feet.

Uneven Lies: Ball Above Feet

Uneven Lies: Ball Above Feet

Option 1: Action-Oriented Flow

“To execute this shot correctly, start by choking down slightly on the grip for better control. You’ll want to aim just right of your target to account for the ball’s flight path while shifting your weight toward your toes to keep the movement dynamic. Complement this by adopting a more upright posture at address, and consider using less club than usual; this helps take some speed off the swing and effectively reduces the risk of a hook.”

Option 2: Casual & Direct

“When setting up, try shortening your grip and aiming a bit to the right to give yourself some room to work. Keeping your weight on the balls of your feet and maintaining a taller, more upright stance will help stabilize your plane. Finally, reach for less club—it’s one of the easiest ways to kill that unwanted hook and keep your ball on a straighter line.”

Key Adjustments Included:

. Choking down: Improving control.
. Aiming right: Counteracting a hook.
. Weight on toes: Promoting balance and athletic movement.
. Upright posture: Creating a more repeatable swing plane.
. Less club: Reducing swing speed to minimize excessive curvature.

SWING – The more lofted club you use for this shot, the further the face will point to the left. Using a lower lofted club will point closer to the target at address and reduce the amountof hook on the shot. This lie shifts the ball closer and higher to you than normal, which will steepen the swing plane, causing you to hit too much ground. At impact, feel the club just brushing the top of the grass. The slope, and a flatter swing plane, will create a right-to-left flight.

Uneven Lies: Ball Below Feet

Uneven Lies: Ball Below Feet

Option 1: Technical & Instructive Flow

“To properly address the ball and guard against a slice, start by gripping up on the club to utilize its full length for maximum leverage. Set your alignment by aiming slightly left of your target, which helps square the face at impact. At address, shift your weight toward your heels and increase your knee flex to create a deeper, more stable base. Finally, opting for a club with more loft is a simple but effective equipment tweak that reduces the side spin responsible for a slice, keeping your ball flight straighter.”

Option 2: Casual & Action-Oriented

“Setting up for success starts with your hands—grip further up the club to gain a bit more extension and power. You’ll want to aim to the left of your final destination to account for any natural curve, while sitting back with your weight on your heels and adding a bit more bend in your knees. This grounded stance, combined with the extra help of a higher-lofted club, will work together to kill off that slice and keep you in the fairway.”

Key Adjustments Included:

. Grip up: Maximizing club length for leverage.
. Aim left: Offsetting the left-to-right curvature of a slice.
. Weight on heels: Promoting a more stable, grounded foundation.
. Increase knee flex: Lowering your center of gravity for balance.
. More loft: Reducing the axis of side spin to straighten out ball flight.

SWING – This is by far the hardest of the uneven lies. Why? In this situation, your swing needs to be more upright than normal WITHOUT changing your posture or knee flex duringthe backswing. Opposite of the other lie, the ball is now further away, making is easier for you to thin or top the shot. Keep your chest down and keep your knee flex throughout the swing, including the finish. Use a club with more loft to help increase backswing on the ball which will reduce the amount of slice. Play for a left-to-right shape and stay down.

Summary

To wrap up these techniques, it’s all about understanding how small setup tweaks can completely alter your ball flight. The first shot requires a more athletic, “tall” posture with the weight forward to help you hold off a hook and maintain precision. Conversely, the second shot focuses on creating a deeper, more stable foundation with a lower center of gravity to help square the face and eliminate a slice.

By mastering these opposing adjustments, you gain the ability to troubleshoot your swing flaws in real-time and keep your ball on the intended line.


Why Mastering the End of Your Swing Fixes the Start.

Welcome to the finale of our four-part transformation. Over the last three days, we’ve built a rock-solid foundation, wound your core into a high-tension spring, and mastered the “Gravity Drop” that delivers the club with professional sequencing. You’ve done the hard work of rebuilding the machine. Now, it’s time to learn how to stick the landing. Have you ever wondered why the best players in the world—from Tiger Woods to Nelly Korda—look like they’re posing for a bronze statue after every shot? They hold that finish, chest high and eyes on the ball, until it disappears into the horizon. It’s not vanity. It’s not for the cameras. A balanced, held finish is the ultimate “receipt” for a perfect swing.

If you find yourself stumbling forward toward the ball, “walking” after your shot, or falling back toward your heels, it is a definitive sign that your swing path was a mess long before impact. Your finish is the diagnostic tool for everything that happened in the previous two seconds. Today, we’re closing the loop. We’re going to focus on the end of the swing to fix the beginning.

The Finish as a Mirror: Diagnosing Your Faults

In golf, the “result” isn’t just where the ball goes; it’s how your body ends up. Your brain is an incredible compensation machine. If you swing too much from the outside (the slice path), your weight will naturally pull toward your toes to keep you from falling over. If you swing too much from the inside, you might find yourself falling back toward your heels.

By forcing yourself into a specific, balanced finish position, you are actually “reverse-engineering” your swing. When you commit to a pro-level finish, your brain subconsciously self-corrects your swing path and tempo mid-stream to make that balance possible. You cannot hold a perfect finish if your transition was violent or your path was crooked. To own the finish is to own the fairway.

The Drill: The “Three-Second Freeze”

This drill is the ultimate lie detector. It’s easy to fake a good swing for a split second at impact, but you can’t fake balance once the club has stopped moving.

The Mission: To prove your swing was in total equilibrium and that you used your “foundation” from Day One correctly.

1. The Setup: Head to the range or your backyard net. Grab a mid-iron, like a 7-iron, and go through your full routine: the Wall-Butt hinge, the Shoulder-to-Chin load, and the Step-In transition.

2. The Action: Swing through and make contact. But here’s the catch: You are strictly forbidden from moving your feet, dropping the club, or “stepping out” of the swing until the ball hits the ground (or for at least three seconds if you’re hitting into a net).

3. The Checkpoint: While you are “frozen” in your finish, run through this mental checklist:

. The Chest: Is your shirt buttons (or chest) facing directly at the target or even slightly left of it?
. The Weight: Is 95% of your weight on your lead leg? You should feel like you could stay there all day.
. The Trail Foot: Is your trail shoe completely vertical, with only the very tip of the toe touching the turf?The Spine: Are you standing tall, or are you “crunching” over?

4. The Payoff: If you can’t hold this for three seconds without wobbling, you’re swinging “out of your shoes.” It means you’re trying to generate speed with effort rather than with the sequencing we’ve built this week.

Did you notice any specific wobbles during your first few Three-Second Freezes, or were you able to stay rock-solid right away?

Efficiency Over Effort

The “Three-Second Freeze” teaches you the difference between forced power and efficient power. When you swing within your balance, you create a more consistent strike. A center-face hit at 80% effort will always out-drive a toe-hit at 100% effort.

The finish is where you prove you stayed “connected.” If your arms and body finished together, you’ll be as stable as a tripod. If your arms raced ahead or your body outran your hands, the “statue” will crumble. By mastering the finish, you’re training your nervous system to maintain control through the most violent part of the swing.

Summary: The Receipt of Success

The finish is where you diagnose your game. It’s the final grade on your four-day exam. When you commit to a full, balanced follow-through, you remove the “hit” impulse and replace it with a “swing” motion. You’ve now completed the circle. You started with a foundation that allowed for movement, you built a turn that created tension, you mastered a transition that used gravity, and now you’ve learned to hold it all together until the very end.

The Final Word

You’ve gone from a shaky, “Rubik’s Cube” setup to a pro-level finish. You have the blueprint in your hands: Posture, Load, Transition, and Balance. The instruction phase is over. Now, it’s time to stop reading and start swinging. The transformation won’t happen sitting on the couch; it happens in the dirt. Grab your bag, head to the first tee, and show your playing partners what a four-part transformation looks like. Your skyscraper is built—now go see how far the penthouse can hit it.

Need more help? You’ll find it here at golftipsmag.com

Why Your Swing is Over Before It Even Starts

The Foundation of Power: Why Your Setup is Sabotaging Your Swing

Welcome to Day One of your transformation. You aren’t here to “tweak” a few things; you’re here because you’re tired of the inconsistency that haunts every amateur’s weekend.
This is the first of a four-part series designed to strip your game down to the studs and rebuild it with the precision of a professional. Most golfers approach the tee like they’re trying to solve a Rubik’s Cube while falling out of a plane. They focus on “fixing” their swing mid-air—trying to manipulate the clubface at 100 mph—but the truth is much simpler: you’re sabotaging yourself before you even move the club.

Think of your setup like a skyscraper’s foundation. If the concrete is tilted at the base, it doesn’t matter how expensive the glass is or how pretty the penthouse looks; eventually, the whole thing is coming down. In golf, that “collapse” looks like a snap-hook into the trees or a thin shot that rattled your teeth. Today, we’re ending the guesswork. We’re getting your body into an aggressive, athletic position that makes success inevitable.

The Anatomy of the Athletic Setup

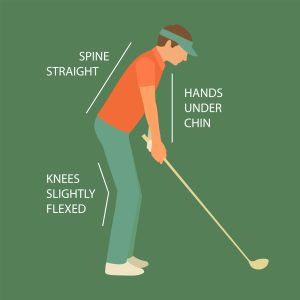
Before we touch a club, we have to talk about posture. The biggest mistake high-handicappers make is confusing “bending over” with “hinging.” When you simply bend over, you round your spine, tuck your chin into your chest, and kill your ability to rotate.

You become a hunchback, and a hunchback cannot move with speed. A pro-level setup requires Dynamic Balance. This means your weight isn’t on your heels (which causes a slice) or on your toes (which causes a shank). It’s centered over the balls of your feet, allowing your large muscle groups—the glutes, quads, and core—to bear the load. When you sit into a proper posture, you create “secondary tilt.”

This is the slight angling of the spine away from the target. It creates the “room” your arms need to swing freely. Without this space, your brain realizes mid-downswing that your knees are in the way, forcing you to “stand up” through impact. We call this early extension, and it is the primary killer of distance.

The Drill: The “Wall-Butt” Posture Check

To find this position, we’re going to use a tool you have at home: a flat wall. This drill removes the ego and the golf ball from the equation so you can focus entirely on feel.

The Mission: To find that elusive “athletic hinge” and create a flat back without looking like a hunchback or a folding chair.

1. The Starting Block: Stand with your back to a wall, feet shoulder-width apart. Position your heels about six inches away from the baseboard. Stand tall, shoulders back, and look straight ahead.

2. The Hinge: Place your hands in the creases of your hips (where your thighs meet your torso). Without bending your knees yet, push your hips backward. Your goal is to “hinge” at the pelvis until your glutes lightly graze the wall behind you.

3. The Soften: Once your glutes touch the wall, add a very soft flex to your knees—just enough to unlock them. Let your arms hang naturally. They should feel like “dead weight,” dangling straight down from your shoulder sockets.

4. The Checkpoint: If you’ve done this correctly, you will feel a slight tension in your hamstrings and your weight will be distributed over the balls of your feet. You should feel “heavy” and connected to the ground, yet ready to spring in any direction. This is the blueprint for a repeatable swing.

How did the Wall-Butt drill feel on your first few tries—did you notice any tension in your hamstrings?

The blueprint for a repeatable swing, begins with a solid foundation.

Why “Dead Weight” Arms Matter

In the drill above, I mentioned letting your arms hang like dead weight. This is a secret many pros won’t tell you: Tension is the enemy of speed.

When you reach for the ball or pull your arms in too tight, you create tension in the forearms and shoulders. This tension acts like a brake on your swing. By finding the correct hip hinge against the wall, your arms naturally hang in a position where they can swing like a pendulum. This “hanging” position ensures that the club travels on a consistent arc, reducing the need for your hands to “save” the shot at the last second.

Summary: Balance is Your Only Constant

A great setup isn’t a suggestion; it’s a requirement. By mastering your hinge and your weight distribution, you eliminate the frantic compensations that lead to those “where did that come from?” misses.

When you start in balance, you stay in balance. You’ve now built a frame that can handle high-velocity rotation. You’ve cleared the path for your hips to turn and your arms to fire. Most importantly, you’ve stopped fighting your own anatomy.

What’s Next?

Congratulations—you’ve officially moved out of the “hopeful” category and into the “intentional” one. You’ve got the stance of a pro, but let’s be honest: a statue doesn’t hit 300-yard drives.

A great setup is just a loaded gun; tomorrow, we’re going to learn how to pull the trigger. We’re taking this rock-solid blueprint and turning your body into a high-tension spring. We’re moving from Posture to Power.

Check back tomorrow for Part 2, where we break down the “Coil vs. Turn” and show you how to generate effortless speed without swinging harder.

0
0
Your Cart
Your cart is emptyReturn to Shop