October 17, 2026

Full Swing

Golf Launch Pad Address

Golf Launch Pad AddressJust what is a golf launch pad, and how does it lead to a more efficient and powerful swing? I’ll show you, but first a little background.

Each golf season, as a full-time teacher and coach, I re-examine techniques that I use, as well as the techniques of others. During the past 10 years, we have watched golf instruction and golf technique information evolve. The how-to’s, if you will, explode in abundance to the point where the student desperately needs, I feel, someone to help them not only with their golf game, but with any potentially confusing information that might divert the student from a properly focused path to improvement.

As my friend and mentor Bill Strausbaugh (1992 National PGA Teacher of the Year) repeatedly reminded me, “Proper golf instruction is based on a few key principals that are learned and then worked on forever.” It is my feeling that personal golf instruction — that is, live instruction between professional and student — has become far too complex. I also feel strongly golf is severely over-taught and under-coached.

An instructor should first diagnose a student’s motion and decide in his or her own mind on a starting point. Sound fundamentals affect any golf motion. They must, in fact, be solidly in place first: grip, base, ball position, posture, spacing, weight distribution, alignment, and tension levels of the arms and hands. All these items form  the launching pad (traditionally called the setup) — what I call The First Bookend.

The golf launch pad is static as opposed to the swing, which is dynamic. All dynamic swing cancers can be traced back to the launching pad/setup (Photo 1). Most students who come for instruction at the club level don’t understand the vital importance of a sound launching pad, and don’t realize how dramatically the cause-and-effect results of improper launching pad conditions affect the student’s ability to make solid contact with the ball on a regular basis — and produce the type of trajectory and ball flight that will allow the student to control the ball and advance it around the course toward an acceptable score.

For example, the vast majority of club players (Tour players and club professionals) tend to align themselves too far into right field (right handed players) with their bodies; therefore, their club face is often aiming right of the foul line (or you might say into the right rough). I like to view the target area in front of the player (i.e., the fairway off the tee and the green for my approach shots) as a base-ball diamond. When I prepare a student to both optically as well as conceptually understand alignment, I ask he or she to feel as if they would like to aim their club face at the second base bag and their body lines (feet, knees, hips, and shoulders) at the shortstop. I also stress the shoulders may feel slightly (and I stress slightly) more left than the shortstop. Most players I encounter will aim their body, not club face, at the second base bag and their club face at the sec-ond baseman while optically they’re commanding the nerve center to propel the ball over second base. Their conscious intent and their perceived actuality doesn’t match; therefore, disaster looms.

Golf Launch Pad Extension
A solid launch pad at set-up leads to great extension after impact.

Often from this setup condition, the club is swung early inside, then lifted, and then rerouted over the top to compensate for a bad alignment condition. This leads to a very steep angle of attack and ball flights that are either pulls or pull slices, often both, the only difference being the club face condition at impact. For a player whose normal 5-iron may fly 175 yards, the pull will go long left 190 yards, and the pull-slice will go short right, 150 yards, so it’s easy to see how this is a tough way to play and score.

These problems are just a few of the issues I see on the lesson tee. Most students want you to fix their golf swing, and when you mention the launching pad, they look at you as if to say, “No, my swing, my swing,” never believing in their heart that the relationship between the two (launching pad and swing motion) is so vital. The correction, in fact, must start there. When I am finally able to get a student to buy into the importance of the launching pad and I physically lead them into an exact condition (that is, a proper setup condition via a well-constructed and executed pre-shot routine) from which I’d like them to begin, it often, in many ways, feels extremely strange to the patient. This is a true sign that their golf motion has actually been strangled by an improper launching pad.

Much of the work is done in front of a mirror. On my lesson tee I have a full-length mirror, as well as numerous still photos of various world-class players, for the student to see fundamentally sound launching pad conditions. Through excessive repetition of the process they can make constant visual comparisons between their image in the “understanding mirror” and the photos. The best way to convince a student that what is occurring is in fact correct, is to put them in a situation where they can convince themselves and see success. Feel is not always real, but seeing is believing, especially when there is a real comparison.

In my entire career the number of launching pads I’ve seen at the club level that looked as if they would produce a desirable ball flight without the need for compensation could be counted on one hand. Conversely, during my time working with players on both the PGA and LPGA tours, I would count the launching pads that looked unable to produce a satisfactory result on one hand. Tour players look fundamentally ready to go.

As I switch my focus to the finish condition, I hear folks out there screaming: “What about the in-between? What about my backswing? My transition? My leg drive? My shoulder turn? My impact condition? I don’t ignore all of the above, because in my student’s swing, each of the above could be an issue; I do, at the proper point in our instructional relationship, address them if necessary. But if I can posture and position my students’ launch-ing pad correctly and also allow them to feel and understand the conditions (feelings, visuals) of their finish (i.e., The Bookends), they will have a heck of a chance of making an improved, dynamic motion in between these two static conditions.

Golf Launch Pad ChartConditions of the finish include the following (See Photo 3):

  • A level shoulder condition
  • A level hip/pelvic condition
  • A vertical right foot
  •  A right knee that finds a relationship with (touching and behind) the left knee
  • A vertical spinal column
  • A level head and level eyes looking level at the horizon
  • A feeling of balance dictated by your ability to swing at a controllable pace.

Again, a mirror and many repetitions helps ingrain this feeling. I usually start by taking some film of the student’s motion, and simply freezing the film at the point of their own full finish, then show them a point-by-point comparison with any world class ball striker, male or female. The pictures don’t lie.

Teaching my players to “post up” into a balanced, controlled finish, is vital. If I’m able to modify the player’s launching pad and post-up condition, the in-betweens start to beautifully fall into place.

Tom Patri is president/founder TP Golf, GolfTips Magazine Top 30 Instructor  and PGA Quarter Century Member. Reach him at  www.tompatri.com

stack-and-tilt


Stack & Tilt-teachersMike Bennet (left) and Andy Plummer (right).

Editor’s Note: When this story ran in Golf Tips magazine back in 2010, the stack & tilt phenomenon was in full flight, with PGA Tour pros like Mike Weir and Aaron Baddeley singing its praises. While both of those players have pretty much faded from the scene, the fundamentals of Stack and Tilt still remain in many teachers’ arsenals, and some prominent players from the past, including “Mr. 59” Al Geiberger, swear by its tenets. It’s just known by other names these days.

“I have picked up on this system that has a funny name. Stack & tilt,” Geiberger told Golf Tips in April 2017 during the Haggin Oaks Golf Expo in Sacramento, California. “All the good things all the good players do, they [teachers Mike Bennett and Andy Plummer] have condensed into their book. Throw all of your other books away, including mine. And if you don’t like to read, watch their videos.”

So, to follow Geiberger’s lead, let’s take a fresh look at the Stack & Tilt method.

Indeed, 2010 was a very good year for Stack and Tilt gurus, Mike Bennett and Andy Plummer. Their premier student, Charlie Wi banked $1.5 million, and three others (Bill Lunde, J.J. Henry, Alex Cejka) finished 1, 2, 3 at the Turning Stone Resort Championship in August. (Even more remarkable has been the turnaround of Lunde who had quit golf three years earlier. The San Diego native rebuilt his swing with Bennett and Plummer, notched three top 10s and banked over a million bucks in 2010.)

We caught up with Bennett and Plummer at last fall’s Justin Timberlake Shriners Hospitals for Children Open in Las Vegas to get a firsthand look into their controversial methodology. What we found were two soft-spoken, bright men with what they say is a measuring system that every player fits into. As Bennett told Golf Tips, It’s a thoroughly mapped-out set of variables and principles, but ultimately because it’s a system, it can start at its lowest denominator and increase in sophistication for the amount the golfer wants or needs. In other words, it’s applicable to pros and beginners. If you’re looking to overhaul your swing for 2011, read on.


Stack & Tilt-bend backHere’s Mike at setup and Andy illustrating how one should extend at impact.

1. EXTEND AT IMPACT!
Andy Plummer: One of the biggest differences between the game’s poorest and best players is how they extend (or don’t extend) at impact. The legs straighten and the spine extends, pushing the golfer off the ground. This is the swing’s power source.

Mike Bennett: The spine is flexing and extending continuously through the whole swing. Your address posture is not static throughout the swing. As most golfers swing through, they stay in flexion and their body stops turning, their arms start flexing and, as a result, they don’t hit the ball far.

Plummer: Because you can’t turn in flexion. If one tries to, his or her hips will stop turning. Some folks write that off as a flexibility problem. In fact, there’s a whole cottage industry that has sprung up with people getting soft-tissue massages because no one has taught golfers how to extend through the ball. Unfortunately now we’ve got lots of golfers who think that the golf swing is really difficult and that they have to be in such good shape to do it. We believe that point of view damages the golf-instruction industry.


Stack & Tilt-extend to turnAndy’s legs straighten and his spine extends. This pushes him off the ground. Mike demonstrates the result: a perfect finish.

2. EXTEND TO TURN
Bennett: These pictures illustrate how the body must extend to turn. It’s that extension that also functions as a power source.

Plummer: Notice above how Mike sets up in flexion and I end up in extension. This is uniformly demonstrated by the game’s best players and uniformly not demonstrated by the game’s worst players.

Bennett: Most golfers think that they need to maintain their spine angle at impact. But we say you’re supposed to maintain your inclination. Your spine angle constantly changes its flex during the swing so that you can have thrust and keep turning. Andy often tells students in clinics to tuck your hips underneath you when you finish, or rather to raise your hips up when you finish.

Plummer: All athletes make this motion. Think of volleyball players spiking it over the net, or a gymnast doing a back flip, or Kobe dunking a basketball.

Bennett: The discus thrower, the high jumper.

Plummer: A shot-putter goes from flexion into extension. All these athletes extend. The same motion is demonstrated in a variety of sports where your body generates any sort of thrust.


Stack & Tilt-left tiltAndy shows the extension and left tilt; Mike shows how it looks in the swing.

3. EXTEND, TILT & TURN
Bennett: The above pictures illustrate how, in the backswing, the spine angle changes. The spine goes into extension so that it can turn. The spine keeps tilting to the left the longer your backswing gets so that your head doesn’t raise up from the ground.

Plummer: Golfers don’t stay bent over when they swing back–they extend. But if they only extended, their head would raise up. At the same time they extend, they also must left tilt and turn. Coordinating those three pieces (extension, left tilt and turning) keeps their head still. Doing one piece more than the other, makes one’s head move.

Stack & Tilt-hip bend Stack & Tilt-hip bend straight on

There are two things in these pictures that illustrate major differentiators between the game’s best players and its worst. The first is the degree the left shoulder goes downward. A poor golfer’s left shoulder doesn’t go down enough, long enough. He or she levels out and, as a result, raises his or her head. The second thing is that the player’s left arm can’t orbit the body long enough. It won’t go back far enough, and if he or she tries to go back farther, the head starts bobbing all over the place. The function of the extension is to allow the golfer to turn longer on the backswing, propelling the left arm. That fault has been written off to lack of core strength–and more–and it causes a very poor definition of how the body needs to continually keep left-tilting. On the other hand, one’s extension allows his or her shoulder to turn. That permits the left arm to orbit all the way around the body, which permits the player to hit the ball far.

Bennett: It’s your body turn that allows you to keep your arms straight. If you try to stay in flexion, your arms start to flex to help move the club back. You just can’t stay bent over and keep your arms straight, whether in the backswing or followthrough.


Stack & Tilt-hip slide

4. SLIDE YOUR HIPS


Stack& Tilt-follow-through tiltMike’s tilt is a result of Andy’s hip slide.

Plummer: Another component to demonstrate is the linear component or the hip slide. So we have extension, left tilt and hip slide. (And, trust us, we recognize that slide is a dirty word in golf.)

The poorest players don’t move their hips forward enough, long enough. In fact a good mantra for golfers would be: fast enough, forward enough, long enough. It’s beneficial for people who don’t really understand how much extension they need to start out with more weight on their left side. Starting out with more weight on their left side eliminates the need for the hips to slide and allows the golfer to extend.

Some people think that sliding your hips causes a block. It does not. Extending or standing up too fast does. It throws the club to the right, and you end up blocking the shot. If you just slid and turned, the club would always come around in a circle. Coordinating those three things together (extension, left tilt, hip slide) to make the golfer swing in a circle is what the Stack and Tilt system is all about.

Stack & Tilt-back-extend Stack & Tilt-down-extend Stack & Tilt-follow-extend

Bennett: In the pictures (left), Andy is tilting and extending to propel his backswing and followthrough.

Plummer: You can sum up the pictures of Mike below in just six words: weight forward, shoulder down, hands in. Note how his arms didn’t lift off his rib cage on his backswing because his shoulders continued to turn. And his shoulders only continued to turn because he kept left-tilting and extending. You can see that the hands are in by the fact that they’re behind–not above–the shoulder.

From the down-the-line view, you can see how the spine tilt is keeping Mike’s club from swinging out across the ball. Because the hips slid forward, his head didn’t raise from the ground so he stayed in inclination. Hence, he’s not topping the ball. Note how the shaft angle is parallel to the ground, and in line with his hands. Most amateurs start their downswing with not enough hip slide, keep their weight back and so are outside of it. It’s the slide that keeps the club in.

Bennett: The last part of the equation would be the player tucking the hips in extension. The hips are higher (that’s part of the extension), the arms are straight (that’s part of the extension too), and the hip slide helps prevent the head from ever raising up from the ground. If a player keeps sliding his or her hips, what’s lost in extension (from moving one’s head away from the ground) is reestablished when the hips slide and he or she tilts to the right.


Plummer: Now let’s take a look at Mike’s photos. Note how his head hasn’t raised up and his shoulders have turned at the same angle as the backswing. The eyes, shoulders and spine are tilted to the ground. That only happens because Mike has done a continuous hip slide.

When you look at the picture below, you can see that I’m extended off the ground–I’m in anatomical extension. But if you look at Mike’s picture, he hasn’t raised off the ground. How’s that possible? How is it possible to go from flexion to extension without raising up? The answer is that his hips have slid. It increases the right tilt that replaces the loss of forward flexion coming through the ball.

Stack & Tilt address Stack & Tilt backswing Stack & Tilt downswing Stack & Tilt follow-through


Most people don’t know how much they need to slide and how far they need to go forward. They move forward a little bit, then stop and continue turning without moving forward so they have more rotary movement than linear. As a result, they swipe across the ball like a windshield wiper. If you could tell them to start with more weight on their left and to continue to keep moving their hip forward, that would keep them from hitting out at the ball and make them draw the ball.

The first line in our book, The Stack and Tilt Swing, says, If all of the golf instruction books, videos and lessons for the last hundred years had taught people to keep their weight on the left side and to swing their hands inward, we would have generations of golfers drawing the ball instead of slicing. The game has been misinterpreted by shifting the weight back and then not clearly articulating how far and how long it needs to go forward.
This story originally ran in Golf Tips in the winter 2010 issue.

Bonus Tip: Play Better GolfBowl!

Plummer: Most golfers turn too much, but don’t move their hips forward enough, long enough. A helpful image to think about is a bowler who always draws the ball. A bowler’s hips move forward without turning very much. He’s more linear and less rotary. He keeps his weight forward and his right foot back. This image should help golfers get the feel for hitting out at the ball (and drawing it) as opposed to hitting across the ball (and slicing it).

Michael Bennett and Andy Plummer have more than 40 years of combined experience in golf instruction, and teach their Stack and Tilt swing to more than 20 PGA Tour players. To order their DVD, The Stack & Tilt Golf Swing, please visit stackandtilt.com.

Shot on location at Angel Park Golf Club in Las Vegas, Nevada.

schmedes-4keys-1

four key movements-rotateEverything I teach comes from studying the best players in the world. I don’t necessarily teach the “Fundamentals of Golf” as I learned them growing up — based on a number of factors I’ve found they don’t necessarily apply to all golfers. I like to teach what I call the Tour Fundamentals of Golf, which I’ve found the majority of all golfers on the PGA, LPGA, European, and Champion tours apply in their own games. The four movements below are essential to playing golf at a high level and are adhered to by the best players in the world.

  1. Rotation
  2. Tilt
  3. Shift
  4. Extend

These movements have a huge effect on clubface orientation, swing direction, low point control, and club head speed. The difference between an elite golfer and a higher handicapper can typically be found in one of these four areas, and although the full swing is only one piece of the pie, the majority of higher handicap golfers waste a large number of strokes because they cannot control their golf ball. This is a telling sign that they are struggling with at least one of the four movements listed above.

four key movements-tiltROTATE

The initial move away from the ball is very important in the golf swing as it sets the tone for the rest of the swing. The best players in the world begin by rotating the buttons of the shirt (center of sternum) until they point at the trail knee. This will place the hands just past the knee with the club head just slightly out in front of the hands, as I’m demonstrating in Photo 1. The average tour player has 27 degrees of rotation prior to the club becoming parallel to the ground in the backswing. More tilting goes on as the player rotates, but that is set up by forward bend at address. I like a player to think rotation in the first few inches away from the golf ball. The thought of tilting can then follow.

TILT

Once the buttons of the shirt, or center of sternum, are pointing at the trail knee it’s time to begin adding tilt. Feel the left shoulder (RH golfers) work down and across moving the hands and arms inward. The average tour player begins with their trail shoulder tilted 11 degrees downward at address and by the time they reach the top of the backswing the forward shoulder is tilted downward 36 degrees. In Photo 2 I’m using a club held against my chest at would be the top of the backswing to show how much tilt that really is. That means from the time the buttons reached the trail knee in the rotation phase, the shoulders tilted another 20 plus degrees before the player reaches the top of the backswing.

four key movements-shiftSHIFT

The movement in the transition, and into the downswing, is one that should begin with a lateral bump of the hips towards the target. This initial move is key to facilitating the plane at which the golf club moves into impact (Photo 3). From the top, the tour player shifts and sits down into the ground, allowing them to spring upward, creating maximum force into impact. The average golfer typically does the opposite. They begin with a spinning of the hips since many players can’t separate the hips from torso; the golf club is then out of balance, and on top of the plane. They are also now more on their trail side (right side for right-handers) as they near impact. This causes both heavy and thin mis-hits.

four key movments-extendEXTEND

The extension (straightening) of the arms, club, and body post-impact is a key characteristic all great ball strikers share. This extension is produced by what happens prior to impact. The first three movements are very important! The best players in the world use the ground as leverage just prior to impact, causing the legs and pelvis to begin to straighten after impact. This is why they hit the golf ball as far as they do. This movement controls the positioning of the golf club. Don’t be afraid to feel the front knee straightening through impact, as I’m doing in Photo 4. The backside will then begin to tuck a bit and the arms will extend. Unfortunately I see 95 percent of golfers trying to do the opposite, which robs them of power and the consistency they are looking for.

Bill Schmedes is director of instruction at Fiddler’s Elbow Golf Club in Bedminster, New Jersey. Reach him at www.bs3golf.com

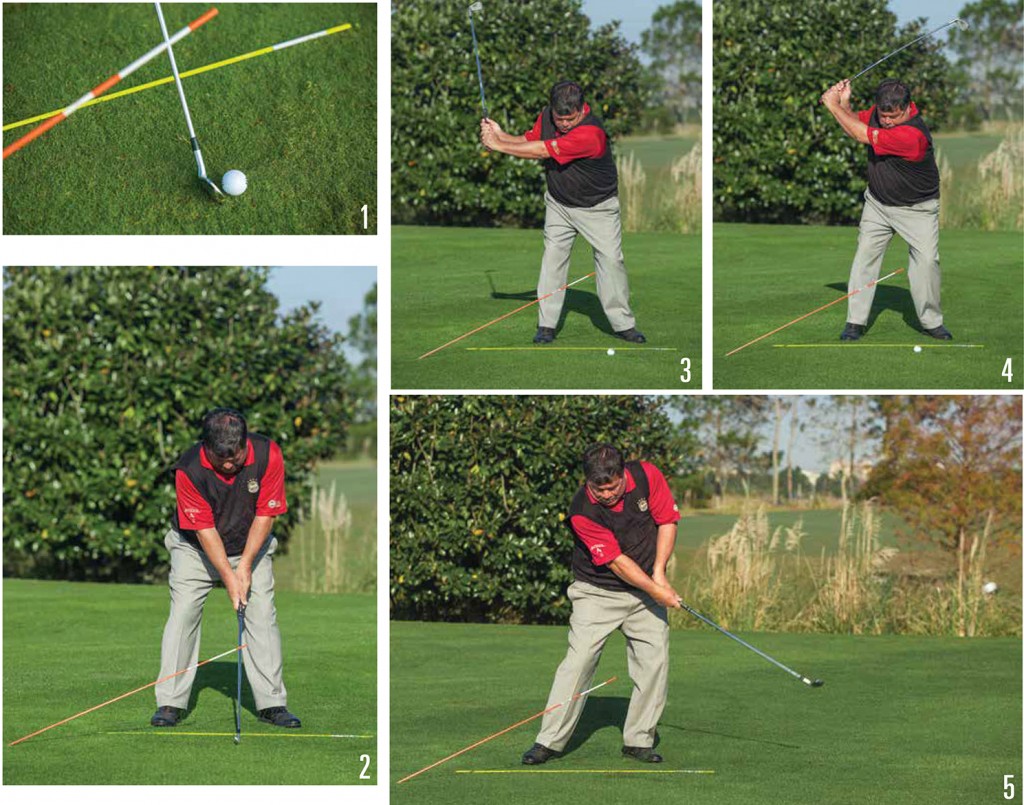
45 Degree Stick Drill

I assist many golfers who have aim issues, which in turn create significant club path issues within their swing. The predominant issue is aiming too “closed” to the target — as in too far right for a right-handed player — forcing the golfer to create the classic “Over the Top” swing.

What you have to realize first is in order to correct the club path issue, you must first correct your aim. Doing so with an alignment stick — or a spare golf club — is an effective way for your eyes to see a proper alignment, so long as you go through your pre-shot routine prior to hitting every practice shot.

Once you are well on your way to aiming better, you can introduce what I call the 45 Degree Stick Drill to help you flatten the club path of your swing, which allows you to store more energy in your swing and release that energy to the ball at the right time.
Step 1

Place an alignment stick on the ground indicating a parallel left alignment (right-handers) or a parallel right align-ment (Left-handers) to your intended target. Take another alignment stick and force one end of the stick into the ground at a 45-degree angle to your target that also is parallel to your align-ment stick. See Photo 1.

Step 2

Stand to the sticks in an address position (Photo 2) and make practice swings so that on the way down, the club does not touch the 45 degree stick.

Step 3

When ready, place a ball underneath the end of the 45 Degree Stick. At-tempt to make a swing, hitting the ball without hitting the stick. (Photos 3-5)

At first you may hit the stick. Most of the time this is due to you trying to hit the ball far and hard, versus accom-plishing the objective: DO NOT HIT THE STICK! Be willing to gear down your swing so it resembles a pitch shot swing, if needed, to achieve the desired outcome.

Doing this over a period of time, focusing first on proper alignment that allows a more consistent and flatter club path, will significantly increase  the distance you hit each club and provide more opportunity for you to put a square club face on the ball at impact.

John Hughes is a PGA Master Professional based in Kissimmee, Fla. Reach him at www.johnhughesgolf.com

Are You Really Swinging Photos 1-4

In my 17 years of teaching, one thing is very clear to me – the golf swing is very elusive for most people. One day you have the feel and are hitting it great. Then literally the next day, you try the same tip or feel and you can’t come close to finding the center of the club. What is it about the golf swing that is so hard to repeat? Are you really swinging the club?

The problem lies within two areas – the rigidity and weight of the club AND severe misconception by the golfer of what to do with the club. In this article, I’d like to show you what a golf swing IS and what a golf swing ISN’T using my patented training aid called The PRO. I think you will find the concepts very simple to understand.

WHAT IS A SWING?

A swing relies on a constant pulling force in line with the shaft. A simple way to understand a swing is to do this:

Are You Really Swinging Photos 1-4

  • Hold your club between your thumb and index finger as lightly as possible (Photo 1).
  • With your other hand, pull the clubhead until the shaft is horizontal with the ground (Photo 2).
  • Let the clubhead go and it will automatically accelerate until the club reaches a vertical position (Photo 3).

This swinging energy is the key to harnessing effortless power and requires NO assistance by the golfer. Learning to position the natural swinging energy in the swing is what technique is all about. If you don’t understand what a swing is and you can’t feel what it is, you will always struggle.

  • Place your club on your finger so it is balanced – where your finger is right now is the center of mass of the club (Photo 4).
  • Push the handle in one direction and the club head moves in the opposite direction.
  • The club is not swinging when this happens which means there is ZERO natural acceleration.

Anytime you employ a “pushing” force against the shaft, the club responds by trying to rotate around its balance point. Once you do this, you don’t have a swing. The only way to hit the ball is to muscle it through impact. This causes a physically uncomfortable swing and is HIGHLY inconsistent!

Here are the three of the most common problems that struggling golfers face.

FAULT 1: “OVER THE TOP” OR “CASTING”

Golfers that cast the club actually start interfering with the swing right from the beginning of the forward swing. By gripping the club too tightly and trying to push the clubhead through the handle, we see what is commonly referred to as OVER the TOP. Over the top is not a swing path problem, it is a misconception by the golfer on what the CLUB actually WANTS!  When you try to push the entire club at the ball, the club tries to rotate around its center of mass. Your body then feels the club moving in a path where it can’t hit the ball, and the rest of the swing is spent trying to guide the club back into a place where it can hit the ball. This usually causes a slice or even a push-slice (Photo 5).

Are You Really Swinging Your Club Photos 5-6

FIX1: When you learn that the club wants to be pulled along the length of the shaft, then OVER THE TOP goes away! When you swing the PRO, the grip and the rope will be bent if you are supplying a pushing force at the start of the forward swing (Photo 6). When you learn the feel of getting the rope in line with grip, then you quickly realize that the pushing force you are using doesn’t exist in a swing. The club will NOT swing properly unless you supply a pulling force to get the swing started. To do so reliably, you must have a VERY light grip pressure which allows your wrists to stay passive and hinged.

FAULT 2: EARLY RELEASE (MID DOWNSWING)

Similar to Over the TOP or Casting, many mid-handicappers rob themselves of effortless power by trying to force the release of the club at the mid-point of the forward swing.

Are You Really Swinging The Club Photos 7-9

In the beginning of the swing they usually look pretty good, but as the club comes around the bend, their wrists push on the club handle and the club is forced to accelerate too early (Photo 7). This causes the body to avoid hitting the ground (fat) and results in the body trying to push or steer the club through impact.

FIX 2: When the golfer employs a true swinging motion, he is only providing a pulling force which naturally allows the club to swing freely around the wrists. Notice when I use the PRO, the Grip, Rope, and Cylinder will swing in a straight line if I am providing that pulling force (Photo 8). If I attempt to force the release of the club, the PRO will bend at the grip and immediately go into chaos indicating that I’m not swinging.

FAULT 3: PUSHING (NO RELEASE)

Many golfers are taught that leaning the shaft forward at impact is the key to hitting it solid. While this is desirable when done with the proper physics, there is a large misconception that arises. Golfers that tend to hit really low shots or have very steep divots are what I call “pushers.” In an attempt to keep the club head behind the hands at impact, they try to hold the angle between the wrists & shaft with so much force that they simply shove the whole club into ball without gaining any natural acceleration from the natural swing of the club! Many players like this also tend to “dip” into the ball to ensure making contact (Photo 9).

Are You Really Swinging The Club Photos 10-11

FIX 3: When you swing the PRO, the goal is to keep the grip, rope, and cylinder in line for as long as possible. If you are pushing the club, the rope will bend at the grip and never catch up until way past the impact point. If you are keeping it in line by supplying the pulling force, however, the cylinder automatically accelerates into (Photo 10) and through impact (Photo 11). Hitting a solid shot is about learning the RHYTHM and TIMING of positioning the swing, NOT by forcing the club to “look” like you are hitting it solid.

Of course there are many other faults that we pros have identified in the golf swing, but it is my finding that many of the “common” ball flight problems and swing faults arise from simply not UNDERSTANDING what the swing is and having no feedback of when you are swinging and when you aren’t! Once you have bad swing habits, you will never break them unless you can establish the actual FEEL of a swing. I believe the fastest way to develop your swing is to train with the PRO. You will rapidly learn where and when in the swing you are adding unnecessary interference to YOUR best swing!

To learn more about The PRO visit www.swingthepro.com

Dan Martin is Director of Instruction at Rustin Canyon Golf Course in Moorpark, California

Stay Connected for Power

In my years of teaching, I’ve seen far too many “disconnected” golf swings resulting in weak and off-line shots. It’s a common issue, but it’s easily remedied.

I was personally trained and certified by the legendary Jimmy Ballard. He always taught me to teach my students to set up “connected” at address. That is, to have the upper part of your left arm connected and tied into the body in a soft manner (Photo 1).

This prevents the lead arm from disconnecting from the body which causes all kinds of problems. Walk down the practice tee at any PGA Tour event and you’ll spot several players employing a method to keep the left arm connected to the chest — a true source of both power and accuracy.

Here’s how I recommend you getting the feel of this all-important connection:

Stay Connected For Power

Put a credit card or golf glove under the left arm at set up. In Photo 2 I’m using a credit card, which is thin enough to demand that you keep that left shoulder and upper arm connected to the torso, but light enough to not interfere with the swing. By keeping it there all the way through the swing as I do in Photo 3, you’ll feel more connected, and see the results immediately both in distance and accuracy.

Stay Connected For Power

If you don’t stay connected and experience the dreaded “chicken wing,” as I demonstrate in Photo 4 and 5, you’ll end up with far too long a backswing and an abbreviated through-swing. I’ve clearly let the card go, and there it is, tumbling to the turf.

Stay Connected For Power

So, keep that card, glove or towel tucked where it needs to be throughout your swing, and these and other issues will disappear. This simple tip creates the proper feel for connection throughout the swing. It works for 100 percent of golfers of every skill level.

Stay Connected For Power


Barry Goldstein
is PGA Teaching Professional at Inverrary Country Club in Lauderhill, Florida.

 Wrist Cupped? Flatten It!

A cupped or for the medical types a wrist that is in “dorsiflexion” has the potential to ruin even the best of golf swings you make out on the golf course. What it means to be cupped during your backswing is your left wrist bends so that the back of your left hand and the top of your left forearm create an angle like Photo 1 above.

 Wrist Cupped? Flatten It!

The more the left wrist cups, the more trouble we will find ourselves in during the remainder of the swing. Typically golfers who cup the left wrist the most will bend and fold their lead arm the most, separate their arms from their chest and body, and finally open the face of the club to the path they are swinging on (Photo 2), and swing the most over the top. That’s a lot of problems for just having a cupped left wrist, and they’ll always result in a shot that slices, fades, or travels high and to the right, and creating a huge lack of distance. If this sounds like something you do, let’s fix your problem with this simple drill involving a book or, in my case, a tablet.

 Wrist Cupped? Flatten It!

Book Drill

The book drill is a very simple drill that can be done almost anywhere you have a hardcover book, clipboard, etc. Begin by taking the book and place it in your hands, using your typical golf grip with book between your hands, between your forearms (Photo 3). Next, take a few slow backswings and take note of what forearm the book touches as you make your backswing. If the book touches your right forearm, take a look at your left wrist, you will notice a break or angle and not a flat of bowed left wrist. Repeat the process again and this time make sure the book is touching your left forearm (Photos 4 and 5). Look back at your left wrist and notice a FLAT wrist! Make a few more practice swings with the book until you master the ability to let the book touch your left forearm.

 Wrist Cupped? Flatten It!

Scott Yurgalevicz, PGA, is a teaching professional at DuPont Country Club in Wilmington, Delaware.

 ‘Clock In’ To Work the Ball

Amateur golfers often marvel at a pro’s ability to maneuver the golf ball right to left or left to right at will. Producing draws and fades is actually quite simple. Your ability to shape shots stems from understanding the factors that control direction.

The direction of a golf shot after a solid impact is determined primarily by two factors:

• Face position: The direction the club’s face is pointed or “looking” at impact.

• Club head path: The direction the club head is moving at impact. In simple terms, the ball will curve when the path of the club and the face position disagree.

If you want to curve the ball you must set up to produce the desired path and face position at impact. Use your stance line to create the path. You must swing the direction your body is aimed, then simply point the face slightly opposite and the ball will curve.

To get a better image of the task, a right-handed golfer should visualize a clock with the target at 12:00. The ball rests on the target line (the arrow on the clock). The area where the golfer stands is called inside (the higher numbers on the clock). The area on the opposite side of the target line is called outside (the lower numbers on the clock).

To control the ball flight I recommend the following procedure for right-handers:

1. For normal straight ball flight, aim the face of the club at 12:00 and align your body parallel to the arrow on the clock. Swing the club on a path that approaches the ball from 6:30 and exits impact between 11:00 and 12:00 (where the large hand of a clock would be at 11:30). If the face is square and you swing on this path the ball will start toward the target and fly relatively straight.

2. To draw the ball from right to left, align your body as if you were swinging to a target at 1:00. This is what’s known as a “closed” stance. Swing the club normally relative to your stance line and it will travel on a path that approaches the ball from 7:00 and exits impact moving toward 1:00 (inside to outside). Aim the face halfway between 12:00 and 1:00 (where the large hand of a clock would be at 12:30). The club face will be slightly open to the target but closed to the 1:00 path. The ball will start to the right then curve back left toward the target.

 ‘Clock In’ To Work the Ball

3. To fade the ball from left to right align your body as if you were swinging to a target at 11:00. This is called an “open” stance. Swing the club normally relative to your stance line and it will travel on a path that approaches the ball from 5:00 and exits impact toward 11:00 (outside to inside). Aim the face toward where the large hand of a clock would be at 11:30. The face will be pointed slightly left of the target but it will be open to the 11:00 path. The ball will start left then curve back right toward the target.

 ‘Clock In’ To Work the Ball

One final note: When hitting a draw you may need to use a more lofted club, and when hitting a fade you may need to take a less lofted club.

nail-your-impact2


Nail Your Impact

WHEN STRIKING A GOLF BALL with any club, the moment of impact between the ball and the clubhead is one of epic proportions. It’s the point in time where all of the information from the moving clubhead is delivered and, ultimately, determines what the fl ight of the ball will look like in the air. Get this moment wrong, and hitting consistent golf shots will be very challenging!

Most of the problems at impact come either from a lack of knowledge concerning what should happen or a fl awed perception of what’s actually happening. It’s a scientifically proven fact that the clubhead should be moving down when we strike the ball, meaning that the shaft of the club will be leaning forward, toward the target, at impact. A golf club is actually built to be used that way. The problem is that striking down on a ball you’re trying to hit up in the air is a diffi cult concept for most golfers to grasp. The human brain is very skilled at creating movements in the body that support our perception of what we think should be happening, which can be a very powerful tool if we can just get our perception and reality to line up. The images here illustrate a drill to help you understand what the correct impact position should look like so you and your brain can start communicating with each other more effectively.

Nail Your Impact

The only possible way to drive the nail into the ground in the top photo would be to deliver a forward-leaning shaft with a downward strike. The only way to accomplish both is to have your weight well into your lead foot, with your chest and head directly over the ball. If you imagine the nail through your golf ball the next time you’re playing, your brain will start to better understand what’s necessary to deliver the club in a way that would drive the nail into the ground—and that thought will lead to a much more consistent impact position!

LONG GAME

In the second image, you’ll see the brain’s normal response when asked to make the body move in a way that would loft the ball up in the air (the single most common misconception among most golfers). The weight moves heavily into the trailing foot, the chest and head move backward, and the hands try to “throw” the clubhead under the ball in order to hit up and get it airborne. This type of motion often leads to the club striking the ground before the ball and taking a heavy divot or sometimes striking the ball without hitting the ground and taking no divot.

Nail Your Impact: Long Game

The third photo is a great visual for you to use when trying to understand what actually should be happening during impact. It would be physically impossible to drive the nail into the ground at such an angle with your weight back and your hands throwing the club under the ball. If your brain were given this task, it most certainly wouldn’t tell your body to move in that fashion.

Brandon Stooksbury, PGA, is Director Of Instruction at the Idle Hour Club in Macon, Georgia, and author of “The Wedge Book: An Owner’s Manual For Your Short Game.” Visit www.StooksburyGolf.com.

Juniors: Think Outside The Box...

Juniors: Think Outside The Box...

In the last 10 years, there has been a dramatic shift in the way juniors are developed. For many years, junior golfers have been taught with the same mentality as adults, both in philosophy and methodology. “Keep your head down” and “stay balanced in your finish” are often thoughts given to young golfers while learning the game.

The one overwhelming difference when it comes to instruction for juniors in comparison to adults is that juniors are still developing! Because of this fact, we have to take a different approach to help that junior develop into the best athlete he or she can be.

The graph shows the growth height velocity curve juniors follow as they mature.
The graph shows the growth height velocity curve juniors follow as they mature, along with the corresponding window of opportunity we can develop at the appropriate times.

One of the key pieces to understand when working with junior athletes is what you can develop during appropriate times in their development stages. These are most commonly referred to as windows of opportunity. They’re specific times in the juniors’ lives when they’re more susceptible to heightened periods of adaptations.

The easiest way to measure a junior and predict when these windows are open is to take periodic height measurements to determine the junior’s velocity of growth. For example, during the speed window, have your junior swing as fast as he or she can, even if he or she falls off-balance! Here’s one of my favorite drills for junior golfers.

One of my all-time favorite drills to do with my juniors comes directly from the age-old movie Happy Gilmore. Allowing juniors to make “Happy Gilmore Swings” does a number of positive things for their development:

Juniors: Think Outside The Box...

1 Teaches juniors proper weight shift from trail leg to lead leg

Juniors

2 Helps juniors to develop excellent timing

Juniors

3 Promotes proper coordination of their bodies in the golf swing

Juniors

4 Generates greater speed in their swings

Juniors

5 And, finally, and most importantly, it’s fun for them!

Joseph DiChiara, PGA, is a Performance Coaching Specialist and Founder of Nexus Golf, www.nxs-golf.com. He’s also a Golf Tips Magazine Youth Advisory Board Member. Contact DiChiara atJoseph@nxs-golf.com.


0
0
Your Cart
Your cart is emptyReturn to Shop