Trying to figure out what to do next on the golf course can seem like looking into the abyss.
Are you frustrated to the point that you just want to give up altogether? Then you’re not alone! Too many golfers despite working hard on their game share in your frustration.Are you “Dazed and Confused” not knowing what to do?
To improve your on-course golf strategy, focus on mastering your short game, developing a consistent pre-shot routine, planning your shots strategically, and practicing with a purpose. Additionally, consider experimenting with your swing and setting specific goals for each round to boost your performance. I’ve put together some tips to help you re-focus your game to include developing a better on-course strategy.
Here’s a more detailed look at these tips:
Master the Short Game: The short game (100 yards and in) is often where strokes are gained or lost. Focus on improving your chipping, pitching, and putting skills. Practice these shots regularly, focusing on consistent contact and distance control.
Pre-Shot Routine: Develop a consistent pre-shot routine to help you focus and execute shots effectively. This could include a few practice swings, visualizing the shot, and focusing on your target.
Strategic Shot Planning: Before each shot, assess the course layout, hazards, and wind conditions. Choose the club that best fits your shot selection and the desired trajectory. Consider where you want to miss the ball, aiming for the “best miss” if you have a tendency to hook or slice.
Practice with a Purpose: Don’t just hit balls aimlessly. Set specific goals for your practice sessions, such as improving your accuracy, distance control, or putting. Simulate on-course conditions during practice to prepare yourself for the game.
Experiment with Your Swing: Consider experimenting with different swing techniques and grips to find what works best for you. This could involve trying different tempos, ball positions, or club faces.
Starting to make sense? Here are a few “Bonus Tips” just in case!
Bonus Tips:
Know your numbers: Accurately measure the distance you hit each club to make better shot selection decisions. This is crucial! Not knowing your numbers, makes it difficult to plan the next shot with any kind of success.
Stay positive: Don’t let a bad shot ruin your round. Focus on the next shot and maintain a positive attitude. Having a good mindset keeps you in the right frame of mind when you need it most.
Don’t be a hero: Play a smart game and avoid taking unnecessary risks. Lay up when necessary and focus on getting on the green in regulation. too often golfers think they can go for it only to fall short. Be smart!
Respect the course: Study the course layout and hazards before you play, and be aware of your surroundings. Knowing where the trouble is, and how to respond accordingly will make the round go a lot smoother.
Visualize your shots: Mentally picture yourself hitting the shot you want to hit. This can help you focus and stay confident. This was a key strategy for one of the greatest players who ever lived. If it’s good enough for Jack Nicklaus. It’s good enough for you!
Summary:
Too often golfers spend a lot of time worrying about hitting the perfect golf shot, when really what they need to do is spend more time perfecting their on-course strategy. Developing good ball striking is definitely a bonus, it gives you confidence over each shot. However, if you are unable to capitalize on that good shot because you haven’t developed an equally good on-course strategy, then you are just wasting time. Ideally you want to learn to be good at both. Review the tips above and try to spend as much if not more time, working on your on-course strategy as you do your ball striking. I think you’ll find the strokes will begin to drop.
It’s that time of year to dust off those cobwebs and pay your local range a visit. With golf season fast approaching, it’ll be critical for your golf sanity to get back into your peak golf form as quickly as possible. One of the most commonly forgotten pieces to a good golf swing is proper weight transfer to produce a good finish. Let’s review this concept.
Evaluating your finish is one of the easiest ways to figure out whether you’ve shifted your weight. If your trail foot is still planted well after you’ve completed your swing, you will need to work on this to improve your strike.
Poor finish leaves a gap between the inner thighs and kneesA poor finish can also cause you to fall back on your trail legA proper weight transfer results in a nice balanced finish
Club Drop Drill
You can take rehearsal swings or hit balls for this drill. Take your sand wedge and place the club (face up) under your trail heel. The shaft should point away and behind you. Take your swings with your normal swing speed and practice dropping the club to the ground. If your weight doesn’t transfer to the lead side, the club will not drop.
Take your sand wedge and place the club (face up) under your trail heelClub fails to drop with poor weight transferIn this image you can see I transferred my weight correctly, so the club dropped
Cup Drill
Practice the proper finish by placing a tumbler or water bottle next to your lead foot. The goal is to finish your swing at full speed without moving or knocking it over. Practicing this will help with completing the hip turn and a stable lead leg.
Place a tumbler or water bottle next to your lead footA good weight shift keeps the tumbler in placeFall back and you knock over the tumbler as in this picture
Close The Gap
The feeling of turning your trail knee into your lead knee as you take your downswing will help with transferring weight at the proper time. At the finish, you shouldn’t be able to see a gap between your inner thighs. This will also help with a full hip turn, along with a completed weight transfer.
Poor weight shift will leave a gap between the kneesA good weight shift has the knees closer together
Tip provided by: Cathy Kim, PGA/LPGA Professional & Top 25 Instructor & Director of Golf Instruction at Baltimore Country Club
Do you find yourself feeling somewhat deflated after a round, and ultimately staring into the sunset? Part of the reason may be you lost confidence in your game. Every golfer at some point in their golfing journey has experienced this at one time or another.
So what do you? I’ll answer that after we first examine: “Five Signs: A Golfer May Be Losing Confidence”
Worrying too much about making mistakes: Golfers who are losing confidence may be overly concerned with avoiding bogeys or hitting bad shots, causing them to feel anxious and unable to focus on the present moment.
Pre-round jitters that don’t go away: Anxiety and a tight feeling that persists beyond the first hole can indicate a loss of confidence and an inability to relax and trust the game.
Losing confidence after a single bad shot: If a single bad shot or score quickly erodes confidence and leads to frustration, it suggests a struggle with maintaining a positive mindset.
Focusing excessively on technique or how to make a perfect swing: Over-controlling the swing and focusing on the mechanics can indicate a lack of trust in the swing and a fear of failure.
Getting easily frustrated or playing cautiously: Frustration when not playing to expectations or a tendency to protect a score when things are going well can suggest a lack of confidence and a fear of losing.
If your one of those golfers who sees themself in this dilemma than you know what I’m talking about. There’s no worse than to hit the course feeling like nothing is going to work today. What typically happens in this situation is you simply go through the motions, and pray the round ends soon. You’ve read every golf book, watched every golf lesson on YouTube, but nothing seems to help. NOW WHAT?
Help is here!
I’ve been teaching this game to corporate clients for over 32 years. Every one of them at some point has felt the same as you have. Here’s what I tell them.
Let’s address each of the “Five Signs” mentioned above.
Point 1: If you focus solely on your mishits and not on good shots, then self doubt begins to creep in. Try this! After you hit a bad shot; let out that emotion and expell the negative energy. Getting it out of your system in a burst of raw energy will actually make you feel better, rather than keeping it pent up inside. Once you have done that visualize a really good shot you hit that day, and allow yourself to absorb the positive energy. You’ll begin to feel better because you’ve focused on something good that happened. Now re-group, and focus on the next shot.
Point 2: Everyone feels nervous stepping up to the first tee, even the pros. It’s normal! Some may feel that way until they have a few holes under their belt. The reason you are feeling nervous is you probably haven’t practiced much lately, or your warm-up routine lacks any real sense of readiness. Make sure that every time you hit the practice range, you do it with a sense of purpose. Don’t just rake and hit balls. Imagine you’re playing the first few holes of a course you’re going to play this weekend. What shots are needed to make a good score? Visualize each club you intend to play on every hole. See in your mind how you’d like the shot to be executed. Allow yourself to feed off the positive energy. Do the same in a warm-up right before your round. Don’t forget to stretch too! That really helps you to relax tense muscles.
Point 3: So you hit a bad shot! Who hasn’t? Does that mean the round is over? No! It just means you hit a bad shot. Stick that in the back of your mind and analyze it post-round. Trying to figure what went wrong during the round can be disastrous. Did I do this? Or do that? Who cares right now? There’s still plenty of golf left. Brush it off and see what you need to do on the next shot. Do I need to hit a recovery shot? Maybe! Focus on what needs to be done now and don’t worry about the past. That shot is gone. Learn from it and move on.
Point 4: Ahh! The perfect swing, good luck with that! There is no such thing. Every swing is different and unique to each golfer. Instead focus on becoming a better player. What can I do to improve my score? Having a perfect looking swing doesn’t necessarily mean lower scores. What does help lower them is to practice areas of your game that you fall short. We’ve all heard the saying: “Drive for Show! “Putt for Dough!” Well, there is a good reason for it. Bombing drives down the fairway looks great, but most amateurs lack the skill to do that with any consistency. However, working more on the short game like pitching, chipping and putting, can really drop your score. Spend the majority of your practice time working on these areas of the game. It will really help raise your confidence level.
Point 5: Emotions can often get the best of us. A common mistake golfers make after a bad shot, hole or even a round is to completely change the way they play. A player who typically goes for the pin suddenly gets squeamish and starts to play overly conservative. What happens then is they get out of their natural rhythm. They slow down and begin to second guess every shot. The opposite can happen for more conservative players who now feel they need to be aggressive to make up for lost strokes. Did you ever see Nicklaus change his game mid-round when things didn’t go his way? Not likely! So why should you? Stay the course and play the way you always have. Making a drastic change like that can turn a small thing into something worse. Play your game!
In conclusion: To regain confidence requires you to analyze things and put them into perspective. Building confidence takes time and a lot of hard work. Losing confidence can also take time to come back. How much time really depends on how you approach things. You can walk around feeling bad because you hit some poor shots, or played a few bad holes. Or, you can use them as a learning opportunity. It depends on you! Better players have conditioned themselves to do just that. They shrug off the less than perfect shots, focus on what they did well. All that leads to confidence building. Tiger Woods often said in his interviews: “I didn’t play my “A” game today, but I’m happy with the results”. If one of the best players to ever play can look at his game that way. Why shouldn’t you? You might find that it’s not your game that needs to change, rather your attitude.
If you would like to submit game improvement tips to help with your game. Send them to: editor@golftipsmag.com
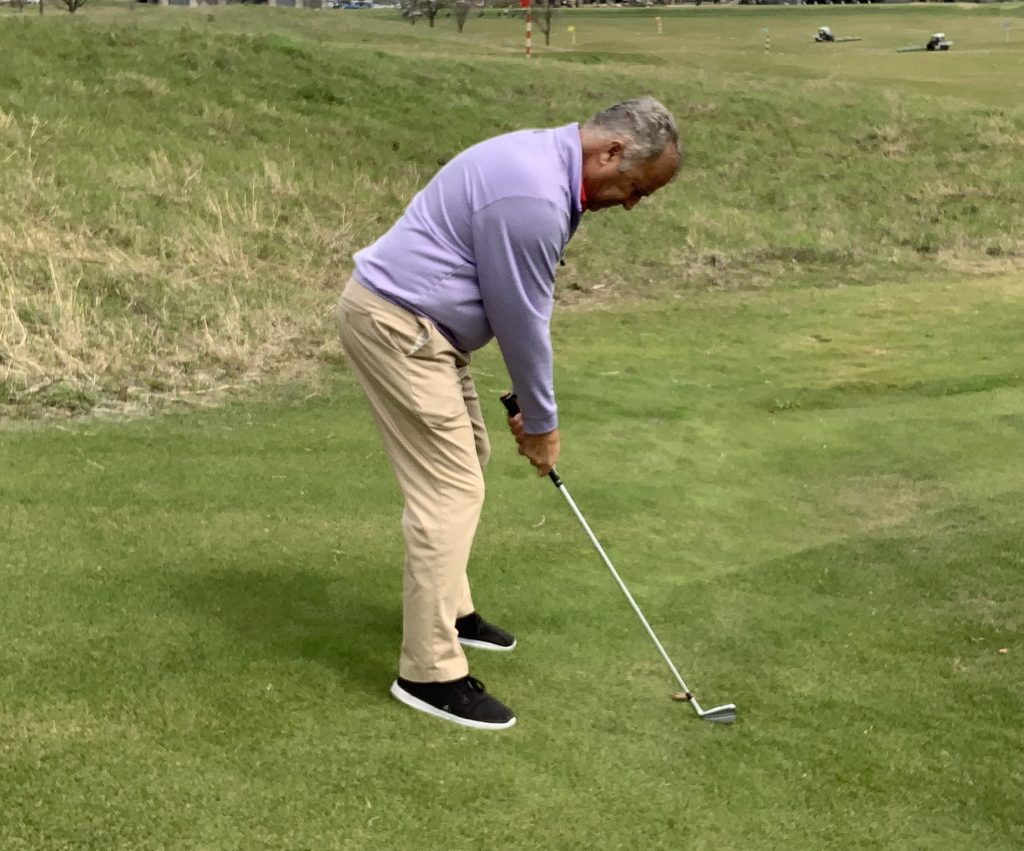
Do you get confused when hitting off of hillsides? Here is a simple way to position yourself when you are playing up and down the slope. The player needs to position themselves relative to the hill to accommodate the slope’s needs by either flattening the plane or making the plane more vertical.
Here is how we establish this relationship on a slope.
Ball Above Your Feet Lie
We begin our setup for the ball above our feet by aiming the club toward the target and placing it on the slope with the correct loft relative to the hill. Then, when taking your stance, align the handle about 1 inch forward of the center of your body, which will establish the correct ball position for the club you have chosen.
Photo 1
Take your stance by placing a little more weight on the downhill part of your feet—in this case, more toward your heels. This will place you in a posture where your back is a little straighter relative to the ground. In swinging the club (Photo 1), swing along the slope by emphasizing turning the body in the backswing and turning the body in the through swing.
When playing in this situation, you will be able to select most any club because there is not a limitation on the loft of the club. Your ball will tend to draw slightly due to the flatter swing plane (Photo 2), and the loft of the club will be pointed slightly left. Align yourself accordingly to accommodate for this.
Photo 2
Downhill Lie
We begin our setup for the ball below our feet by aiming our club toward the target and placing the club on the slope with the correct loft relative to the hill. Then, when taking your stance, align the handle about 1 inch forward of the center of your body, establishing the correct ball position relative to the club you have chosen.
Take your stance, placing a little more weight on the downhill part of your feet—in this case, more toward your toes. This will place you in a posture where your back is bent over more than a neutral posture used in a level lie.
Photo 3
When swinging the club (Photo 3), swing along the slope by emphasizing the shoulders rocking and the arms swinging on a more vertical plane (Photo 4) in the backswing and in the through swing. When playing in this situation, you will be able to select most any club because there is no limitation on the loft of the club; however, shorter clubs will fit the situation better due to the more vertical plane they tend to swing on naturally. Your ball will tend to fade slightly due to the more upright plane, tending to cause the face to open to the path. Align yourself accordingly to accommodate for this.
Photo 4
When playing from any uneven lie, remember to address the ball with the following:
Aim the club with the correct loft relative to the slope.
Stand with the handle pointed 1 inch toward the target of the center of your body.
Place weight on the downhill part of your feet and set your spine perpendicular to the slope.
Swing your club along the shape of the slope.
Tip provided by: Jim Endicott – PGA Professional & Golf Tips Top 25 Instructor. PGA Education Faculty Member and PGA Specialized Professional in both Teaching and Coaching.
Often when you make a change in your golf swing, things feel weird. It’s only natural that when you have been doing something wrong for an extended period and you then make a complete U-turn, your brain is going to resist it.
We often refer to this as “feel vs real.” What you feel as being correct typically isn’t what is really happening in your swing. Any change you make in your swing sometimes will be counterintuitive.
Recognizing key positions within the golf swing will go a long way toward taking full ownership of your golf swing and cultivating the correct feel when it comes to making changes. These key positions can be broken down into four points: setup, top of the backswing, impact and finish.
Setup is obviously the starting point and foundation of the golf swing. Any imperfections in your setup will cause other parts of the swing to break down. Always make sure that your fundamentals are in order, including grip, posture and alignment.
The true starting point of the golf swing, though, is the top of your backswing. Think of it as the starting line of your downswing, and there is a race between your hips, shoulders, arms and hands to get the club back to the golf ball.
Often, though, golfers never complete their backswings, which throws off all the timing on the downswing. Most golfers don’t know what it feels like to make a full backswing. Depending on the body’s flexibility, your top backswing position might be longer or shorter than your playing partner’s.
Don’t be concerned with how far the club goes back or gets at the top of the backswing. There are players we see on Tour who fully rotate their bodies but look like they are only making a three-quarter swing.
On the opposite side of this, John Daly has had an amazing career taking the club past parallel on his backswing, which is credited to his flexibility. Is either one better than the other? No; if you maximize your body’s rotation, you can then start creating the right feel for completing your backswing.
Not completing your backswing doesn’t allow a golfer to sequence their downswing correctly back to the golf ball. Typically, the shoulders haven’t turned 90 degrees to a point where the left shoulder (right if you are swinging lefthanded) doesn’t get underneath the chin. The lead arm will also chicken wing, and the hands never get above the shoulders. This all will cause the body to pivot incorrectly and transfer the weight on the backswing.
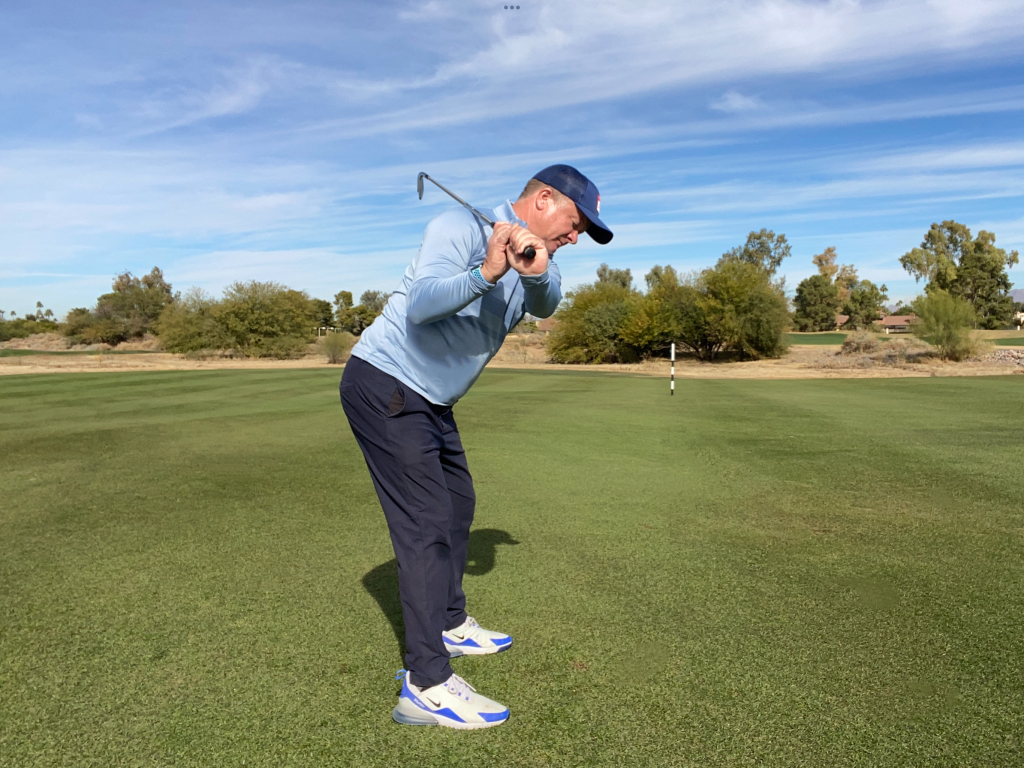
To create the correct feel for a complete backswing, start by standing upright with your back straight and legs locked. Hold the golf club out in front of you and fully hinge the club head up toward the sky. The shaft of the golf club should be parallel to your chest while your left arm remains straight. This will help you feel what it is like to fully set the club with your hands and wrists.
While maintaining your wrist hinge, tilt your pelvis to create enough spine tilt that mimics a 45-degree angle. Your back should stay relatively straight. If you lean from your waist, your spine angle will curve, creating more of a slouching posture. Soften the bend in your knees at the same time so that you feel like your weight is on the balls of your feet. Keep the shaft of the golf club parallel to your chest by maintaining your wrist hinge.
Rest the shaft of the club on your trailing shoulder. If you must let your left arm fold slightly to get the club there, that is OK. Rotate your shoulders as far back as possible. The goal is to get your left shoulder underneath your chin while maintaining your spine angle. A good feeling here is to make sure that your left shoulder is slightly lower to the ground than your right. If your shoulders are level, you have lost your posture and have not fully rotated.
Fully extend your hands away from the body and toward the sky while maintaining your spine angle and posture. A good indication of a complete backswing is where your shoulders have rotated twice as much as your hips, weight is on the inside of your back heel, and your hands have raised above your shoulders. Don’t be surprised if it feels like you are stretching more than you have before.
Tip provided by: Alex Fisher, PGA & Top 25 Instructor
Golfers need to be proficient at two types of bunker or sand shots: from fairway bunkers and from greenside bunkers. Here’s a simple plan for each.
The Fairway Bunker Shot
The main priority here is to make solid contact between the clubface and the ball. This can be accomplished by using a setup and swing similar to what you do when your ball is on grass.
Setup For Fairway Bunker Shots
Position the ball an inch or so back in your stance.
The clubface should be square to the intended target line.
Your weight should be evenly distributed on both feet.
Note: Playing the ball an inch or so back in your stance ensures that you will contact the ball first. Just be sure to plan for a lower trajectory.
The Greenside Bunker Shot
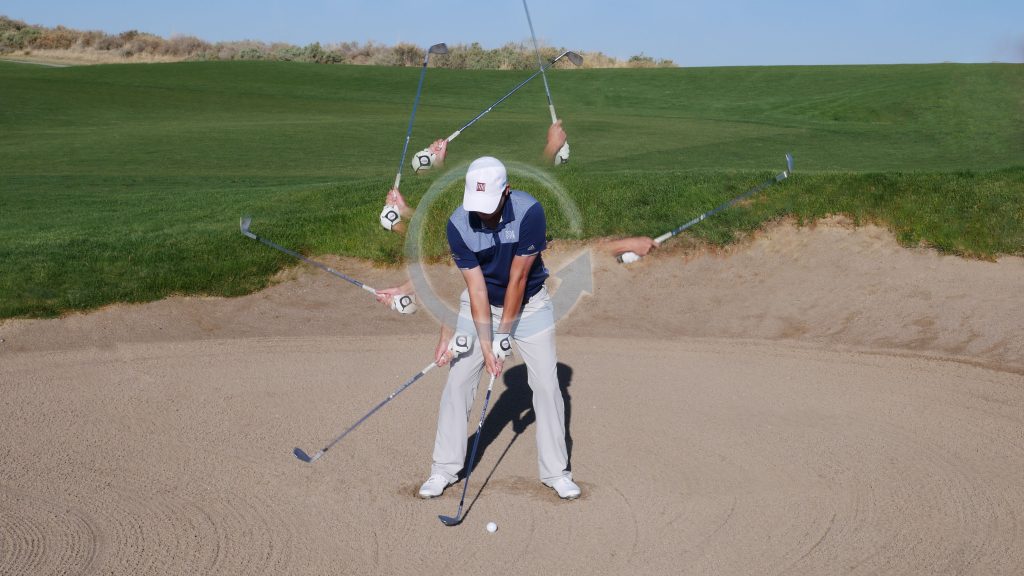
The main priority here is for the clubhead to contact the sand instead of the ball. When done correctly, sand builds up on the clubface and pushes the ball out of the bunker. The clubface never comes into direct contact with the ball. It can be accomplished by using a similar setup and swing as you do when your ball is on grass.
Setup For Greenside Bunker Shots
The club should be in the center of your stance.
The clubface can be played square or open and may vary based on the firmness of the sand. I prefer to play most of my greenside bunker shots with an open clubface.
You should widen your stance, work your feet into the sand, or a combination of both. This will lower the center of your swing, allowing for the clubhead to contact the sand instead of the ball.
Your weight should be evenly distributed on both feet.
Note: The sole (bounce) of the golf club is responsible for keeping the club from digging into the sand. When the club is placed in the middle of your stance with shaft perpendicular to the target line, the sole of the club is exposed to keep the club from digging. Setting the club this way gives you the best chance to utilize an important design benefit (bounce) of the golf club.
Bunker Shot Swing Thought
Once set up, the key is to remain balanced while swinging the golf club in the direction of the target. An effective way to swing with enough speed is to visualize the ball rolling up to the hole. Hold that image during the swing, and you’ll have great distance control.
By Henry Stetina, PGA | Photos by Kyla Carlson
Henry Stetina is responsible for player development and golf instruction for the NMSU PGA Golf Management Program and is the director of instruction at Red Hawk Golf Club in Las Cruces, New Mexico. Henry’s approach to golf instruction is to focus on the intended use of the golf club as opposed to the intended movements of the body. Contact Henry at www.henrystetinagolf.com.
No time to practice? No clubs allowed in your office? A lot of items on the “honey do” list? No worries! You can play better, or should I say “smarter golf,” with the skills you currently possess, and lower your scores.
Most golfers put very little “thought” into their games, for good reason. You do not want golf to be like work! I get it. But if you make simple decisions, almost automatic decisions each day with what amounts to mundane tasks, why not apply the same methodology to your golf game?
This will take some effort at first, but once ingrained, you’ll see more consistency in your game. And you’ll also realize when you are making that “stupid” mistake before attempting a stroke.
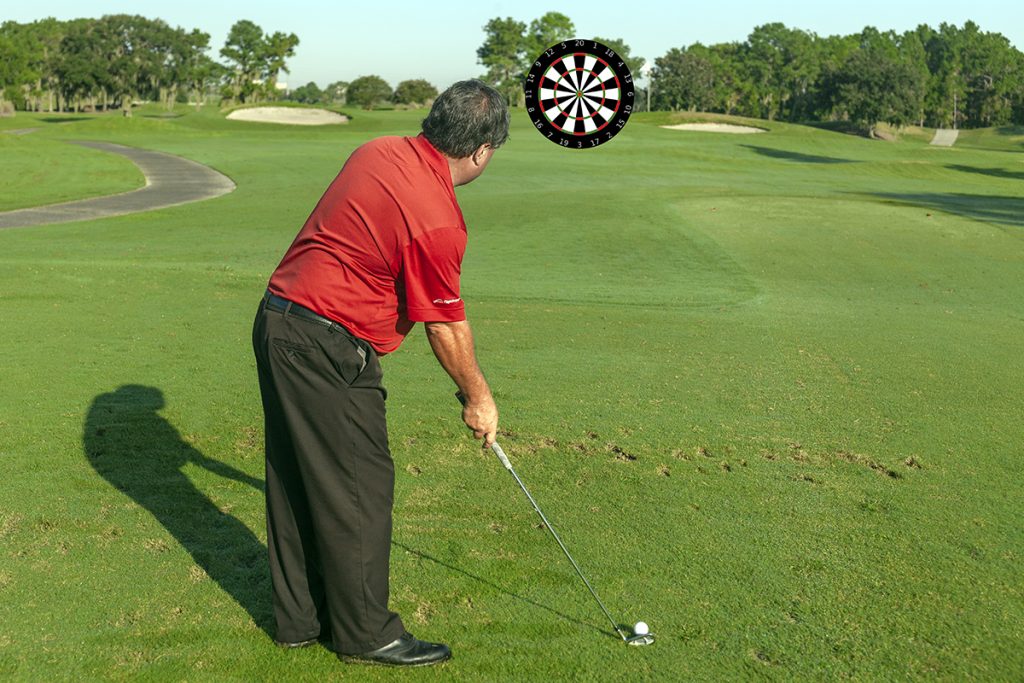
Think of your ultimate target as the bullseye of a dart board, instead of the entire board. Be as specific as possible — a certain leaf on a tree, for instance.
Be More Precise with Your Targeting
All great players use intermediate targets or aiming points such as a divot a foot or two in front of the ball — something that is in your immediate peripheral vision at address.
Tour pros are often quoted as aiming to very precise, smaller targets. The adage of “aim small, miss small,” is a fantastic way of thinking of this concept, and applies to every shot.
Don’t just aim at a tree, aim at a specific part of the tree. If you’re going to aim to a bunker, what part of the bunker? Homing in on a small part of a larger objective stirs the chemicals in your brain and heightens your awareness of not only your target, but the situation you’re in.
As you make smaller targets a part of your pre-shot routine, be sure to incorporate a smaller target that lies within your peripheral vision as you address the ball. Most golfers know to aim to a smaller target in front of your ball that lies on your target line. But of-ten I see golfers aiming to smaller targets five or more feet away from your golf ball. This almost forces you to look up, a lot, and possibly maneuver your body to a position that is not in line with your target. Find a divot, discolored grass, broken tee, anything, that is two or three feet in front of your ball, and you’ll find it easier to keep yourself in line with the smaller target you picked.
Photo 1: Playing “pin high” might not put you exactly even with the pin, but you’ll end up within easy two-putt distance in most cases, either just short or just long of the hole. Photo 2: Choose the club that will allow you two swing comfortably and within yourself, which usually means taking one extra stick. Avoid going for the “career” shot.
Play Pin High Approach Shots
There is a direct correlation between you hitting an approach shot that reaches the flag or past, versus ending up short, and your score. For the average golfer, if you end up short of the flag by more than 20 feet, your chances of making par or better drop to only five percent.
Whether you’re short, long, left or right of the green, hitting an approach shot that covers the total distance you need to carry the shot is essential to your success. The one common mistake most golfers make is trying to hit the “career” shot when it comes to yardage. This is the distance you hit perhaps once ever with any given club, versus the “average” length yardage you tend to hit a club. It’s amusing to witness on the course and very easy to correct, once you understand Career Shots only happen once.
Hitting “pin high” approach shots is easy to accomplish. Choose the right club, the club that hits an average carry distance. Don’t max out any club in your bag. Instead of making an overly aggressive swing with any club, opt for one more club and make a normal swing. You’ll probably find yourself pin high or just past the hole more often.
Play to the Middle of the Green
Most holes are designed with trouble to either side or in front of the green. When pins are tucked close to those obstacles and you “accidently” miss a shot in that obstacle, that is a stupid mistake that is easily correctable.
I had a young competitive Junior Golfer a few years back that always, no matter what the shot, would play to the pin. This left him short-sided for most of his misses off the green, with almost impossible short game shots to salvage par. I placed a soda can in the exact middle of nine greens one day and walked him around the edges of each green, asking him to pace off the distance from a potential place where a hole could be cut, to the soda can. Because most greens average about 33-37 paces from any end to the opposite end, he never had more than a 30-foot putt. This convinced him to always target the center of the green. The next tournament he played, he used that strategy to shoot three sub-par rounds in awful conditions and won the tournament by eight shots.
Avoid going for the “sucker” pin and simply play for the middle of the green, which, again, will leave you in two-putt range and keep you out of the trouble lurking right or left.
Moral to the story: If you want to shave some strokes off your game immediately, without any practice, change your strategy as you determine where to hit your approach shots. When in doubt, always aim for the middle of a green. The worst position this can create for you, with your ball lying on the green, is a lot better than the worst position you can be in if your ball is not on the green.
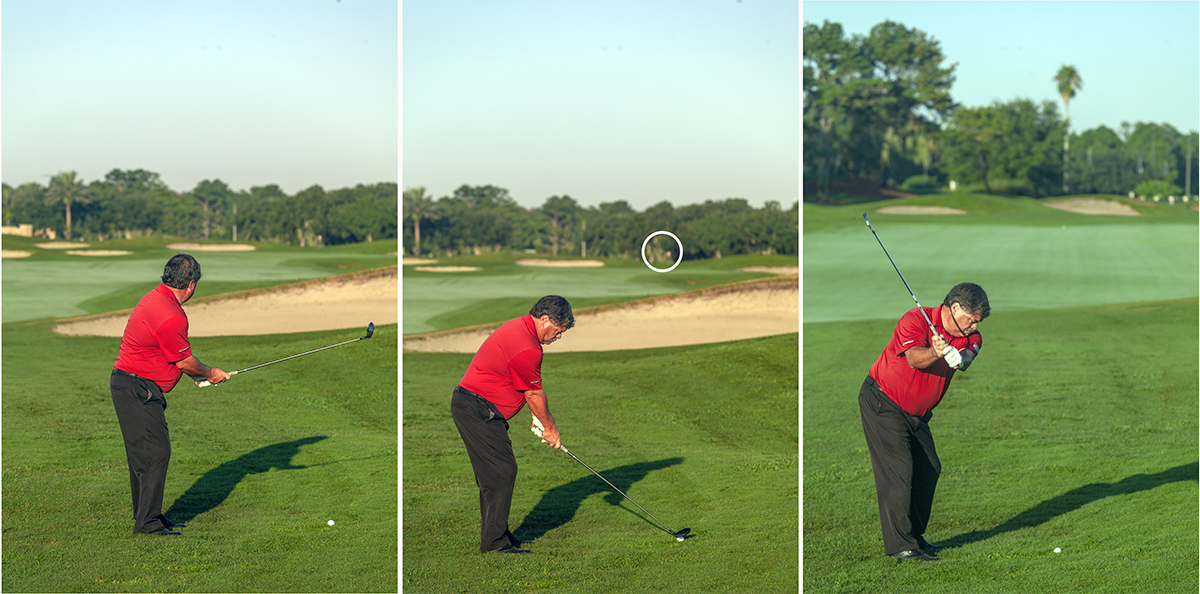
Take a look at hazards in the distance and figure out what is reachable. Here the right-side fairway bunker probably isn’t in play, but the others are. Aim accordingly. Another great aiming idea is to choose a target that’s well out of range, like the base of the tree circled here. Always figure distant slopes into your reckoning of where a ball with land, and how it will carom off those slopes.
Know the Course
Ever been tempted to hit a drive and cut a corner, only to find your ball in a hazard you could not see around the corner?
Or have you estimated yardage to a flag, only to realize you under or over-estimated, placing your shot in a condition you did not know about?
Understanding the course you’re playing as well as what is in play from certain angles your game may place you in, can create easier strategic decisions and in turn, lower scores. It’s your responsibility as a golfer to understand the course you’re playing and know what obstacles are in play versus what obstacles are designed into the course to use as targets. It’s also your responsibility to avoid being tempted into making shots you can’t execute (more about that later). Here are three simple items of thought you can use as you under-stand the course better and make better pre-shot decisions:
Understand what is in play versus what is not in play – Know your yardages to certain landmarks as well as understand that what you can’t see from the shot you’re attempting to execute may be in play
Aim for landmarks that you can’t reach – If a tree, bunker, or other landmark is in direct line with your intended target line, but is not reachable, you have a green light to take dead aim at that landmark
Understand slopes and use them to your advantage – Ever tried to have a shot hit a slope and carom back to your target? Of have you purposely aimed wider of your intended target to marginalize the slope your ball is on? Being able to creatively use slopes, and or avoiding slopes altogether, can shave a couple stokes off your game.
Often you have the option of hitting one of two clubs or more, expecially on par 5s. Go with the one you can rely on for accuracy and control. Aim to take into account your usuall ballflight — fade or draw, and set up to give your ball the widest possible margin of error. Here I’m definitely playing to a fade. Have creeping doubts that you can hit the ball far enough with one club? Then go with a shorter one and keep it in the short grass to avoid extra strokes.
Play to Your Strengths
One of the most common flaws all golfers make is attempting a shot that you are not capable of pulling off. Professionals included, this most often hap-pens when trying to rescue your round from a difficult position. Attempting the super hero shot from extremely difficult positions can quickly create a double-digit score for one hole of your round, making the rest of your round worthless.
Playing to your strengths can sometimes be humbling, in good ways. You’ll recognize what skills you need to practice. Or you’ll realize that practicing trouble shots a couple times before going out to play may pay dividends later. Most importantly, it’s humbling to play sideways versus forward. Doing that more often than not will definitely have you buy into these three suggestions to play to your strengths:
Choose clubs you know are accurate executing — be willing to give up a couple yards of distance to keep your shot in play
Shape your shot to the design of the hole vs. attempting to hit a shot you can’t — If you hit a fade, align yourself to an intended target line that allows that shot to happen, even if the hole is designed to favor a draw. Doing so may place you a few yards behind where you’d ideally like to be, but most times than not will keep your ball in play from a safe position
Play to yardages you are comfortable with — If in doubt that you can hit a shot that requires a longer distance without placing your ball in a compromising position, opt to lay up, especially the second shot of a par 5, to a distance you know you can stick 90 percent of the time or better. Sacrificing a shot in the fairway may allow you to eliminate an extra short game stroke or putt.
Conclusion
Playing smarter is all about making great decisions. It’s easy to do and requires no more effort than making decisions that allow you to play your game without compromise.
I’ve always told my son there is a difference between dumb and stupid. Stupid knows better. All five suggestions above are now in your brain, and you should know better the next time you’re playing golf not to make a “stupid” mistake. Playing smart golf now can lead to immediately reduced scores, only if you stay true to yourself and committed to making smarter decisions.
John Hughes is a PGA Master Professional, 2023 Northern Florida PGA Teacher & Coach of the Year, founder of John Hughes Golf in Orlando, Florida. Reach him at www.johnhughesgolf.com
The golf set up (PGA) is 70 percent of the golf swing. Perhaps you are among the many golfers that struggle with this concept. Here is a tip and corresponding photos to help you navigate the perfect set up, which leads to great golf fundamentals.
In order to effectively swing the club down a path to the target, it is important to perform three pre-swing principals:
POSTURE, GRIP, and ALIGNMENT
POSTURE
Feet are approximately shoulder width apart (weight on the balls of your feet), knees slightly flexed, upper body tilted from the pelvis, arms in front to swing freely to your target. Keep your chin up, and look down with your eyes.
GRIP
Palms facing each other with thumbs on opposite sides of the shaft in balance of each other. Maintain a light grip pressure for the club head to swing, yet keep control of the club in your fingers. The correct grip will allow the clubface to remain square against the golf ball.
Place a golf tee between your thumb and index finger on the lead hand. Using a proper golf grip the ball will balance on this tee, validating the correct grip position on the club.
Repeat the process of golf tee between thumb and index finger on the trail hand. Palm of your trail hand will match the club face position
ALIGNMENT
Shoulders, hips, knees, and feet are on a parallel line with the target path.
The primary goal is for you to understand and execute one swing concept. The distance from your body to the club is one open hand width away.
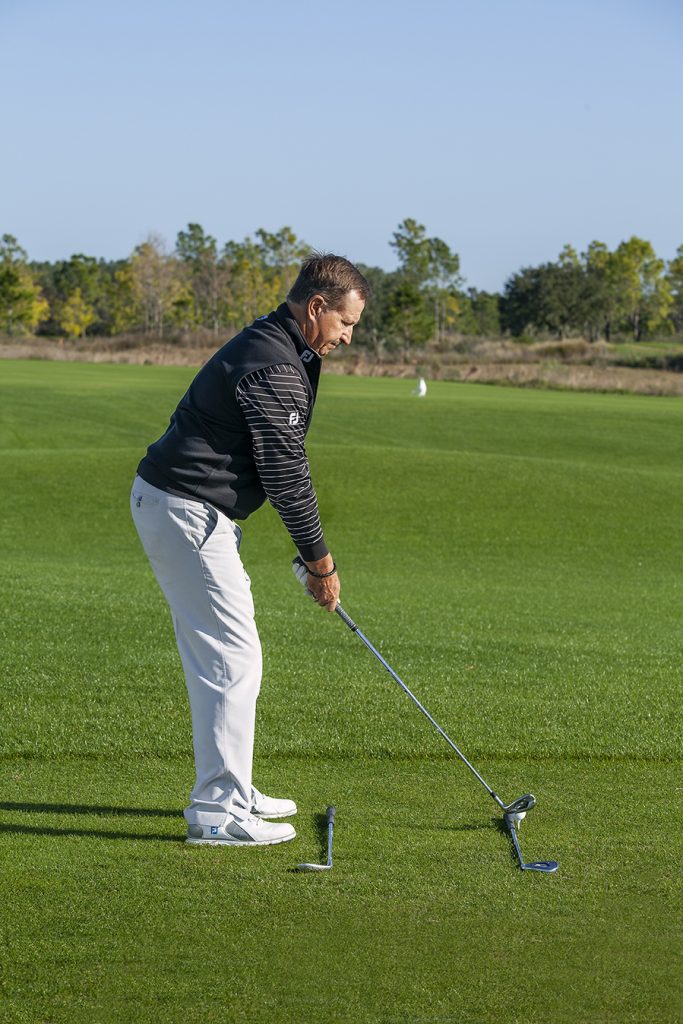
Place two golf clubs on the ground, parallel to one another like a “railroad track.” Shaft of the club closest to your body will be a guide to align your feet, knees, hips and shoulders. The shaft of your club further away from you represents the target line. Place the club head on that shaft to obtain proper direction
Try “PGA” set-up for optimal results!
Warren Bottke is a PGA Master professional based at PGA National Resort and Spa, Palm Beach Gardens, Florida. He was coach to three-time major winner Brooks Koepka from ages 11 to 18. Visit him at www.warrenbottkegolf.com
Hey, guys, it’s Aimee, your golf coach. Today, I’m going to share a tip that will change your driving forever.
Common Mistakes Off The Tee
Many amateur golfers make mistakes such as getting too quick, casting, early extending and using their arms instead of their body turn. These movements are interconnected, leading to shorter distances and slice or hook misses. Prioritizing your swing fixes is crucial. Imagine having a dozen things to work on; addressing the right one first can take care of many others.
What It Takes To Hit Great Drives
Great tempo: If your swing is rushed or inconsistent, you’ll start compensating with your arms, losing power and control. A smooth tempo helps you maintain control over the clubface at impact, enhancing both distance and accuracy.
Tempo
Creating a whip: The whip in your swing generates clubhead speed, resulting in longer drives. This comes from proper hinging, lag and release.
Whip
Maximizing power: Properly using your body means coiling and uncoiling effectively, utilizing a good weight shift.
Maximizing Power
The Key To Great Driving: Setting The Club
Short and slice misses often stem from setting the club incorrectly, leading to a lofty backswing and improper coil. This disrupts the desired whip and causes compensations like casting. Casting reduces whip and control over the clubface, resulting in distance loss and accuracy issues. It also causes you to hit behind the ball, leading to early extension and misuse of your body, draining power from your swing.
Today’s Goal: Mastering Three Essentials
Great tempo
Creating a whip
Maximizing power
To simplify these, let me “Aimeefy” it for you, making golf simple, fun and effective. Focus on one thing: setting the club at the top of your backswing.
How To Set The Club
Setting the club means finishing your wrist hinge in the backswing, like supporting a big serving tray. Many amateurs struggle with this. Properly setting the club enables you to create lag in the downswing. Once you experience the correct setting and lag, you’ll realize how much more efficient your swing can be.
Set Club
Using Training Aids
I recommend using training aids to help you feel the correct movements. These aids provide immediate feedback, ensuring quality practice and preventing the reinforcement of bad habits.
One such aid makes a click sound if you hinge correctly. Common faults include rotating the wrists too early in the takeaway, which disrupts proper body turn and sets the clubhead under the plane. Our goal is to take the club back on a straighter path without excessive wrist rotation at the beginning. You should hear the clicks between the halfway point and the top of the backswing. This indicates a proper hinge and body turn.
ClicksZero Clicks
Practicing With The Training Aid
Put the training aid on and listen for the clicks. Aim to hear the last clicks toward the end of your backswing. Start hitting balls at 50% speed, focusing on hearing the clicks and feeling the lag. As you get comfortable, gradually increase your speed to 100%. Initially, don’t worry about how you hit your shots; focus on hearing the clicks and feeling the lag. A long pause at the top of your backswing is a good sign.
With practice, you’ll set the club, create lag and compress the ball effectively. This will help you develop an amazing tempo, create a powerful whip and maximize your power, leading to longer and straighter drives.
You hit a pretty good drive, but as you step off the yardage to the green, you discover that you’re 5 yards farther than you comfortably hit your 8-iron and 5 yards shorter than you would hit your 7-iron. So what do you do?
Here’s The Solution
Learning to take yards on or off the distance you hit each club is an important skill. If you don’t have it, then the only time you will get close is when you are at exact distances from the pin with each of your clubs.
The odds of that happening are not very likely, so you need to be able to make adjustments in order to give yourself options. Below are clues to help you decide between hitting a hard shot with a shorter iron or a soft shot with a longer one.
Hit The Longer Club If…
The hole plays uphill.
The wind is in your face.
There’s trouble short.
Plus, make sure the distance you’re sitting at is to the pin, not the center of the green. If you only know the distance to the center, play the longer club if the pin is in the middle or back of the green.
Hit The Shorter Club If…
The hole plays downhill.
The wind is at your back.
There’s trouble long.
If you only know the distance to the center, play the shorter club if the pin is in the front of the green.
To add or subtract 5 yards off that club, you need to incorporate the following techniques.
How To Add 5 Yards To An Iron
Step 1–Play the ball just back of center and lean the shaft forward. This will de-loft the clubface, turning your 7-iron into a 6½-iron.
Step 2–Make a full backswing. From the top, feel like you’re about to pinch the ball between the clubface and the grass, as opposed to picking it off the turf.
Step 3–Be sure to accelerate to a full finish.
How To Subtract 5 Yards From An Iron
Step 1–Play the ball forward, more toward your left heel, and set your hands directly above the ball.
Step 2–Make a ¾ backswing, so your hands reach about shoulder height.
Step 3–Swing to a ¾ finish on the follow-through but make sure to turn fully toward the target. Because you are not making a full turn, be sure to keep an even tempo in your swing. It’s easy to rush in the backswing or downswing on less-than-full shots. So think “smooth” when you execute the ¾ shot.
Another “key point” to remember: When hitting your longer club, choke down an inch or two on the handle when taking your grip. It shortens the club, making it easier to control. If you keep this in mind next time you’re faced with shots in between your normal distances, you will find that you will be able to handle the situation better. This is a great tip to practice next time you visit the practice range. Having the skill to execute these shots will give you a world of confidence on the course.