October 16, 2026

golf instruction

Are you choosing the correct side of the tee box for your swing?

If you’re guilty of trying to make a driver swing change in the middle of your round like most, you’ve probably realized that it isn’t the greatest way to play. Instead of trying to make mechanical changes, try playing with the shot that you have for that day and take advantage of your surroundings instead. Most tee boxes are wide enough to set up in a variety of locations, so let’s figure out which side is the correct side for you. In general, whatever side you fear hitting to, you will go to that side of the box.

Scenario 1

Let’s say that you are a player who absolutely hates missing the shot to the left. I would suggest that you set up on that side of the tee box to eliminate the left side. If you tee it up on that side, you will open up more of the right side of the hole.

To help avoid the left side of the fairway. Tee it up on the left.

Scenario 2

If the right side of the hole makes your blood boil, try teeing it up on the right side of the tee box, so you’ll be more inclined to aim out toward the left side.

Golfer who typically fade or slice the ball, you should tee it up on the right side.

Scenario 3

The middle of the tee box works best if your miss is minimal both ways and if you’re teeing off with a shorter club.

If you hit pretty straight then you are generally safe to tee it up in the middle.

Bonus Tip:

Did you know that you can set up with your feet outside of the tee markers? As long as the ball itself is teed up within the parameters of the markers, it is completely legal. As extreme as this may be, it comes in handy if the teeing ground is uneven or if there are divots all over.

As long as the ball itself is teed up within the parameters of the markers, then this is completely legal.

Summary:

Instead of making mechanical swing changes during a round, golfers should use tee box positioning to manage their ball flight and fear of hazards. Align on the side of the tee box that corresponds to the side you fear missing on, or use the center for minimal misses, notes instructor Cathy Kim

Tip provided by: Cathy Kim, PGA/LPGA Professional & Top 25 Instructor

The “Tough Two”: When the Ball is Above and Below Your Feet.

Think back to your last round—how many times did you actually have a perfectly level stance? If you’re like most golfers, you can probably count them on one hand. Golf is a game of slopes, yet we spend hours practicing on level ground. To truly take your game from the range to the course, you must understand how to work with gravity, not against it, by adjusting your setup for every incline. Understanding what may or may not happen from these uneven lies and making the necessary set-up adjustments are extremely important to executing the shot and minimizing the BIG mistakes.

When executing any of the uneven lies, use these three steps to help.

Step 1: Take several practice swings to get a feel for the slope
Step 2: Swing at 75% tempo
Step 3: Use a three-quarter length swing

Here we’ll discuss the two toughest uneven lies: Ball above your feet and ball below your feet.

Uneven Lies: Ball Above Feet

Uneven Lies: Ball Above Feet

Option 1: Action-Oriented Flow

“To execute this shot correctly, start by choking down slightly on the grip for better control. You’ll want to aim just right of your target to account for the ball’s flight path while shifting your weight toward your toes to keep the movement dynamic. Complement this by adopting a more upright posture at address, and consider using less club than usual; this helps take some speed off the swing and effectively reduces the risk of a hook.”

Option 2: Casual & Direct

“When setting up, try shortening your grip and aiming a bit to the right to give yourself some room to work. Keeping your weight on the balls of your feet and maintaining a taller, more upright stance will help stabilize your plane. Finally, reach for less club—it’s one of the easiest ways to kill that unwanted hook and keep your ball on a straighter line.”

Key Adjustments Included:

. Choking down: Improving control.
. Aiming right: Counteracting a hook.
. Weight on toes: Promoting balance and athletic movement.
. Upright posture: Creating a more repeatable swing plane.
. Less club: Reducing swing speed to minimize excessive curvature.

SWING – The more lofted club you use for this shot, the further the face will point to the left. Using a lower lofted club will point closer to the target at address and reduce the amountof hook on the shot. This lie shifts the ball closer and higher to you than normal, which will steepen the swing plane, causing you to hit too much ground. At impact, feel the club just brushing the top of the grass. The slope, and a flatter swing plane, will create a right-to-left flight.

Uneven Lies: Ball Below Feet

Uneven Lies: Ball Below Feet

Option 1: Technical & Instructive Flow

“To properly address the ball and guard against a slice, start by gripping up on the club to utilize its full length for maximum leverage. Set your alignment by aiming slightly left of your target, which helps square the face at impact. At address, shift your weight toward your heels and increase your knee flex to create a deeper, more stable base. Finally, opting for a club with more loft is a simple but effective equipment tweak that reduces the side spin responsible for a slice, keeping your ball flight straighter.”

Option 2: Casual & Action-Oriented

“Setting up for success starts with your hands—grip further up the club to gain a bit more extension and power. You’ll want to aim to the left of your final destination to account for any natural curve, while sitting back with your weight on your heels and adding a bit more bend in your knees. This grounded stance, combined with the extra help of a higher-lofted club, will work together to kill off that slice and keep you in the fairway.”

Key Adjustments Included:

. Grip up: Maximizing club length for leverage.
. Aim left: Offsetting the left-to-right curvature of a slice.
. Weight on heels: Promoting a more stable, grounded foundation.
. Increase knee flex: Lowering your center of gravity for balance.
. More loft: Reducing the axis of side spin to straighten out ball flight.

SWING – This is by far the hardest of the uneven lies. Why? In this situation, your swing needs to be more upright than normal WITHOUT changing your posture or knee flex duringthe backswing. Opposite of the other lie, the ball is now further away, making is easier for you to thin or top the shot. Keep your chest down and keep your knee flex throughout the swing, including the finish. Use a club with more loft to help increase backswing on the ball which will reduce the amount of slice. Play for a left-to-right shape and stay down.

Summary

To wrap up these techniques, it’s all about understanding how small setup tweaks can completely alter your ball flight. The first shot requires a more athletic, “tall” posture with the weight forward to help you hold off a hook and maintain precision. Conversely, the second shot focuses on creating a deeper, more stable foundation with a lower center of gravity to help square the face and eliminate a slice.

By mastering these opposing adjustments, you gain the ability to troubleshoot your swing flaws in real-time and keep your ball on the intended line.

This might sound like a stupid question but do you want to hit the ball further? Well, there are many things that can go right or wrong during the golf swing, but one thing is for sure, the golf ball really cares about what happens at the moment of impact. It is at that precise moment the golf ball is given all its flight data from the golf club. It really doesn’t care about what your swing looks like. Even on the PGA Tour today there are different styles of golf swings. Some people might consider Matt Wolfe to have a very upright swing plane, Matt Kucher flat arms at the top of his swing, or Adam Scott just picture perfect. Is one swing better than another? To be honest, all the golf ball cares about is that the clubface angle is square to its intended target, the club is traveling on the correct plane, and that you make a divot after the golf ball with all your clubs except a driver and of course, a putter.  

A lot of the golfers I see want to hit the golf ball further. More often than not they aren’t being efficient at impact. Common issues I see with amateurs at impact are: weight is on their back foot, their hands are behind the ball, and the left wrist (for a right handed golfer) is cupped. Not only is their ball striking not crisp, but the contact on the club face is not centered. Ultimately the club is ascending into the ball and there is a significant loss of distance.

In order to improve your ball striking and impact you first have to “educate the hands and arms” to be in the right position. If you are a right handed golfer your left hand specifically controls the club face. If your grip isn’t fundamentally sound you’re unlikely to have a square clubface at impact. Your right hand and arm influences the plane angle of the swing as well as shaft lean at impact. The right arm is a major sauce of power in your golf swing because of the levers in your right wrist and elbow. The concept of leading with the left arm and letting the right arm go along for the ride simply doesn’t hold true. You have to use your dominate arm as much as you can in the golf swing.

There are certain drills that can over correct a problem but this impact drill will have you hitting your shots better and maximizing your golf swings efficiency.

Setup: Make sure that your fundamentals are in place and you haven’t cut any corners

Before you proceed with the 2×4 impact drill, make sure that your setup fundamentals are in place and you haven’t cut any corners. Using a short iron, place the 2×4 approximately one foot behind the ball, perpendicular to your toe line. The golf ball should be positioned in the middle of your stance. Your setup should look like you are getting ready to make a full swing.

The Take Back: Take the golf club back until your left arm is parallel to the ground and the shaft is set at a 90 degree angle.

When you’re focusing on improving your impact position in the golf swing, start by making slow half swings. Take the golf club back until your left arm is parallel to the ground and the shaft is set at a 90 degree angle. To ensure that your clubface remains square, make sure that your left wrist remains flat and the right wrist is fully cocked. Your right arm should feel relaxed and soft like a wet noodle and you should have little to no tension in your left arm.

The Down Shift: To start your down swing you have to start transferring your weight toward your front heel.

As you start your down swing you have to start transferring your weight toward your front heel. If you don’t shift you are likely to hit the 2×4 before you get back to the golf ball. Make sure that you are keeping your wrists fully cocked while at the same time making sure that left wrist is flat. All this will ensure that you avoid releasing the club head early and casting. Remember, your hands will lead the charge back towards the golf ball.

The Moment of Truth: Feel like your right arm is extending and driving the club head through the ball and into the ground.

As the club continues to travel on a descending path towards the ball you should feel like your right arm is extending and driving the club head through the ball and into the ground. The most critical moment at impact is when the club reaches the low point in the swing arc and bottoms out. Your low point at impact should be in line with your left heel (approximately 4 inches past the ball) and will be identified as the end point of your divot. It is the only position in the swing that both left and right arms are fully extended at the same time. Other key points to recognize at impact are that your left wrist is still flat and right wrist is bent. The majority of your weight is on your left foot and your right heel is slightly raised.  

Stick the Landing: Your weight is on your left leg, you should be able to maintain a balanced abbreviated finish position.

As you continue to rotate your body into the swings finish position, maintain extension in both arms to avoid the dreaded “Chicken Wing Left Arm”. As long as your right arm pushed down through impact and your weight finished on your left leg, you should be able to maintain a balanced abbreviated finish position. Remember these two key points; if you hit the 2×4 on your down swing it was because your weight remained behind the golf ball. If you were unable to take a divot it is because your right arm didn’t drive the club head into the turf. 

Why Mastering the End of Your Swing Fixes the Start.

Welcome to the finale of our four-part transformation. Over the last three days, we’ve built a rock-solid foundation, wound your core into a high-tension spring, and mastered the “Gravity Drop” that delivers the club with professional sequencing. You’ve done the hard work of rebuilding the machine. Now, it’s time to learn how to stick the landing. Have you ever wondered why the best players in the world—from Tiger Woods to Nelly Korda—look like they’re posing for a bronze statue after every shot? They hold that finish, chest high and eyes on the ball, until it disappears into the horizon. It’s not vanity. It’s not for the cameras. A balanced, held finish is the ultimate “receipt” for a perfect swing.

If you find yourself stumbling forward toward the ball, “walking” after your shot, or falling back toward your heels, it is a definitive sign that your swing path was a mess long before impact. Your finish is the diagnostic tool for everything that happened in the previous two seconds. Today, we’re closing the loop. We’re going to focus on the end of the swing to fix the beginning.

The Finish as a Mirror: Diagnosing Your Faults

In golf, the “result” isn’t just where the ball goes; it’s how your body ends up. Your brain is an incredible compensation machine. If you swing too much from the outside (the slice path), your weight will naturally pull toward your toes to keep you from falling over. If you swing too much from the inside, you might find yourself falling back toward your heels.

By forcing yourself into a specific, balanced finish position, you are actually “reverse-engineering” your swing. When you commit to a pro-level finish, your brain subconsciously self-corrects your swing path and tempo mid-stream to make that balance possible. You cannot hold a perfect finish if your transition was violent or your path was crooked. To own the finish is to own the fairway.

The Drill: The “Three-Second Freeze”

This drill is the ultimate lie detector. It’s easy to fake a good swing for a split second at impact, but you can’t fake balance once the club has stopped moving.

The Mission: To prove your swing was in total equilibrium and that you used your “foundation” from Day One correctly.

1. The Setup: Head to the range or your backyard net. Grab a mid-iron, like a 7-iron, and go through your full routine: the Wall-Butt hinge, the Shoulder-to-Chin load, and the Step-In transition.

2. The Action: Swing through and make contact. But here’s the catch: You are strictly forbidden from moving your feet, dropping the club, or “stepping out” of the swing until the ball hits the ground (or for at least three seconds if you’re hitting into a net).

3. The Checkpoint: While you are “frozen” in your finish, run through this mental checklist:

. The Chest: Is your shirt buttons (or chest) facing directly at the target or even slightly left of it?
. The Weight: Is 95% of your weight on your lead leg? You should feel like you could stay there all day.
. The Trail Foot: Is your trail shoe completely vertical, with only the very tip of the toe touching the turf?The Spine: Are you standing tall, or are you “crunching” over?

4. The Payoff: If you can’t hold this for three seconds without wobbling, you’re swinging “out of your shoes.” It means you’re trying to generate speed with effort rather than with the sequencing we’ve built this week.

Did you notice any specific wobbles during your first few Three-Second Freezes, or were you able to stay rock-solid right away?

Efficiency Over Effort

The “Three-Second Freeze” teaches you the difference between forced power and efficient power. When you swing within your balance, you create a more consistent strike. A center-face hit at 80% effort will always out-drive a toe-hit at 100% effort.

The finish is where you prove you stayed “connected.” If your arms and body finished together, you’ll be as stable as a tripod. If your arms raced ahead or your body outran your hands, the “statue” will crumble. By mastering the finish, you’re training your nervous system to maintain control through the most violent part of the swing.

Summary: The Receipt of Success

The finish is where you diagnose your game. It’s the final grade on your four-day exam. When you commit to a full, balanced follow-through, you remove the “hit” impulse and replace it with a “swing” motion. You’ve now completed the circle. You started with a foundation that allowed for movement, you built a turn that created tension, you mastered a transition that used gravity, and now you’ve learned to hold it all together until the very end.

The Final Word

You’ve gone from a shaky, “Rubik’s Cube” setup to a pro-level finish. You have the blueprint in your hands: Posture, Load, Transition, and Balance. The instruction phase is over. Now, it’s time to stop reading and start swinging. The transformation won’t happen sitting on the couch; it happens in the dirt. Grab your bag, head to the first tee, and show your playing partners what a four-part transformation looks like. Your skyscraper is built—now go see how far the penthouse can hit it.

Need more help? You’ll find it here at golftipsmag.com

Letting Gravity Do the Heavy Lifting in Your Downswing.

The Gravity Drop: Mastering the Transition from Load to Lead

Welcome to Day Three. This is the moment of truth. Over the last two days, you’ve built a professional foundation and wound your torso into a high-tension spring. You have the posture of an athlete and the potential energy of a coiled cobra. But now comes the part where most amateur games fall apart: the delivery. If the backswing is about building the engine, the downswing is about the transmission. Most golfers panic at the top of the swing. They see the ball sitting there and their brain screams, “Hit it!” In response, they “cast” the club from the top, throwing their hands and shoulders at the ball like they’re trying to swat a fly against a wall. This move—the dreaded “Over-the-Top” move—is the primary cause of the weak slice and the pulled shot. The pros do the exact opposite. They don’t try to “hit” the ball; they let gravity and sequencing do the work. They understand that speed isn’t created by shoving the club downward; it’s created by letting the club “drop” into the slot so it can arrive at the ball with clinical precision and maximum velocity.

The Secret of Sequencing: The “Bottom-Up” Engine

In a perfect golf swing, the downswing starts before the backswing even finishes. Think about a professional pitcher or a quarterback. They don’t wait for their arm to reach the furthest point back before they start stepping toward their target. Their lower body moves forward while their upper body is still finishing its load. This creates “separation.” When your lower body starts moving toward the target while your shoulders are still turned away from it, you create even more tension. This is the “Gravity Drop.” By shifting your weight to your lead side first, the club naturally falls into a shallower, more inside path. When you “cast” with your hands, you pull the club outside the line, forcing a steep, across-the-ball strike. When you lead with your hips, the club “slingshots” behind you, allowing you to hit the back of the ball rather than the side of it. Today, we are going to force your body to feel this professional sequence.

The Drill: The “Step-In” Transition

To master this, we’re going to use a dynamic drill that makes it impossible to “cast” the club. This drill forces your lower body to take the lead in the dance, creating a natural, effortless transition.

The Mission: To force your lead side to “re-center” and clear the path before your hands have a chance to take over.

1. The Starting Block: Set up to a ball (or just a spot on the ground) with your feet touching—heels and toes side-by-side. Hold the club in your normal grip, but keep your stance completely narrow.

2. The Move: Start your backswing as you normally would, focusing on that “Shoulder-to-Chin” rotation we practiced yesterday.

3. The Action: Here is the key: Just as the club reaches about 75% of the way to the top—before you’ve finished your backswing—take a small “stride” (about 6 to 10 inches) toward the target with your lead foot.

4. The Follow-Through: Once that lead foot plants firmly on the ground, let your hips turn and allow the club to swing through.

5. The Payoff: This “re-centering” move is a game-changer. It forces your hips to clear and your weight to shift forward before your hands can fire. You’ll feel the club “drop” onto an inside path, ensuring you hit the back of the ball with a compressed, powerful strike.

When you tried the Step-In drill, did you find it difficult to time the stride while the club was still moving backward?

Why “Effortless” Speed is the Fastest Speed

There is a massive difference between “swinging hard” and “swinging fast.” When you swing hard with your arms, your muscles tense up, which actually slows the clubhead down. When you sequence the swing correctly—starting from the ground up—you create a “whip” effect. Imagine a long bullwhip. To make it crack, you don’t throw the tip of the whip at the ground. You move the handle forward, then snap it back. The handle (your hips) leads, and the tip (the clubhead) follows with massive, multiplied speed. By using the Step-In Transition, you are training your body to be the handle, not the tip. This is how players like Fred Couples or Ernie Els look like they’re barely trying while the ball screaming off the face.

Summary: Power is Sequenced, Not Forced

The transition is the bridge between your preparation and your result. If that bridge is shaky, the result will be inconsistent. By letting the lower body lead the downswing, you eliminate the “handsy” compensations that lead to fat shots, thinned shots, and slices. You’ve learned that the downswing isn’t a race to the ball; it’s a controlled release of the tension you built in Part 2. When you trust the “drop,” you stop fighting the club and start letting the club work for you.

What’s Next?

You’ve made contact, and if you’ve followed the sequence, it probably felt like butter. You’ve felt the “click” of a compressed ball and seen the higher, more penetrating ball flight. But the work isn’t done. Are you falling over your own feet after the strike? Are you “walking after” your shots because you’re off-balance? A great swing doesn’t end at impact; it ends in a position of total control. Tomorrow, we wrap the series by mastering the “Statue Finish.” This is the secret to consistency that the cameras love, your playing partners envy, and your scorecard desperately needs.

Check back tomorrow for Part 4, the final piece of the puzzle that ensures every shot you hit is as repeatable as the last.

Stop Lifting the Club and Start Loading the Engine.

The Power of the Coil: Why “Loading” Beats “Moving” Every Time

Welcome back to Day Two of your transformation. Yesterday, we tore down your old, shaky foundation and replaced it with a rock-solid, athletic setup. You’ve mastered the hip hinge, your weight is over the balls of your feet, and your arms are hanging with professional “dead weight” relaxation. You finally look like a golfer who means business.

But here is the hard truth: standing like an athlete is only half the battle. Now that you’re standing like one, it’s time to move—but “moving” isn’t actually the goal. “Loading” is.

The biggest mistake amateurs make is equating a “big swing” with a “powerful swing.” They see a pro like Rory McIlroy or Dustin Johnson and try to mimic the length of their backswing. To get there, they “sway” their hips away from the target or “lift” the club into the air with their shoulders. In doing so, they bleed energy out of the back of the swing like a leaky tire. Real distance isn’t born in the length of your arms; it’s born in the friction between your upper and lower body. Today, we’re turning your torso into a high-tension coil that’s begging to be released.

Movement vs. Torque: Understanding the “X-Factor”

In the world of high-level golf instruction, we talk a lot about “X-Factor.” This is the difference in rotation between your hips and your shoulders. If your hips and shoulders turn the same amount, you aren’t a golfer—you’re a revolving door. There is no tension, no stretch, and therefore, no speed.

To hit the ball a long way, your lower body needs to act as an anchor while your upper body winds up against it. Think of a slingshot: if you move the entire slingshot backward, nothing happens. But if you hold the frame still and pull the elastic back, you create potential energy.

When you “sway” or “slide” off the ball, you’re moving the whole slingshot. When you “coil” while keeping your trail leg stable, you are stretching the elastic. Today’s mission is to teach you how to feel that stretch for the first time.

The Drill: The “Shoulder-to-Chin” Rotation

This drill is designed to take the club out of your hands so you can’t “cheat” the turn with your arms. We are going to use the posture you built yesterday to create maximum torque without sliding an inch off the ball.

The Mission: To find your “max load” point and ensure your lead shoulder is doing the heavy lifting, not your hands.

1. The Setup: Assume your “Wall-Butt” posture from Day One. Instead of holding a club normally, take a mid-iron and hold it horizontally across your chest. Pin it against your shoulders with your arms crossed over your chest (left arm over right for right-handers).

2. The Target: Look down and pick out a specific blade of grass (or a coin on the carpet) directly between your feet. This is your “center.”

3. The Action: Without letting your hips slide toward your trail side, turn your torso back. Focus on moving your lead shoulder (the one closest to the target) down and across. Keep turning until the end of the club points behind that blade of grass.

4. The Checkpoint: At the top of this turn, your lead shoulder should be tucked neatly under your chin. Your back should be facing the target, and your trail leg should feel like a pillar of concrete holding your weight in place.

5. The Payoff: If you’ve done this correctly, you will feel a deep, slightly uncomfortable stretch in your lead lat and your trail hip. That isn’t pain—that is stored energy. You have officially turned your body into a high-tension spring.

During the Shoulder-to-Chin drill, did you find it difficult to keep your eyes on the blade of grass while completing your turn?

The Myth of the “Long” Backswing

Many golfers believe that if they can just get the clubhead further behind them, they’ll hit it further. This leads to “collapsing” the lead arm or over-rotating the hips. The result? You lose your connection to the ground and your timing goes out the window.

A compact, coiled turn will out-drive a long, loose swing every single time. Why? Because a coiled swing is ready to fire instantly. A loose, long swing requires a “gathering” phase at the top just to get back into position. By the time the loose swinger gets back to the ball, the coiled golfer has already zipped through the impact zone with effortless velocity. When you practice the “Shoulder-to-Chin” rotation, don’t worry about how far the club points. Worry about how much resistance you feel in your core. That resistance is your fuel tank.

Summary: Resistance is the Secret to Speed

The backswing isn’t a position you “get to”; it’s a tension you “build up.” By mastering the relationship between your shoulders and your hips, you eliminate the power leaks that cause weak fades and “short-armed” shots. When you create a centered turn, you stay over the ball, making solid contact almost certain. You’ve moved away from “hitting at” the ball and toward “releasing through” the ball.

What’s Next?

You’re loaded, you’re tense, and you’re ready to explode. You’ve built the engine, and you’ve filled the tank with high-octane tension. But here is the danger: if you fire too early, or if you fire from the top with your hands, you’ll lose all that beautiful energy in the first six inches of the downswing.

Most golfers waste their coil before they even get to the ball. Tomorrow, we’re going to show you how to spend that energy wisely. Join us for Part 3, where we reveal the “Gravity Drop”—the move that turns stored tension into pure, effortless speed.

Check back tomorrow for Part 3 as we transition from the backswing to the most critical move in golf: the start of the downswing.


Why Your Swing is Over Before It Even Starts

The Foundation of Power: Why Your Setup is Sabotaging Your Swing

Welcome to Day One of your transformation. You aren’t here to “tweak” a few things; you’re here because you’re tired of the inconsistency that haunts every amateur’s weekend.
This is the first of a four-part series designed to strip your game down to the studs and rebuild it with the precision of a professional. Most golfers approach the tee like they’re trying to solve a Rubik’s Cube while falling out of a plane. They focus on “fixing” their swing mid-air—trying to manipulate the clubface at 100 mph—but the truth is much simpler: you’re sabotaging yourself before you even move the club.

Think of your setup like a skyscraper’s foundation. If the concrete is tilted at the base, it doesn’t matter how expensive the glass is or how pretty the penthouse looks; eventually, the whole thing is coming down. In golf, that “collapse” looks like a snap-hook into the trees or a thin shot that rattled your teeth. Today, we’re ending the guesswork. We’re getting your body into an aggressive, athletic position that makes success inevitable.

The Anatomy of the Athletic Setup

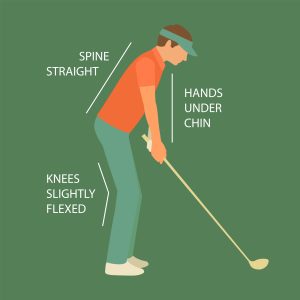
Before we touch a club, we have to talk about posture. The biggest mistake high-handicappers make is confusing “bending over” with “hinging.” When you simply bend over, you round your spine, tuck your chin into your chest, and kill your ability to rotate.

You become a hunchback, and a hunchback cannot move with speed. A pro-level setup requires Dynamic Balance. This means your weight isn’t on your heels (which causes a slice) or on your toes (which causes a shank). It’s centered over the balls of your feet, allowing your large muscle groups—the glutes, quads, and core—to bear the load. When you sit into a proper posture, you create “secondary tilt.”

This is the slight angling of the spine away from the target. It creates the “room” your arms need to swing freely. Without this space, your brain realizes mid-downswing that your knees are in the way, forcing you to “stand up” through impact. We call this early extension, and it is the primary killer of distance.

The Drill: The “Wall-Butt” Posture Check

To find this position, we’re going to use a tool you have at home: a flat wall. This drill removes the ego and the golf ball from the equation so you can focus entirely on feel.

The Mission: To find that elusive “athletic hinge” and create a flat back without looking like a hunchback or a folding chair.

1. The Starting Block: Stand with your back to a wall, feet shoulder-width apart. Position your heels about six inches away from the baseboard. Stand tall, shoulders back, and look straight ahead.

2. The Hinge: Place your hands in the creases of your hips (where your thighs meet your torso). Without bending your knees yet, push your hips backward. Your goal is to “hinge” at the pelvis until your glutes lightly graze the wall behind you.

3. The Soften: Once your glutes touch the wall, add a very soft flex to your knees—just enough to unlock them. Let your arms hang naturally. They should feel like “dead weight,” dangling straight down from your shoulder sockets.

4. The Checkpoint: If you’ve done this correctly, you will feel a slight tension in your hamstrings and your weight will be distributed over the balls of your feet. You should feel “heavy” and connected to the ground, yet ready to spring in any direction. This is the blueprint for a repeatable swing.

How did the Wall-Butt drill feel on your first few tries—did you notice any tension in your hamstrings?

The blueprint for a repeatable swing, begins with a solid foundation.

Why “Dead Weight” Arms Matter

In the drill above, I mentioned letting your arms hang like dead weight. This is a secret many pros won’t tell you: Tension is the enemy of speed.

When you reach for the ball or pull your arms in too tight, you create tension in the forearms and shoulders. This tension acts like a brake on your swing. By finding the correct hip hinge against the wall, your arms naturally hang in a position where they can swing like a pendulum. This “hanging” position ensures that the club travels on a consistent arc, reducing the need for your hands to “save” the shot at the last second.

Summary: Balance is Your Only Constant

A great setup isn’t a suggestion; it’s a requirement. By mastering your hinge and your weight distribution, you eliminate the frantic compensations that lead to those “where did that come from?” misses.

When you start in balance, you stay in balance. You’ve now built a frame that can handle high-velocity rotation. You’ve cleared the path for your hips to turn and your arms to fire. Most importantly, you’ve stopped fighting your own anatomy.

What’s Next?

Congratulations—you’ve officially moved out of the “hopeful” category and into the “intentional” one. You’ve got the stance of a pro, but let’s be honest: a statue doesn’t hit 300-yard drives.

A great setup is just a loaded gun; tomorrow, we’re going to learn how to pull the trigger. We’re taking this rock-solid blueprint and turning your body into a high-tension spring. We’re moving from Posture to Power.

Check back tomorrow for Part 2, where we break down the “Coil vs. Turn” and show you how to generate effortless speed without swinging harder.

Stop second-guessing your yardage and start committing to every strike with a repeatable process for preparation and reflection.

In the high-stakes world of professional golf, the difference between a champion and the rest of the field often lies in the “six inches between the ears.” While fans marvel at 300-yard drives, the true science of the game is found in the repetitive, almost meditative rituals known as the pre-shot and post-shot routines. These are not mere habits; they are psychological anchors that allow players to perform under extreme pressure by turning a chaotic environment into a controlled, predictable process.

The Pre-Shot Routine: The Science of Preparation

For a professional, the pre-shot routine is a transition from the analytical “Thinking Box” to the athletic “Play Box”. In the Thinking Box—usually a few steps behind the ball—the golfer gathers data: wind speed, elevation, lie, and precise yardage. Once a decision is made and the club is pulled, the routine shifts. By the time they step into the Play Box, the thinking is over. The goal is to quiet the mind and let muscle memory take over.

The pros practice this religiously because it builds a “force field” against nerves. For instance, legendary golfer Annika Sorenstam’s routine was famously timed at exactly 24 seconds, rarely varying by more than a single second over a 14-year career. This extreme consistency ensures that whether a player is on the first tee or facing a championship-winning putt on the 18th, the physiological state of their body remains the same. Without this ritual, players often speed up when nervous, leading to the “collapses” seen when a leader’s routine becomes erratic under Sunday pressure.

Finding a Pre-Shot Routine That Works for You

Creating your own routine isn’t about mimicking a pro’s specific “waggle” or “foot-step,” but about following universal principles of focus.

Establish a Decision Zone: Start every shot 2-3 steps behind the ball. Use this space to make your “contract” with the shot. Once you decide on a target and club, commit to it 100%.

Identify Your Visual and Physical Cues: Some players need to see the ball’s flight (visualization), while others need to feel the “weight” of the club or the rhythm of a practice swing. Find a physical trigger—like a deep breath or a specific club adjustment—that signals to your brain, “it’s time to go”.

Keep it Brief and Purposeful: A routine should generally last between 15 to 25 seconds. If you stand over the ball too long, tension and doubt will inevitably creep in.

The Post-Shot Routine: The Art of Letting Go

While the pre-shot routine prepares you for the strike, the post-shot routine protects your mental state for the next one. Its primary purpose is to process the outcome—good or bad—and then “store or reject” it.

A solid post-shot routine involves a brief period of reflection—roughly 10 seconds—where you ask if you were fully committed to the shot. If the shot was poor, you might take one “corrective” practice swing to feel the right motion, then physically signal the end of that shot by cleaning your club and putting it back in the bag. This ritual prevents a single bad swing from spiraling into a bad round, ensuring that by the time you reach your ball for the next shot, your mind is neutral and ready to start the process again.

Summary:

The pre-shot and post-shot routines are the invisible framework that holds a golfer’s physical game together. By mastering the science of the Thinking Box and the Play Box, professional golfers ensure their mechanics remain sharp even when nerves are fraying. While the pre-shot routine builds the commitment necessary to execute a high-level swing, the post-shot routine provides the emotional discipline to leave the last result behind and focus entirely on the next opportunity. For any golfer looking to shave strokes off their handicap, these mental rituals are just as vital as any technical swing change.

Take Action:

Ready to take your mental and physical game to the next level? Don’t leave your performance to chance. Become a Golf Tips Premium Member today to gain exclusive access to tried-and-true methods, deep-dive drills, and professional secrets designed to transform you into a more consistent, confident player.

Join here: golftipsmag.com/register

Why your partner needs a cheerleader, not a swing consultant.

Golf is billed as the “ultimate game for a lifetime,” but for couples, it’s basically an outdoor escape room where the only way out is through four hours of testing your partner’s sanity. Played well, it’s a scenic rolling date; played poorly, it’s just a very expensive way to walk four miles in angry silence. If you want to keep your relationship out of the literal and metaphorical bunker, you have to stop worrying about the scorecard and start worrying about making it to the 19th hole in the same car.

Be a Partner, Not a Pro

The golden rule? Your job is to be a cheerleader, not a swing consultant. When your partner sends a ball screaming into the neighboring zip code, your role is to provide a sympathetic “Tough break, you’ll get the next one” or a very optimistic “Well, at least it’s findable!”

The fastest way to turn a sunny afternoon into a cold war is unsolicited advice. Even if you can clearly see their swing looks like a person fighting off a swarm of bees, do not try to “fix” it on the 6th tee. Instead, be helpful with the boring stuff: rake the sand, hunt for their lost ball in the weeds, and keep the snacks coming.

Why the “Spouse Lesson” is a Death Trap

It’s a tale as old as time: a husband tries to fix his wife’s grip, and suddenly they’re arguing about something that happened in 2014. The emotional baggage of your marriage makes “keep your head down” sound like a personal attack. However, when a PGA Pro says the exact same thing, it’s “brilliant expertise.”

Save your marriage and hire a professional. A pro offers:

Look, unless your last name is Leadbetter, you have no business telling your spouse how to rotate their hips. Trying to coach your partner is the fastest way to end up eating dinner in separate rooms. Do yourself a favor and outsource the criticism to a professional. A Golf Pro isn’t just a coach; they’re a highly-trained marital mediator with a bucket of range balls.

Here is why paying a stranger to judge you is the best investment you’ll ever make:

The Emotional Shield (An Objective Eye): A pro doesn’t have skin in the game. They don’t care that you left the wet towels on the floor or that your mother is coming to stay for a week. When they tell your spouse their swing is “a bit over the top,” it’s a technical correction. When you say it, it sounds like you’re questioning their entire lineage. A pro provides a “Safe Zone” where a slice is just a slice, not a symptom of your failing communication skills.

The Great Equalizer (Neutral Ground): Taking a joint lesson turns you back into a team. Instead of one person playing the “Wise Sensei” while the other seethes with resentment, you both get to be clueless novices together. There is something strangely bonding about watching your partner also struggle to hit a stationary object while a guy in a polo shirt patiently sighs at both of you. It’s much harder to be smug when you’re both chunking it into the same bunker.

The “No-Cry” Zone (Customized Growth): Professionals have seen it all—the tears, the thrown clubs, the broken spirits. They know how to give you drills that actually work without triggering a mid-round existential crisis. They can tailor the torture to your specific physical limitations, ensuring you both progress at your own pace without one person feeling like they’re the “project” while the other is the “pro.” Plus, you’re much less likely to snap, “I’m trying, Linda!” at a man you’re paying $80 an hour.

Make it an Actual Date

Unless there’s a green jacket on the line, stop playing like it’s the Masters. Use the “9 and Dine” strategy: play nine holes (or until you’re tired of each other’s jokes) and head straight to the clubhouse for margaritas. If one of you is a stick-striker and the other is a dirt-shoveler, play a Scramble. Both of you tee off, pick the ball that didn’t hit a house, and play from there. It turns the game into a team effort rather than a competition. You can even add stakes: the loser of the putting contest picks the movie, or the person who hits the most trees has to load the dishwasher.

Ultimately, couples golf is about the walk, the gossip, and the shared trauma of losing six balls in one pond. Leave the coaching to the pros and the ego in the trunk. The fairway is a great place to grow closer—as long as you stay out of each other’s swing path.

Using Metronome Precision to Sink More Testers.

The modern game is played on greens that are smoother and faster than ever before. In the past, putting was about “hitting” the ball; today, it is about launching it. To master contemporary surfaces, you must minimize “skid”—the first few inches where the ball slides before it begins to roll. This is achieved by ensuring your putter has a slight upward rise at impact, which imparts immediate forward roll.

On fast greens, “Aim” takes a backseat to “Speed.” If your speed is off by just 5%, the line you chose is instantly wrong because the ball’s “break” is entirely dependent on its velocity. Today’s best players use a metronome-like tempo, where the backstroke and downstroke take the same amount of time regardless of the putt’s length.

To handle high-pressure “testers” (those 4-to-6 footers), the modern strategy is to pick a “pro-side” line—aiming slightly higher than the hole to ensure that if the ball misses, it stays near the cup rather than catching the “low side” and running several feet away.

The Drill: The “Gate of Truth” & The “String Line”

The “Gate of Truth” is the ultimate diagnostic tool for the modern golfer, designed to strip away the “hit” and replace it with a professional launch. This isn’t just another practice routine; it is a high-stakes alignment test that forces you to marry a surgical start-line with a rhythmic, metronome-driven tempo. By narrowing your focus to two specific gates, you’ll immediately identify the micro-flaws in your face angle and stroke path, turning those nervous “testers” into automatic holing-outs.

Here’s What To Do:

The Setup: Find a straight 5-foot putt. Place two tees just wider than the width of your putter head to create a “stroke gate.”

The Start-Line Gate: Place two more tees about 12 inches in front of your ball, leaving a gap only slightly wider than the golf ball itself.

The Execution: Your goal is to swing the putter through the first gate and roll the ball cleanly through the second gate.

The Tempo Add-On: Use a metronome app set to 75 beats per minute. Start the backstroke on beat one, and impact the ball on beat two.

Why it works: The “stroke gate” ensures you are hitting the center of the face (mitigating energy loss), while the “start-line gate” proves your face is square at impact. If you can move the ball through the gates with a consistent 1-2 tempo, your distance control on lightning-fast greens will become automatic.

Summary: To master the modern game’s lightning-fast greens, you need more than just a steady hand—you need a professional’s approach to launch, tempo, and precision. Modern putting has shifted from “hitting” the ball to launching it, where minimizing initial skid is the secret to a pure, consistent roll. By focusing on an upward rise at impact and maintaining a strict, metronome-like tempo, you can neutralize the unpredictability of fast surfaces and ensure your speed always matches your line.

Mastering these nuances on your own can be a daunting task, but you don’t have to do it alone. Become a Golf Tips Premium Member today to bridge the gap between amateur struggles and pro-level consistency.

As a premium member, you’ll gain exclusive access to Golf Tips’ Top Instructors, the very experts who teach the world’s best players how to navigate high-pressure “testers” and perfect their start-line accuracy. Our instructors provide in-depth breakdowns of drills like the “Gate of Truth,” offering the professional feedback you need to turn a robotic stroke into an automatic one. Don’t just practice; practice with purpose. Join us and let the best in the business transform your short game into your greatest strength.

Level-up your game at: golftipsmag.com/register

0
0
Your Cart
Your cart is emptyReturn to Shop