October 17, 2026

Short Game

stooksbury-web-no.1

The dictionary defines a fundamental as the basic function or movement of something. The game of golf has its own set of fundamentals. They serve as our basic framework for golf instruction and help us work within the laws that govern ball flight and ball control. However, as instructors and coaches we sometimes inadvertently misuse the word “fundamental.” We sometimes end up presenting a simple motion preference or unique individual swing characteristic as a rigid, inflexible fundamental. I call these “anti-fundamentals” and since they are often individual in nature and not applicable to the golfing population as a whole, they can often be very damaging to your swing and score, especially in the short game.

In fact, nowhere in the game are “anti-fundamentals” more prevalent than in the world of short game instruction. In the following tips I’ll share with you the five most common.

ANTI-FUNDAMENTAL 1: BALL BACK AND LEAN FORWARD

I hear this one all the time when talking to golfers about their wedge game. They mistakenly believe that hitting sharply down on the ball with a lot of forward shaft lean, as in the photo at left below, helps to ensure they catch the ball first and get clean contact. In fact, the exact opposite is most likely to happen. When you de-loft the club that much you remove any bounce from the bottom of the sole and use too much of the leading edge. That effectively turns the club into a small shovel and greatly reduces your margin for error.


Anti-Fundamentals: Ball Back and Lean Forward

If you’re going to lean left you’d be far better off moving the ball closer to the middle, or slightly forward, in your stance and using a more neutral (standing straight up-and-down) shaft lean, as in the right photo above. It makes the club much more functional because you’re utilizing the bounce properly.

ANTI-FUNDAMENTAL NO. 2: OPEN STANCE AND SWING LEFT

Anti-Fundamentals: Open Stance and Swing Left

I’m not really sure where this one came from but it’s probably the most prevalent — the idea that if you’re going to hit a chip or pitch you should open your stance and swing the club left through impact, as in the photos above. If you swing the club left of your target line then you have to open the face to get the ball to actually fly toward the target. That discrepancy between the path and face makes it much more challenging to gauge starting direction and puts wicked sidespin on the ball. Neither of which makes it any less challenging to get it close with a wedge!

Stand Square and Swing Along Target Line

Instead of aiming and swinging left, just set your body up square to your intended target and swing naturally along your foot line like you would with any other club, as in the photos above. If you need to open the face on your wedge to add some loft go ahead and do so. Because of the significant loft on your sand wedge or lob wedge, a face angle change will not affect the direction the ball flies like it would with an iron or wood.

ANTI-FUNDAMENTAL NO. 3: ONE CLUB FOR ALL SHOTS

Imagine a carpenter showing up at your house to do repair work and the only tool he brought with him was a screwdriver. That’s exactly what happens when you try to use only one wedge — a 60-degree, for instance — to hit all different shots around the green.

Anti-Fundamentals: Different Wedges For Different Shots

Statistics tell us that whether you shoot 68 or 108, over 70 percent of your shots will be hit with less than a full swing. Just like the carpenter needs a multitude of different tools to suit the task at hand, so do you when faced with an endless possibility of short game shots during a round. Instead of carrying only wedge to hit every shot, consider making room in your bag for three or four wedges, as in the photo above; your 5-wood won’t mind taking a break this season.

ANTI-FUNDAMENTAL NO. 4: CHIP WITH STRAIGHT ARMS

This is an old one. “A chip is just a putt with a lofted club,” or “keep your arms straight so you don’t flip the club” are comments I hear every day as I walk around the practice green. Here’s the thing: a chip shot is NOT the same as a putting stroke, and I’ve never seen any other athletic endeavor using a stick and ball that is performed with “stiff” arms, as in the photos below.

Anti-Fundamentals: Chipping With Stiff Arms

If I were to hand you a ball and ask you to stand in a golf posture and lob it underhanded onto the green, you most certainly would not do so with stiff arms. Your trail arm would gently fold on the backswing and the wrists would hinge the club up slightly, and the same would happen on the other side of the swing in the follow-through, as in the photos below. The motion comes from the softness and lack of tension in the arms as the swing begins. It provides you with the same feel for distance control as if you were simply tossing the ball.

Chip With Soft Arms

ANTI-FUNDAMENTAL NO. 5: LEAN FORWARD AND HIT DOWN IN A BUNKER

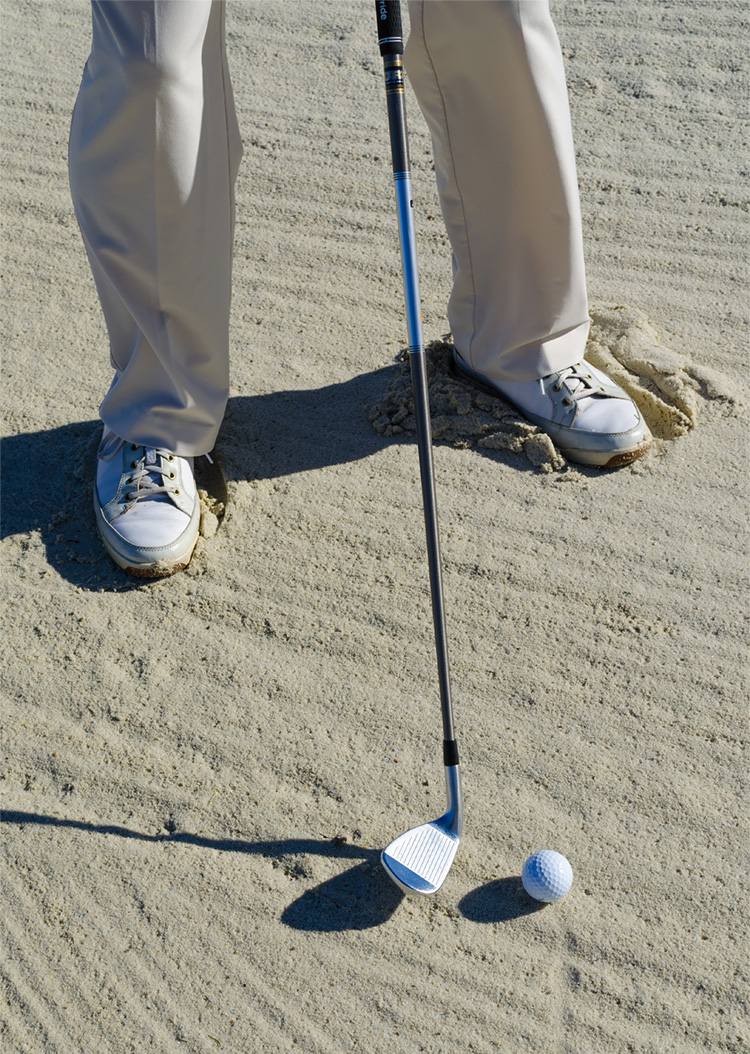
This has the potential to be one of the most damaging anti-fundamentals of them all. Because we don’t actually strike the ball (we should hit the sand 1-2 inches behind the ball), being a good bunker player requires total control over where the club enters the sand and depends heavily on being able to regulate the amount of sand between the clubface and ball. Both are extremely difficult it you’re taking a large, deep divot of sand…which is exactly what will happen if you have too much weight on your forward foot and you swing down steeply into the bunker, as in the photo below.

Anti-Fundamentals: Bunker Wrong and Right

You’ll find it much easier to play shots out of the bunker if you make a longer, shallower divot that minimizes the amount of sand you take (see inset photo above). In order to do so you must make a swing with a flatter bottom that barely “skims” the sand as it hits the ball. This is accomplished with a set-up that has the ball forward and the weight 50/50 and NOT favoring the lead leg. The photo above shows this proper set-up. From that position you simply make a normal swing like any other shot out of the fairway and the loft and bounce on the club will do the work for you.

•••

The next time you’re out on the course for a practice session or a round, watch out for these “anti-fundamentals.” Don’t be afraid to try something different or new with your short game and you might find you really like the results.

Golf chipping tips: common denominators

Brandon Stooksbury is PGA Director of Instruction at Idle Hour Club, Macon, Georgia and co-author of “The Wedge Book — An Owner’s Manual for Your Short Game.” Visit him at www.brandonstooksbury.com

Golf chipping tips: common denominators

Beat The Anchoring Ban 1

On January 1, 2016 the USGA implemented Rule 14-1b, which prohibits anchoring a club while making a stroke. Anchoring a club to a player’s sternum or belly allows a player to easily swing the golf club in a pendulum-like motion. This golf anchoring ban affected many golfers at all levels.

Benefits of making a pendulum-like stroke:

  • Produces a shallow angle of approach
  • Maintains consistent loft of the clubface
  • Utilizes the bounce of the golf club

The player’s responsibility is to swing the club along the target line and keep the clubface square to the path. Even though anchoring a club is no longer within the Rules of Golf, you can make a pendulum-like motion and improve your game by following these simple steps.

Beat The Anchoring Ban 1

STEP 1: SET THE HEAD

Position the golf club behind the ball so that the club face is perpendicular to the target line, as in the photo above.

Set the shaft so that it too is perpendicular to the target line, as in the left photo below. The best view will be when your eyes are over the golf ball.

Note: This view may only be accessible with the putter due to its length and lie angle.

Beat the Anchoring Ban 2

STEP 2: SET THE BODY

Center yourself so that the shaft appears to bisect your body at your belt buckle, sternum, and nose, as in the right photo above. This will position the club directly beneath the center of your body and in the middle of your stance. Square yourself to the club so that an equilateral triangle connects the hosel of the golf club, your left foot, and your right foot.

Hold the golf club with a balanced grip. The palm of the trail hand should face the target while the palm of the lead hand faces opposite of the target. Note: The hands are simply clamps to hold the golf club. The wrists and elbows are hinges and should be free of tension.

Beat the Anchoring Ban 3

STEP 3: SWING

Swing the club in a circular motion so that the handle of the club and the clubhead move in the same direction and at the same time. The shaft should point towards the center of the body (belly, sternum, etc.) as though it were anchored.

DRILL: Place a tee in the butt of the club. At address, identify the tee’s relationship with your lead forearm. As the club swings, watch the tee and confirm that it maintains its relationship with your lead forearm

Beat the Anchoring Ban 4

PITCHING

Swing the club in a circular motion so that the handle of the club and the clubhead move in the same direction and at the same time. Imagine the swinging motion of the golf club as the hour hand of a clock. The address position (see inset above) is 6 o’clock, to the right are 7 and 8, and to the left are 5 and 4. Both ends of the club should arrive together at each hour of the clock.

Beat the Anchoring Ban 5

CHIPPING: SWINGING ALONG THE TARGET LINE

The laws of physics state that for the golf ball to go in a given direction, the club must also move in that direction. Therefore, it is a golfer’s responsibility to swing the entire golf club towards the target. Imagine the shaft of the golf club as a laser beam. As the club swings, the laser beam should create a line on the ground connecting the ball to the target, a.k.a. the “target line.”

Beat the Anchoring Ban 6

PITCHING: SWINGING ALONG THE TARGET LINE

When using an anchored putter you’ll find that the face remains square to the path of the club. Do the same when you make the swing and you’ll find the club face returns correctly to the ball.

BRINGING IT ALL TOGETHER

Learning to move your clubs like a pendulum is a change that’s worthwhile. You can create shots with the height and roll-out that you want by using this same swing and merely changing clubs. With this setup you won’t deloft the club, lose the benefit of the bounce, or be hindered by an angle of approach that is too steep.

Henry Stetina is an administrator in the New Mexico State University PGA Golf Management Program. Photos shot at Red Hawk Golf Club, Las Cruces, New Mexico

The Baby Y Drill

Quick Tips | Chipping and Pitching Drill

I see a lot of golfers set up incorrectly by having their hands hanging straight down and the club shaft is vertical, with the hands even with the golf ball. In Photo 1, you can see that I have pressed my hands towards the target to give me forward shaft lean and have simulated a good impact position — with the arms and shafts forming a “baby y.” Also note that my hands are in front of the club head.

I believe that setting up with a good impact position is essential to getting back to the same position. If you set up with the hands more towards the trail leg, the more likely you’ll have the same look at impact.

So now that you have the set up, let’s try and keep the same position until the end of the swing. In Photo 2 you can see that my hands are still leading the club head — the same position that I had at set up. The only way that this can happen is to make sure your body is the engine supplying the energy to the shot at hand.

Hold your finish at the end of the shot and see if you have achieved the look of Photo 3, with the hands still ahead of the clubhead.

Chipping and Pitching Drill

The key to hitting pitch and chip shots is with your pivot, and the speed at which your pivot and arms work together. If the pivot slows down, the more likely your arms and hands will speed up and your clubhead will end up on the wrong side of your hands.

Jack Crosley is PGA Golf Instructor at The Vintage Club in Palm Desert, Calif., and Carlsbad Golf Center. Follow him on Twitter @jcrosley3 or on Instagram at JackCrosleyGolf. 

Golf chipping tips: common denominators

The Long Bunker Game

Photo 1

For long greenside bunkers — traditionally one of the most daunting shots in golf — don’t reduce your margin of error and make the shot harder than it already is. Too many golfers try to hit closer to the ball and take less sand, thus reducing their margin of error. Instead, use a less lofted club and focus on hitting two inches behind the ball, blasting the ball out as you normally would. My normal club selection from a good lie in soft sand is up to 10 yards of carry with a lob wedge (60 degrees), up to 20 yards of carry with a sand wedge (56 degrees), up to 30 yards of carry with a pitching wedge, up to 40 of carry with a 9 iron and up to 50 yards of carry with an 8 iron (see Photo 1 for this selection of clubs). Using more club allows me to make a swing with good tempo and hit two inches behind the ball (for a good visual, look where the shadow of the club is on Photo 2).

The Long Bunker Game
Photo 2

If I accidentally hit a little too close to the ball, say one inch behind, the ball will fly further but spin more and stop quickly, still giving me an acceptable shot. If I’m not using enough club, I would have to hit one inch or even a half-inch behind the ball, and if I hit a little too close to it, I would hit the ball first — causing it to go flying over the green and into whatever trouble is lurking on the other side. Not good.

The Long Bunker Game
Photo 3

Some of you may be thinking or worrying about how using a less-lofted club might not clear the lip of the bunker. Don’t. Your pitching wedge, 9 and 8 iron have less bounce than a standard sand or lob wedge. A typical pitching wedge will only have six to eight degrees of bounce while an 8 or 9 iron may only have four to six degrees of bounce. This is important because you have to open the face more at address with a club that has less bounce (Photo 3). Opening the face also adds loft and will get the ball over the lip of the bunker. Give it some practice and you will see that it makes one of the hardest shots in golf a lot easier.

GET OUT EVERY TIME WITH THE ‘SURE-OUT’ METHOD

Do you struggle with inconsistent bunker play? Try the sure out method for more reliable results. This greenside bunker method keeps your swing radius constant and the bottom of the swing in the right arc in the right place, 2” behind the ball. From soft sand set up as follows:

Photo 4
Photo 4

Stance about hip to shoulder width apart and your weight just slightly favoring your left side, 55-60%. (Photo 4)

Photo 5
Photo 5

Play the ball just left of center (toward the target) with the clubface slightly open (right of target). (Photo 5)

Without using your wrists and adding any arm swing to the motion, focus on turning your belly button back away from the target and then back through toward the target (Photo 6).

abraham-bunker5
Left: Photo 6; Right: Photo 7

You should finish with your belly button facing the target and your weight and upper torso over your left leg (Photo 7).

Once you get the hang of hitting greenside bunker shots this way, you can eventually allow the wrists to hinge and help hit the ball higher and softer.

Photo 8
Photo 8

>>Drill: Start with the butt end of the grip in your belly button and grip down on the club below the grip (Photo 8).

Keeping the grip touching your belly button, turn back and through keeping the butt end of the club in your belly button (Photos 9 & 10).

Left: Photo 9; Right: Photo 10

This drill should give you a good feel of allowing the large muscles of your pelvis and torso to control the shot. Trouble happens when the little muscles of the arms and wrist take over and the big muscles don’t move.

How To Be A Chip-Shot Champion

Missing greens is pretty much the norm for average golfers. In fact, statistical studies over many years prove that higher handicappers miss almost 16 greens each round, and the majority of those misses are short of the green (a topic for another instructional piece). That’s an overwhelming statistic. But it also reveals what area of your game you can improve the most, almost instantly, that will improve your scores without hitting any more greens than normal.

In other words, the chip shot is arguably the most important shot any golfer should master.

Exactly what is a chip shot? The simple definition is a shot that has more “roll time” than “air time.” The ball is hit with a lower trajectory, lands on the green and rolls itself to the hole utilizing as much of the green as possible.

When do you use a chip shot? Any time you miss the green, as well as when you are in trouble from an errant tee shot. The chip shot is your friend anytime you’re looking to hit a more controlled shot.

How do you hit a great chip shot?

Club Selection — You can use any club in your bag after determining the amount of distance the ball needs to travel in the air versus the amount of green you have to work with to roll the ball as much possible. A simple rule to remember is the more loft, the less roll.

Aim – When aiming, there are two obvious targets you must hit to execute a great chip shot:

Intermediate Target on Green — Where you want the ball to land. It’s a spot on the green that allows for the ball to release properly and roll to the hole. To avoid the ball from landing inconsistently, pick a spot approximately three to five feet on the green. Hint: As you make practice swings, look at that spot, imagining the ball landing there and releasing to the hole. Doing so makes it easier for your eyes and brain to calculate the size of your swing.

The Hole (Bull’s Eye) – Very much like throwing a dart to the bull’s eye of a dart board, I believe you should execute chips from around the green with the sole purpose of making the shot. Too often the chip shot is taught to come to rest within three to six feet of the hole. Under a pressure situation, most of thee chips come up well short or well past your imaginary six-foot circle. Too many studies prove taking dead aim at a target reduces the size variance of missed attempts at a target. In other words, when you take dead aim, balls that don’t go in the hole end up closer to the hole. Hint: Using the intermediate target as the point where the ball rolls to the hole, continue to make practice swings looking at the spot where you want the ball to land, while imagining the ball rolling from that spot to the hole, and entering the hole. Hold your follow through position with this image in mind — it will give your eyes and brain the information they need to execute the proper length stroke for the shot at hand.

How To Be A Chip-Shot Champion

Set-Up – Four simple yet widely overlooked set-up positions will guarantee you hit a better chip shot every time:

Place your Feet slightly “open” to your intended target, not pointing at the target.

The ball should be slightly behind the middle of your stance.

Your weight should be slightly into your forward hip (approximately 60-80 percent depending upon conditions).

Your hands should be low on the grip/handle of the club.

How to swing the club to hit a great chip? The chip shot swing motion is very easy to execute. It’s a smaller than normal swing that has little to no wrist hinge, made mainly from your shoulders and arms, with your lower body solid as you make your back swing, and moving slightly forward as you finish the swing.

A few pointers to properly make a great chip shot swing:

Backswing – Maintain a “triangle” between your shoulders, arms, and hands as you make your backswing. Use your front shoulder to push the club back to a position where your wrists barely want to hinge.

How To Be A Chip-Shot Champion

Downswing – Maintain your triangle as you start the down swing with your hips turning towards your target. As you do this, the back of your top hand will stay ahead of the club head itself and face the target as you swing through the shot.

Throughswing – Keep your triangle intact as your hips slightly release some weight from your front side as your arms release the club through the shot.

Drills You can Use to Improve Your Chip Shots

The most common flaws of the average golfer when executing a Chip Shot are:

• Setting up incorrectly to the ball

• Trying to “lift” the ball in the air

• Failing to land the ball at or near their intended target.

The following drills address those issues. You can do them in your own backyard.

How To Be A Chip-Shot Champion

Shaft Extension Drill

In the photos above, you can see how the upper body forms a triangle throughout the swing. You can use the shaft extension drill to feel a great impact position for a chip shot, or for that matter, any short game shot. This drill will assist you with understanding the relationship between your club face and the ball at impact, to the position various body parts should achieve at the moment of impact.

Execution: Place an alignment stick in your hands as you hold the golf club. The stick should extend underneath the front arm. Make practice swings with the club and stick so the stick does not hit your side when you finish. Doing so will force your front hand from breaking down too soon, like it does if you are trying to scoop or lift the ball when you are making your swing.

How To Be A Chip-Shot Champion

Back Toe In Ground Drill

Use this drill to feel the proper weight distribution in your set up, or you are trying to scoop the ball. Set up normally to your chip shot. Before hitting the ball, remove enough weight from your back foot so it can be pointed, toe first, into the ground.

Hit balls from this position to feel:

• A more descending shot into the ball, versus the hands attempting to use the club to “scoop” the ball into the air.

• When you are attempting to understand that you do not need to shift your weight backwards with your backswing.

• Or when you are attempting to better understand a proper weight shift forward as you finish a chip shot swing.

How To Be A Chip-Shot Champion

Towel Drill

Use this drill if you want to aim to a spot on the green where you want the ball to land and release to the hole.

Place a towel on the green where you intend for your Chip Shot to land on the green. Placement of the towel should be about 3-5 feet from the edge of the green.

Hit balls to the towel with a club that will allow the ball to fly to the towel but roll to the hole from that point.

How To Be A Chip-Shot Champion

Circle Around the Hole Drill

Use this drill if you determine how big your “comfort circle” is when trying to make every chip shot, and to make that circle smaller as you become a better chip shot artist. This circle is not about hitting the ball inside a predetermined distance of the hole. It is all about determining where 60-70% of your current missed chip shots come to rest and making the necessary adjustments to leave 90-95% of the chip shots not made within one to two feet from the hole.

Put it All Together

Hit 10 chip shots with the intent of making all of them. After completing the 10 shots, go to the hole and look at where the missed shots come to rest.

Any shots short are a sign you are a passive player with little or no opportunity to make this shot. Any ball short of the hole has ZERO chance of going in. Gradually learn to be more aggressive with your pre-shot routine; look at your targets and be willing to have the majority if not all of your misses end up beyond the hole.

Any shots pin high, left or right of the hole, are good shots. Be more precise with your aim, adjusting set-up or your intermediate target, and you’ll get closer to the hole.

All shots ending up two to four feet behind the hole had a good chance of going in. Refine your distance control by making more practice swings while looking at your two targets.

Any shots ending up more than four feet beyond the hole are a sign that you are too aggressive and need to refine your touch and distance control. Place a flagstick or alignment rod approximately three feet behind the hole and make sure that all shots will come to rest at the hole or no more than three feet beyond.

The smaller the circle your missed chip shots come to rest, the less pressure you place on making a putt for par.

You can practice all of these drills in the convenience of your office, home, backyard, or on the course. Five to 10 minutes every other day is enough for your brain to understand the concepts and your body to feel the set-up and swing positions you want to accomplish, and to adapt your game to a more aggressive strategy to make great chip shots.

John Hughes is a PGA Master Professional based in Orlando, Florida. He is vice president and secretary, North Florida PGA Section and 2013 PGA of America Horton Smith Award Recipient. He offers golf academies at several locations throughout Central Florida. For more information, visit www.johnhughesgolf.com

Golf chipping tips: common denominators

Short Game Visualization

Short Game Visualization

Whatever shot you’re about to play, if you don’t have a clearly visualized image of what it’s going to look like, you stand less of a chance of executing it. And where this has the most powerful effect is the short game and putting. With 60% of the average score within 100 yards, this is an easy way to lower your scores.

Why Visualize?

Visualization is your way to program the necessary information into your brain to tell your body how it needs to move to hit your desired shot (so you can do it without thinking). In fact, studies have shown that when you visualize performing any physical action, you stimulate those same muscles you’ll use when performing the action in reality. It’s like being able to play a couple of practice shots before playing the actual shot. In the short game and putting, there are lots of options for each shot, and touch and feel are required to consistently get the ball close to or in the hole. It’s not like hitting a full 7-iron shot that you know goes a specific distance on average. For short game shots and putts, you have to rely on your depth perception (judging how far the target is away from you) and then your feel to get it there.

Short Game: Visualization

Commit To The Shot

In the short game and putting, commitment is an important factor in your success. Every shot needs to have a plan. There can’t be any doubt or hesitation when you’re over the ball. When you ask yourself the right questions and build a picture of the shot you’re about to hit, you can move more confidently and fluidly about your action, instead of tentatively.

Short Game Visualization

Look And React To The Imagery

With any shot on the golf course, your focus needs to be external, not internal. What I mean is that you need to be focusing on what’s in front of you, not on your swing mechanics. You need to use the information and image of the shot you’ve created to allow your subconscious to control your movement. When you try to consciously control any movement, it impedes it, and there’s a great chance of a miss-hit. You’re much better off trusting yourself to hit the shot.

In most other ball sports, you’re reacting to something that’s happening in the game. But in golf, you have a stationary ball in front of you and plenty of time to think, which makes it a lot harder. However, visualization can help you make it more reactive and keep your movement free flowing.

When you have strong visualization and you’re able to really imprint the image of what you want the ball to do, your attention is more on what’s in front of you and less on your swing. In other words, you’re making golf more reactive. You simply “look” and “react”! Tour players talk about being able to see the image of the shot and the target in their mind’s eye, even when they’re looking at the ball. It’s like having a camera in the left ear (for the right-handed player). This might be considered advanced visualization that you can achieve with practice. How do you visualize for the short game and putting?

Short Game Visualization

Outcome Visualization

Before every short-game shot, I’d like you to ask yourself the following questions:
• How is this lie going to affect the shot I’m about to hit?
• Where does it need to land?
• How high off the ground will it go?
• How is it going to release to the hole?
• Where on the hole will it drop in? Now paint a picture that shows that shot. You can give the line the ball will travel a color if you like. Keep that image in your mind right up until you take the club back.

Short Game Visualization

Process Visualization

Some players find it useful to take visualization a step further and actually imagine themselves hitting the shot, which further programs the necessary movement before the actual shot.

Experiment with process and outcome visualization, and see what works for you.

Short Game Visualization

Visualization For Putting
Putting is all about line and speed. If you don’t use visualization, you’re throwing away strokes.

I’m going to assume your green-reading skills are pretty good and you’ve got a good idea of the line to the hole. Standing looking down the line (facing the putt from behind), make several practice swings until you feel the exact line and speed. Imagine the ball leaving the putter face and following its line to the hole and dropping in. When you feel you have it just right, step into the putt. When you’re over the ball, see the putt again and make your stroke. Here, you’re “reacting” to the image of the line and trusting your body to hit the putt with the right speed (no technical thoughts!). Accept the outcome whether it went in or not and move on.

Spend a good part of your practice time working on making golf about visualization and feel (not mechanics), and make sure that visualization becomes a key part of your preshot preparation. I’m convinced you’ll see improvement quickly.

David MacKenzie is the founder of Golf State of Mind. David is an expert on the Mental Game of Golf, Short Game and Putting. To learn more about David, visit www.GolfStateofMind.com. He can be reached at david@golfstateofmind.com.

I have been teaching and building golf training tools for over 30 years. Both have truly been a passion of mine, starting back when I was a young teenager helping out my friends with their golf game.

When I became a young golf professional, building training tools began to accelerate. As the knowledge of the golf swing and short game grew, so did my arsenal of training tools. Although, many of these devices were built with equipment and materials found at your local hardware store, in the following tip on improving your greenside bunker game, I have used a couple of things that you might just have lying around the house. Have no fear: There’s no table saw, drill press or hammer needed to build this training tool creation!

WHAT YOU NEED
Eight-inch piece of a noodle – like one your kids used the pool when they were little – a dust pan, and a tape measure

THE SITUATION
Sand shots left in the bunker or sculled into the lip or over the green

Far right: Too Far Behind Ball

• One of the keys to consistent sand shots is hitting the sand two to three inches behind the ball. A common occurrence is when the golfer makes contact too far behind and leaves the ball in the bunker.

• Similarly, contact can be made too far behind the ball, but resulting in ‘sculling’ the shot into the lip or over the green. This happens because the club enters the sand with a shallow angle of attack, which causes the club to bounce off the sand and as it is exiting, skulls the ball.

• Both cases require precision relating to sand contact – again two to three inches behind the ball.

THE SOLUTION
• Turn dust pan upside down and place noodle under handle
• Place golf ball inches ahead of dust pan’s leading edge
• Indicate 12 inches with tape measure

With the dust pan in place and set at a steep angle, your goal is to avoid the dust pan in the backswing and downswing.
Two ways to get this done:

1. Lean left address and maintain the lean throughout your stroke
2. Use your wrists early in the backswing to create a steep angle

• The key is to ‘zero in’ on the 2 to 3 mark

What a Nice Feature: Clean up your messy ‘sand divot’ with the dustpan!

THE RESULT
Consistently out of the sand trap and eventually close to the hole.

Watch the quick demonstration video:

When it comes to chipping and pitching, I see a lot of people using only the hands and arms to hit the shot. To become very good at these shots, you must use the pivot of the body so you can take the hands and arms out of the hit. When hitting chips and pitch shots, have the buttons on your shirt out-turn your target. Try to get the sensation that the energy of the strike is coming from the rotation of your pivot and pivot speed.

The differences in the two sets of photos are pretty drastic. In the first set, the arms and hands are way too active, and there’s zero to little pivot of the body.

In the second set of photos, the body has fully turned and I’ve hit the shot with no hands. When chipping or pitching, try to get the buttons on your shirt to out-turn your target.

Jack Crosley, PGA, is an instructor at The Vintage Club in Indian Wells, Calif. Find Jack on Twitter @jcrosley3 and on YouTube at RollYourRock.

Golf chipping tips: common denominators


ARE YOU READY
to start playing your best golf? Is your swing dialed in and you’re confident with your ballstriking? How about your distance off the tee? Are you happy with your chances to reach an occasional par-5 in two? Is your short game ready for action?

Okay, those were the easy questions. Now let me ask you this: how’s your mental game? When was the last time you practiced your decision-making, controlling your emotion or trusting your instincts?

Hmmm, by now, hopefully I have your attention. Playing your best golf isn’t just about putting time in practicing your swing mechanics. You have to work equally as much on your ability to make wise decisions and react the way you should when things don’t go your way. Let’s take a look at some of my favorite tips that are designed to help you play better between the ears and, ultimately, shoot lower scores.

IT’S OKAY TO GAMBLE SOMETIMES
This scenario follows what you saw in the opening photo of this article. I’ve hit a good drive on a par-5, but my tee shot leaked a little to the right and I’m just barely on the fairway. I have two choices. First, I could lay up and put the ball down in the fairway far enough to leave myself with an easy short shot to the green. Or, I can pull out my 3-wood and go for the green, which as you can see is guarded by a few bunkers.

Now, my ball (which you see in the photos below) is just on the first cut of rough, and I actually have a pretty good lie. I’m only 242 yards from the middle of the green, which is right in the wheelhouse for a smooth 3-wood. Decisions, decisions, decisions!

For this shot, I’m going to go for it with my 3-wood, and here’s why. I’ve addressed three key things. First, the lie. I have a perfect lie for hitting a 3-wood since it’s on a cushion of grass. Second, I take a look at my distance, and 242 yards is a very comfortable 3-wood for me. Next, I’ve determined my shot shape and the angle I have towards my target. Because I’m playing from the right side, I have plenty of room to accommodate my natural fade ballflight.

Based on these variables, I’ve made a decision to let ‘er rip. If I don’t catch it flush, the ball will likely end up in the fairway. If I do hit it well, the ball will land soft on or close to the green thanks to my usual fading ballflight.

I’ve decided to go for the green based on the variables I’ve described, but there was also another element to the mix that lead me to take the gamble and go for the green. I had to make sure I felt it was the right shot at the right time. When I held the 3-wood in my hand, I felt confident that I could execute the shot. I also had no trouble visualizing the shot beforehand. The wide fairway accommodated my fade, and I had an innate sense that 3-wood was the way to go.

Sometimes, even when all the variables point towards going for the green, your gut may tell you the better play is to lay up. When it speaks like that, listen to it and lay up! Play the safe shot and don’t hesitate. On the other hand, when the variables aren’t in your favor to go for it and laying up is the safer play, stick to your routine and don’t feel as though you could will the ball to the hole with your 3-wood. Play it safe when you don’t feel comfortable, no matter what the circumstances are. You may have a perfect lie in the fairway, but if it doesn’t feel right to go for it, don’t!


MANAGE THE TEE BOX
Sometimes we get so fixated on what lies ahead that we forget where we’re standing. On this hole (a sharp dogleg to the right), I’ve got to consider not only what club to use, where I want the ball to land and what shot shape I should play, I also need to find what area on the tee box gives me the best chance for success.

It may not look like much of a big deal, but the two tee box positions in the above photo greatly affect my performance on this hole. The one on the left forces me to play a straight tee shot because it pulls the trees on the left side more into play. I may be able to better see the fairway as it doglegs right, but it’s a tricky angle for my natural left-to-right ballflight. At the top of my swing, whether I’m aware or not, my eyes will notice that I have to steer a straight shot from here, and it’s likely I’ll swing with less fluidity and make more mistakes. This is precisely why you sometimes feel uncomfortable on some tee boxes. It’s because your body and your eyes are trying to tell your mind something that you haven’t consciously noticed yet.

The tee position on the right is much better for me, and I feel much more comfortable from here. I can’t see the fairway as well, but I’ve allowed more room to hit a soft fade. This slight adjustment in tee positioning shows that the difference between feeling comfortable or not can be as subtle as a few feet from side to side.

Consider your natural ballflight and be conscious of what part of the tee box is best for you. Also, it doesn’t matter if the hole is 600 yards or 300 yards. Go with the club you feel comfortable with off the tee. As you can see, I’m hitting 3-wood. Why? It feels right.

PLAN YOUR ESCAPE
No matter how finely tuned your golf swing, or how mentally tough you become, you’re still going to hit the occasional bad shot. Humbling, isn’t it? Even the best players in the world are not immune to making mistakes. And sometimes, it’s not even a mistake that leads to an unfortunate situation. Luck, good or bad, is always a factor in the game. In this instance, my tee shot (on a par-5, luckily) has found the trees on the left side of the hole. It’s a par-5, meaning I don’t have to necessarily advance the ball as far as I can to try and save a good score. I’m going to pitch out, but I want to make sure I evaluate how to do that.

Ask yourself, when was the last time you actually practiced hitting pitch shots out of the rough and back into the fairway? It’s not something most of us spend much time doing! But truth be told, hitting a recovery shot is just as important as any other. Time to do it right.

Most golfers assume hitting a pitch recovery shot means taking a short iron or wedge and pitching the ball back into play. Okay, fine. Sometimes that’s all you can do. But in some instances, there are more choices to make and a short pitch back into the thick part of the fairway isn’t always the best choice. In the above photo, you can see I have quite an opening. Why would I pitch the ball back into the fairway with a short iron when I could advance the ball much farther?


I can’t hit a full middle or short iron because of the tree branches above me. So, first thing I do is choose the right club. I’m going with the 4-iron. For this shot, I can hit the 4-iron without having to deloft the clubhead too much, which, when you deloft an iron, you make it easy to dig into the turf, often resulting in a fat recovery shot. Instead, consider a lower-lofted iron and lower your ballflight that way. If you artificially play the shot with the hands far forward, you’ll find that much harder than it would be with a more natural and lessened forward shaft lean that engages the bounce on the sole and prevents digging.

Then again, if your ball is nestled deep in the grass, use more loft, and go ahead and play with forward shaft lean. You need that steeper angle of attack in that case.

Hitting a good recovery shot usually means limiting as much unnecessary movement as possible. Distance isn’t as important as direction, so the key in this shot is limiting movement and making solid contact with the face pointing in the right direction.

As you can see in the sequence above, I’m making a rotational, body-driven swing with less hand action and lower body action than I normally would have hitting a full swing iron shot. Again, think control first, distance second and remember to use the loft of your iron to adjust for trajectory, not an extremely hand’s forward position (unless you’re in the deep rough.)

Having good mechanics will certainly help in the successful execution of the shot; however, I see too many golfers playing trouble shots without being committed to the shot. If you stand over a shot and you’re still not sure you’ve made the right choice, you’ll become tentative. Doubt of the decision and fear of the consequences get in the way of pulling off successful trouble shots. The decision is based on the lie, the risk versus reward and your skill set. When you assess all of those variables, it will lead to a committed visualization of what you want, which leads to a decisive swing.

SAVE THE HERO SHOTS FOR THE FAIRWAY

We all want to hit the exciting recovery shot that sometimes Tour players make on TV. And as fun as it is imagining yourself to be Tiger, Rory, Bubba or Phil and hitting an all-world recovery, most of the time, Tour players actually opt to get the ball back in play more than they do try for the hero shot out of trouble. Pitching the ball back into the fairway doesn’t make for great entertainment on television, and you don’t see players do it as often on the broadcast, but truth be told, they do it more often. Tour players know that they’re more likely to hit a hero shot from a better lie and/or better position to the pin from the fairway than they do from way off the short stuff.

Now, I know there are some mixed messages on these two pages, and sometimes you should go for broke and try to hit the big, exciting recovery shot. And sometimes, you may be in such a bad spot that you need to stab down on the ball with a lot of forward shaft lean and scoop the ball out. The point is, recovery shots should be rehearsed and practiced, and you should be aware of multiple options. Take time on the range hitting quarter and half shots, and get a feel for how high and low the ball flies, as well as if they fade or draw. Also, aim precisely and practice with precision in mind, not distance.

If you practice your recovery shot routine and options, you’ll be more inclined to succeed on the golf course the next time you need to make a decision from a tough spot.


HIT!

JUNK THE SHOT, NOT THE WHOLE ROUND
Like the previous spread indicated, sometimes you’re going to make mistakes, and sometimes bad things just plain happen. Here, I hit what I thought was a perfectly flush 8-iron, dead straight at the pin. Unfortunately though, just as the ball lifted into the air, a gust of wind picked up and pushed against my ball higher than normal. And guess what? My ball got caught up in the wind, lost it’s velocity and plop, there it goes right into the lake! Yes, a good shot just ended up being a terrible one. It’s now on to the drop area to try and salvage a tough par or bogey.

Now, when that sort of thing happens, remember that it’s only one shot of many that you have to execute, and you can’t let one shot be the catalyst for several more bad shots to follow.


REACT!

For me, hitting what I thought was a good shot that ends up being a bad shot is very frustrating. It’s especially maddening when things like this happen that seemingly aren’t your fault. But, it happens! And likely, it will happen again.

Better players know how to react to a bad shot quickly and come time to hit another shot, move on just as fast. It’s okay to have a moment of anger and frustration so long as you have the ability to move on and be done with it in a hurry.

A simple way to minimize a negative reaction is to hold your finish until the ball lands. Believe me, waiting that three to five seconds before the ball lands will be like having a mini time-out. Just observe the ball in the air without the immediate judgment that so many bring to each shot. This short cooling-off period will minimize the intensity of the frustration. The goal is to be able to bounce back and move on.


PROCESS!

If I react to a bad shot and let anger take over so that it manifests in my body, well, that’s going to definitely linger long enough to affect my ability to not only think clearly, but also make relaxed golf swings.

The emotions that you feel have a direct effect on your grip pressure, breathing patterns and tempo. Your swing will definitely react differently and another poor shot will occur. The goal of the postshot routine is to break that cycle of: bad shot > negative reaction > physical effect > another poor shot. The keys to regain control are constructive self-talk (learn from the shot), slow/deep breathes and transitioning into a productive preshot routine only focusing on the present shot.

Take a breath, think about what just happened, diagnose why it may have occurred and use a bad shot to remember how to avoid the same mistake later in the round. I probably should have hit a 7-iron anyway, ensuring I at least get the ball on the green and not near the pin in the front part of the green. Next time, I’ll play the safe shot and be happy with a par instead of trying too hard (and failing) to make a birdie.

IT AIN’T OVER TIL IT’S OVER

Ain’t that the truth? A round of golf lasts several hours over 18 holes. You’re going to hit good shots and bad shots, have lucky breaks and bad breaks. The important thing is acknowledging that before you tee off, and not going to the first tee with a specific score in mind. “Gosh, if only I can break 90 or 80 today, I’ll be happy.” Breaking that thought process will allow your mind and body to play without the added pressure of hitting a target score. Also, what happens if you don’t hit that score and there are still a few holes left to play? It’s likely things will get worse because you’re already angry and frustrated that you’ve missed your number. It’s even tougher when you get close to your target score on the closing few holes. That kind of added pressure is totally unnecessary!

Start the round fresh with a clean mind, and don’t worry about your score before or during the round. Save your analysis for after you’re done playing, and evaluate the mistakes you made, the good shots you hit and how you could go even lower next time.


SPEED ON LONG, DIRECTION ON SHORT
When it comes to putting better, preparation is key, and you want to feel as comfortable as possible before you tee off. A great way to do just that is to practice some long putts first, but only for speed control. Don’t worry about a target, in fact, you can even putt to the edge of the green. By ignoring the target, you can better gauge your desired stroke length and tempo. Practice this for a few minutes until you feel you can control your speed well enough.

Once you get a feel for roll and speed, the time comes to add direction. Use the practice green to your advantage, and read it like you would if you were on the golf course. Don’t simply putt a ball and make an adjustment to the next ball based on how the first one rolled. You can’t do that on the course, so why do that here? Practice each putt as though it counts.

THINK, THEN EXECUTE (NOT EXECUTE, THEN THINK)
Once you dial in your speed and have determined the direction you want your ball to start, it’s time to execute and trust your decision! When you’re over a putt and in your stance, it’s not time to second guess and reevaluate your intended line. No, it’s go time, and all you’re checking at this point is your ball position, alignment and making sure you make a smooth, sound putting stroke.

Preparing to putt great is one thing, actually executing on the course is another. Too many golfers get away from going through their process and turn their attention to just the outcome. For instance, does your attitude change on a putt if it’s a birdie, par or bogey? If your attitude changes on one type of putt versus another, you’ll quickly get out of your routine and start focusing on outcome. This leads to thinking about missing it and what that will mean to your score, which is exactly the opposite of what you want to do! All that great preparation is wasted, and frustration ensues if you have a negative outcome in your mind.

The key to good putting on the course is to embrace the process for each putt and treat it the same no matter the circumstances. The process includes: determining your intention of speed, the line that matches that speed, seeing the ball go in and getting the body relaxed to execute a smooth stroke.


GETTING READY TO PLAY
Often, golfers get off to bad starts and don’t look at their preround routine as the reason why. A preround routine isn’t jumping out of your car, putting your golf shoes on and running to the first tee.

The first step in a proper preround routine is to warm up the body. I don’t know about you, but I need some time to stretch and get my back ready for golf swings. I use a device called Smart Flex (smartflex.com), which helps me stretch out my muscles and simulate the proper rotation of a golf swing.

The second step is to warm up the swing. This doesn’t mean fixing the swing; it means developing the balance and tempo you want to use on the golf course. I use a sand wedge and do three-quarter shots to get into my rhythm. I then progress through my clubs with my intent on having a smooth tempo and solid balance.

The third step is to warm up the mind. Here’s where I actually do full preshot routines and hit specific targets on the range. I imagine the first three tee shots I’ll encounter that day and maybe some tee shots that require me to shape the ball. By rehearsing these shots, I’m waking up my focus and developing confidence for these key shots.

The final step of my preround routine is getting comfortable with the greens. I spend a few minutes putting some long putts to gauge the speed and then finish with some shorter putts to boost my confidence. Now, as you go to the first tee, you’re physically and mentally ready to play your best. This routine can be modified for 10 minutes or 45 minutes.


THE FIVE MOST COMMON MISTAKES IN GOLF

1 Getting Easily Distracted. There’s a lot of downtime in golf, which allows our minds to wander. Some players begin to think of the holes that are coming up, while others are thinking of the phone message they just received from work. These are distractions that will take away from you being focused on the current shot. Instead, ask better questions of yourself to stay focused. How is this lie of the ball going to affect my shot? What angle do I want to come in from to this hole location? What’s my intermediate target on this chip shot? Questions like that will change your focus and get you to stay focused on what’s relevant for the present shot.

2 Obsessed With Score. Yes, we keep score, and it’s an important aspect of the game; however, if golfers only focus on their scores, it will create a major distraction. Thinking of score too much creates anxiety and added tension. Instead, focus on the process of each shot. Use a mental routine, breath deep and survey the shot at hand. Check for wind, elevation changes–basically, do what you can to distract yourself from your score and think more about hitting shots. You can only control the current shot, and thinking of what could happen to your score will only pull you away from making a relaxed, confident swing.

3 Reacting Emotionally To Poor Shots. Golf can be a frustrating game, if we let it. If every time you hit a poor shot you react with anger and frustration, it will be very difficult to bounce back and be ready for the next shot. When we experience frustration, it affects our tension level, decision-making and enjoyment of the game. No one hits good shots all the time, but your reaction to your poor shots will determine your mind-set for the next shot. The best players use a postshot routine to learn from a shot instead of constantly being critical of their performance. Being able to learn from the shot and move on is a mental game skill you should develop. Ask yourself, “Why did that ball go there? Was it a mental error or physical error?” Then, make a practice swing, and put the club back into the bag and move on to the next shot, leaving the last shot behind. If you can manage your emotions, you’ll begin to bounce back quicker and enjoy the game more.

4 Lack Of Course Management. Okay, you may not be able to play like Tiger, but knowing your strengths and limitations can help you shoot lower scores. So many golfers play shots based on their ego and not on reality. These poor decisions lead to blowup holes and further frustration. When you play to your normal patterns, you’ll be more comfortable and relaxed, which leads to better performance. Play to your strengths. Know your average distances you hit clubs. Play your normal shot pattern–if you normally hit a 20-yard fade off the tee, play it, don’t fight it! A good rule of thumb is that if you can’t hit a certain shot at least 70 percent successfully, then play that shot no matter how the hole is shaped. When you’re comfortable with your decision-making, it will result in a relaxed, confident swing. Make the best decisions based on your game and you’ll shoot lower scores.

5 Losing Confidence. Believing you can hit a shot successfully is crucial to lower scores. Unfortunately, many play golf with doubt and fear. So many choose to remember poor shots or think of worst-case scenarios. You need to choose to be confident by recalling past shots you’ve hit well in similar situations, visualizing the shot exactly how you want to perform it. Check your self-talk to make sure you switch it from negative to positive, and improve practice habits to work on shots that give you trouble. By using other mental game skills like course management, focus and emotional control, you’ll actually improve your confidence. All aspects work together to make or break your performance. Put time in today to avoid making these mental mistakes, and see your score lower.

Rick Sessinghaus, PGA, is “Golf’s Mental Coach” and is based in Southern Calif. Learn more about how to improve your mental game at www.MZCoach.com and wwww.RickSessinghaus.com.


Hey, sometimes no matter how well you practice and prepare to play your best, you’re going to have days where you struggle to hit greens and shoot lower scores. This is what makes the short game so important. You can have an off day when it comes to ballstriking, but if your short game is good, you can save some serious strokes and prevent what otherwise might have been a disastrous round. The following pages outline a few shots (and shotmaking decisions) that you ought to know come time to save a round of golf that just isn’t going your way. Follow my advice, and you’ll take pressure off the rest of your game and still shoot some decent scores.

CHOOSE WISELY
When it comes to hitting short shots around the green, don’t limit yourself to just one club. I use a variety of irons and wedges, depending on what type of shot I face. And, yes, I do use a 6-iron from time to time. It’s a great club for hitting short shots with maximum roll.

CHIP SHOT

PLAY FOR MAXIMUM ROLL (WHEN YOU CAN)
Speaking of maximum roll, it’s always easier to control the ball while it’s on the ground versus when it’s in the air. The simple (and not only) reason is, the sooner you get the ball rolling, the less you have to worry about where the ball should land and how much spin will affect the shot. If you normally fly the ball closer to the hole with hopes it will check up consistently the way you want it, I have news for you: It won’t. Your lie, the slope you’re on, even the firmness of the green and your contact, all affect how much backspin you’ll have on the ball. So, instead, plan on using as much green as you can, and get used to practicing your chips that roll more than they fly. This isn’t always the case for every shot, but for most, more roll is the way to go.

MANAGE YOUR SET UP
I’ve been teaching golf for many years and I’m still surprised to see so many players ignore the importance of setting up correctly for chips and pitches. Usually, they lean back and hope to lift the ball up into the air.

To clear the record, setting up for a short shot is just as critical as any other. Get into an athletic position with the hands forward, the ball slightly back in the stance and your weight centered, or even slightly forward, if you prefer. Remember, you have plenty of loft, so no need to hang back and try and lift the ball up. The loft will do the work for you!


I like to hit chips by quieting the hands as much as possible. This keeps the club low to the ground on the backswing. If the rough is deeper, then I get a little steeper, but in this case, I have a good lie. Quiet and low hands are the way to go for most chip shots.

QUIET HANDS, MORE SHAFT LEAN


For better consistency, it’s imperative that the shaft leans toward the target at the moment of truth. Not only are irons and wedges designed to meet the ball at this position, but forward shaft lean ensures you don’t add too much loft to the shot.


Through impact, youcan see I haven’t lifted the club up with myhands. By minimizing any flick of the wrists and keeping the clubhead low, I can ensure a more consistent trajectory and contact.

TOO MUCH BACKSWING = BAD CONTACT

Another cause for poor chipping is from too much backswing motion. If you take too big of a backswing, you’re likely to decelerate at impact, causing the hands to flip (scoop) and the arms to constrict, two things that you want to avoid come time to chip better.

Try to limit your backswing, and remember, even though it’s a short shot, you have to accelerate through the hit. That means the clubhead should be moving its fastest after contact with the ball, not before.

The length of your stroke depends on the shot length. A good rule of thumb is that the length of the stroke is very similar to the length of the stroke if you were putting from the same spot. Keep your chip swings accelerating, lower and shorter for better results.


I like to chip on a straight line, just as I do with the putter.

The club moves straight back along the targetline.

Through impact, the clubhead travels along the targetline.

After impact, the club will want to move back inside the line. Let it!

ROUGH BLAST


Hitting a pitch out of thick rough requires a steep angle of attack to ensure ball-first contact. To create that, it doesn’t mean you lift the club up abruptly on the way back. All you have to do to steepen your angle of attack is add some extra hinge to the wrists.

As you start the backswing, hinge the wrists quicker than you would normally. This will steepen your swing considerably. The key is not to overdo it! Hinge your club so the left arm and clubshaft form a 90__ angle. Any more hinge than this is too much and you’ll struggle with releasing the club through impact. So stay tilted and follow through, and don’t be afraid to make a divot!

HEAVY ROUGH? HIT THE TEE
Here’s a great drill/swing thought for managing the rough. Imagine the ball is on a tee. The goal with the shot is obviously to extricate the ball, but more importantly, you want to hit the tee, as well. The best way to clip the tee is to swing aggressively and hit it with the leading edge of the clubhead. If you actually can lift the tee out of the ground, that’s even better.

Go ahead and try this drill without a ball and do it a few times until you can consistently clip the tee. It doesn’t have to come out of the ground, but if it does, it’s a sign that you’re doing it right. Next, play some pitches from deep rough with the same visual picture. Imagine the ball is nestled down in the rough on a tee and you need to hit that tee with the leading edge of your club.

Do that, and you’ll instinctively swing a little harder with more acceleration, which, by the way, is another must-do from the rough!

UPHILL LIES

STAY CONSISTENT WITH THE SLOPE
Most greens slope, to some degree, from back to front. And, coincidentally, most missed approach shots end up short of the green, meaning you’re going to have a few uphill chips every now and then. The trick is to mimic the slope as best you can. Align your setup along the angle of the slope with the ball in the back region of your stance. As you swing, keep your weight over your left leg. If you slide to the right leg, you’ll get stuck there and have a hard time making good contact with the ball.


RETURN TO SETUP
When it comes to the full swing, your setup and impact position ought to be pretty different. But when facing uphill chips (or sidehill and downhill ones, for the matter), the goal is to remain stable and limit as much motion as you can. This is why I like to see my students get back to their setup position at impact when hitting delicate chips and short pitches off uphill lies. (Notice that, at impact, I haven’t rotated at all.)

Try to keep your weight stable over your left side and make a short, controlled stroke that, at impact, looks just like your setup position. Because of the slope, you’re basically hitting up a ramp, so use a less lofted club to control the trajectory. Also, use a rocking motion of the shoulders as the driver of your stroke, much like you would with a putter.

BUNKER SHOTS

STAY CENTERED!
The first and foremost goal from the sand is to get the ball out of the sand. Ironically, to get the ball up and out, you have to swing down and through! To ensure you hit down into the sand, make sure you keep your weight favoring your left side. If you drift to the right, you’ll likely release too soon and hit too far behind the ball. Instead, swing from the left side and finish on the left side with the clubhead in a low position post-impact. Hit down and through the sand behind the ball, not up and away.

SEE THE TEE…AGAIN
Whip out that tee again! Like the shot from the rough, trying to clip a tee beneath the ball is a great drill to help improve your ability to escape the sand.

Having the image of breaking the tee will ensure that the clubhead is deep enough into the sand and that you’re accelerating through the shot.

Try this drill until you can consistently hit the tee underneath the ball. Then use a ball and see how easy it is to get it out of the sand!


STAY UPRIGHT
If you’re finding some success from the sand, but still struggle with hitting the ball up and over high-lipped bunkers, consider a swing that’s more up and down and not around, i.e., get steeper and more upright. This will make it easier to strike the sand with a square or open clubface. If you tend to swing on a flatter or more rounded swing plane, it’s likely you’ll strike the sand with less loft on the clubface. Also, a steeper swing engages the wrists, and they tend to hinge and unhinge more actively in the swing. More wrist action coupled with a descending blow into the sand behind the ball will help prevent you from digging too much. Try to get steep and engage the hands more. You’ll hit it higher!

HARDPAN BLAST

Sometimes when you really miss, you find yourself on surfaces that you probably never practice on. So is the case with a tight lie on hard dirt (aka hardpan). To play this shot successfully, imagine it like you would play from the sand, only with a few modifications. First, don’t open the clubface. If you do, that will add unneccesary bounce to the shot, making it impossible to make clean contact. Second, play the ball slightly back in your stance so your swing’s lowpoint is just in front of the ball. Next, make a steeper bunker swing and descend into the ball. Unlike the bunker shot, you want to catch the ball first, not the dirt!

After impact, don’t restrict the hands from releasing and turning over. Instead, keep them low and allow the clubhead to swing through the hit faster than the handle does. Think in terms of trying to make a divot in the dirt after you make contact with the ball. The hardpan is firm, so if you catch the ground anywhere before the ball, the clubhead will bounce up and cause a skulled shot. So hit down on it!


CHOOSE THE RIGHT BOUNCE
Choosing the right bounce on your wedges can help more than most golfers know. A great place to start is by evaluating the types of courses you normally play. If you play on soft, wet or fluffy grasses and rough areas, consider using wedges with more bounce. If you play on tight and firm surfaces, lower-bounce models may help. Also, know that as you work your way down in loft with your wedges and into your irons, you’re also working your way down through clubheads with less bounce. So if you need to hit a shot that requires ball-first contact off a tight lie, consider using a lower-lofted wedge or even a short or middle iron to get the job done.

AGAINST THE COLLAR

PUT WITH AN EDGE
Or maybe we should call this tip “Putt With A Wedge.” Either way, the concept is simple. If you find yourself with the ball against the collar, using a wedge’s leading edge to roll the ball may be a lot easier than trying to make solid contact with your putter. To hit this shot, simply set up the same way you would over a putt and make your putting stroke. The goal is to try and catch the ball’s equator with the leading edge of your wedge. It may seem tricky at first, but with a little practice, you’ll find it’s easier to do than trying to hit down on the ball with your putter, which actually pushes the ball farther into its indentation on the green, causing it to pop up and roll somewhat erratically.

As Dan Martin states in his article “Use Your Senses” in this issue, putting with a wedge also helps with improving your putting concentration, so it’s a win-win, as far as I’m concerned!

Jeff Johnson, PGA, teaches at the Ojai Valley Inn & Spa in Ojai, California. For more information, visit ojairesort.com.

0
0
Your Cart
Your cart is emptyReturn to Shop