In grade school I can remember my math teacher standing at the chalkboard trying to explain some abstract topic like the Pythagorean theorem, square roots, or prime numbers proudly touting “mathematics is present in everything we do in life.” One of the more useful topics that year was the concept of common denominators in fractions. Defined by the dictionary as a feature shared by all members of a group, when applied to the game of golf it could be something present on every shot like the grip, or stance width, or ball position. In the short game — golf chipping tips particularly — we also have common denominators, or parts of the swing that are present in every shot we hit from the smallest chip shot to the largest pitch. Get these pieces right and you’ll be well on your way to hitting it closer to the hole and having more fun around the greens.
 COMMON DENOMINATOR 1: A LEVEL SET-UP
The swing motion in the short game is very different from you see in the full swing. The length of the swing is often much smaller and the body moves much less. It stands to reason then that the set-up should also be different. In order to properly control where the club strikes the ground you have to make a few adjustments:
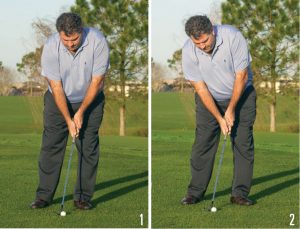
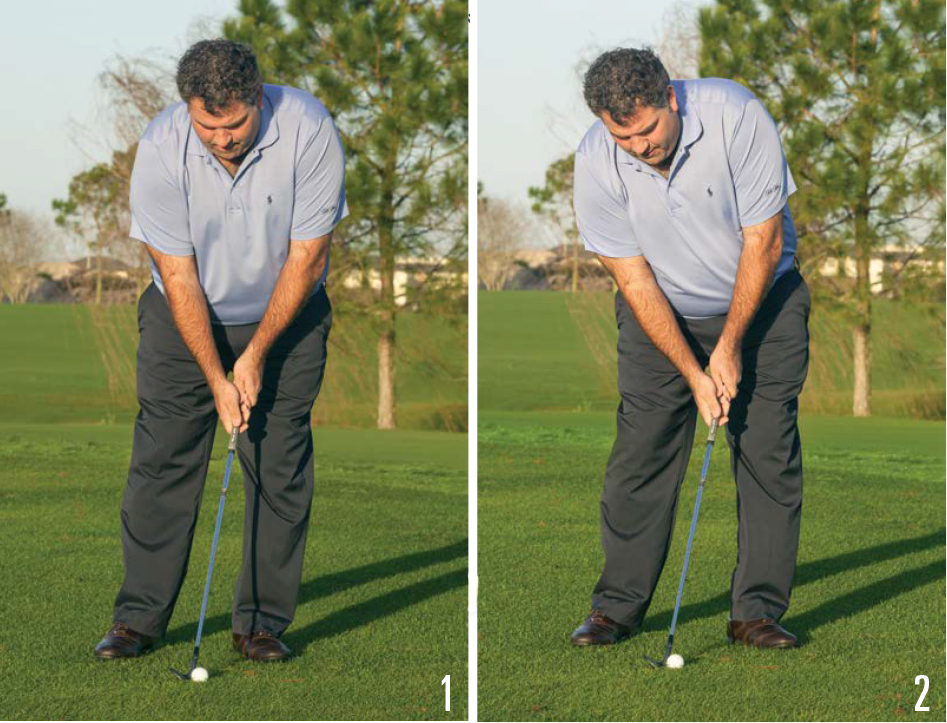
Photo 1: Here you can see the shoulders are level with very little tilt and the spine is vertical to the ground. The chest is moved forward 1-2 inches with the weight favoring the lead (left) leg.
Photo 2: That’s very different from the normal, full-swing set-up you see here with a tilted spine and lower trail (right) shoulder. The weight still favors the lead leg but is accomplished by pushing the lead hip toward the target.
 COMMON DENOMINATOR 2: SOFT ARMS & NEUTRAL GRIP
Associated with the change in body position and weight distribution at setup, the lead arm and grip are also important. Being able to manipulate and manage trajectory in short game shots is a necessity and a functioning grip and lead arm is important in allowing the club to work properly.
Photo 3: The arms are soft and bent, hanging directly under the chest. Both hands are placed on the club in a neutral to slightly weak position with the thumbs directly on top of the grip.
Photo 4: The position of the hands, arms, and grip in this image is problematic. The arms are straightened and stiff, pushing the club and hands forward toward the target and out from under the chest. Both hands are placed in a very strong position on the club with the thumbs rotated to the side
of the grip. This position makes it next to impossible to release the club properly and control trajectory.
More great golf chipping tips
 COMMON DENOMINATOR 3: MATCHING SIDES
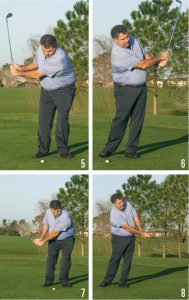
Managing the speed of the club is a must for distance control when making shorter swings. This is one of those crucial golf chipping tips. Excessive acceleration or deceleration of the clubhead through impact is a consistency nightmare and making sure the swing length is symmetrical on both sides of the ball is the best way to manage the clubhead speed and distance control.
Photos 5-8: In these images you can see two different lengths of backswing, each correlate to a finish position that matches in size. The distance the ball travels in the air can be controlled by the overall length of the swing; the swing length in the top images (Photos 5 and 6) would hit the ball much farther than the bottom image (Photos 7 and 8).
 COMMON DENOMINATOR 4: RELEASE THE CLUBHEAD
Common advice throughout the golfing world is that you should always “hit down” on the ball and keep your “hands ahead” through impact. While both of those statements are usually true in the full swing, things aren’t so simple when we’re talking golf chipping tips. Golfers often make a serious error trying to follow that advice and it can lead to very poor performance around the green.
Photo 9: Here you can see what happens when you try too hard to “hit down” or have your “hands ahead” through impact. It leads to an awkward finish position that can lead to mis-hits and distance control issues.
Photo 10: A better idea would be to allow the clubhead to naturally release through the shot. Instead of attempting to hold the angle in the trail wrist, just use the natural momentum of the swing to allow the clubhead to pass the hands through impact.
Pitch shot tips for beginners
 COMMON DENOMINATOR 5: ‘GO WITH IT’
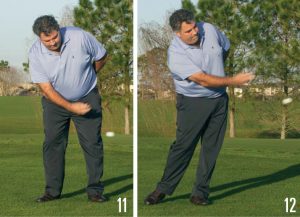
There is no doubt that our bodies move differently when making less-than-full swings, as the motion is smaller and slower with much less momentum. However, you should still make every effort to move your body athletically despite the small and slow nature of short game technique. Too many times golfers stay flat-footed and don’t allow the body to shift and rotate naturally as the club swings toward the target. Think about how you would move if you were simply throwing a ball underhanded off the side of the green. If you’re not moving the same with a club in your hand then you’re living dangerously!
Photo 11: Nobody with any athleticism would throw a ball this way … weight hung back with the body rigid and stiff as the arm throws the ball.
Photo 12: In this image the body is moving much more naturally to the throwing motion … weight gently shifting toward the target and body slightly rotated open as the arm crosses the chest to throw.

UP-DOWN-UP: THE CLUBHEAD RELEASE DRILL
Allowing the clubhead to release properly through impact is paramount to hitting the high, soft floating ball that lands gently on the green and stops near the hole. This drill will help you to get the feeling of what an appropriate release should feel like.
Photos 13-15: Place three balls on the ground in line with the target approximately 12-14 inches apart. Setup to the mid-dle ball with it slightly forward in your stance and try to hit it without touching either of the other two balls on the ground. If you can pull it off it means your swing has the right amount of “UP-DOWN-UP” and you’ve released the clubhead properly. Get it right and you’ll be hitting it higher and softer than ever around the greens.
Brandon Stooksbury is Head PGA Teaching Professional at the Idle Hour Club in Macon, Georgia. Read more of his golf chipping tips.



 Or, you can do as I’m doing in the upper photo at right, drop the right shoulder and reverse pivot to lower the club so it goes under the ball. However, when you do this the clubface has so much loft that the ball pops up and does not carry the needed distance. You can see in the photo how the ball has too much loft and therefore not enough carry—a typical fluffed shot.


 Try this mental approach: take your normal stance and normal swing you would use for a full golf shot. Select the appropriate club according to the length of the bunker shot. That could be anything from a 60-degree wedge to an 8- or 9-iron, depending on how far away the pin is and how much green you have to work with. (Photo 4)

 When you desire a softer type of explosion shot out of the bunker from what’s commonly known as the fried egg lie, you need to Make a few adjustments for the best chance at getting the ball out in one stroke. For one, employ a sightly open clubface and relaxed hands. Make your angle of attack steeper by leaning your weight toward your front foot. This weight shift also accentuates the digging action of the clubhead, making soft hands and an open clubface that much more critical. Otherwise, the golf ball will come out with more velocity than desired.
 THE SETUP
 THE SHOT

 To hit solid chip shots and pitches every time, the low spot in your motion needs to be in front of the ball. Here’s my easy recipe for ensuring this happens:
 Swing the club back and through, making sure that you finish with a straight line from your left shoulder to the club head. To do this, you will need to make enough of a back swing that you can let the club gradually accelerate into the ball, but not too long of a back swing that you decelerate. Many amateurs jab the club toward the ball, accelerating too quickly, which leads to mis-hits and poor distance control. Remember, a natural, correct rate of acceleration will get you closer to the hole. Photos 4-7 shows the proper swing sequence for a standard chip/pitch shot, with that all-important straight line from left shoulder through the club.
 Make sure to grip the club in front of you first and then push the hands forward so that the grip is aligned with the middle of your left leg at address, as I’m doing in Photos 8-9. It is crucial that you grip the club first. Most golfers make the mistake of putting the grip forward and then gripping the club, as in Photos 10-11. This causes the club to be closed somewhere in the neighborhood of 25-30 degrees! If you grip the club and then lean the shaft toward the target, the lines formed by your thumbs and index fingers will point toward your left shoulder and allow you to use the bounce of the club correctly.
 It’s always a big question for teachers when they’re working on the all-important sand game with their students: Should you use the same swing plane for all types of greenside bunker shots?
 Picture the ball sitting on a block of cement. In Photo 1 I’ve drawn a box around my ball in a bunker to illustrate that block. If you were allowed to pick up the ball and bounce it off the cement to create the trajectory of the shot you want, you’d bounce it a steeper angle to go higher and shorter, with an overhand arm motion, as I demonstrate in Photo 2; therefore your swing would match that (Photos 3-5).
 If you wanted to create a shot that would run lower and a little further and running, you’d create a shallower bounce off the cement with a sidearm motion, like skipping rocks (Photo 6). I would also want my swing to mirror that look, as in Photos 7-9.
 When you have really fluffy, soft sand, shallow with a more open face works better (Photo 10). When it’s harder and more compact, steep works better, with a bit less of an open face (Photo 11).
 Greetings, beginning golfers! Are you interested in learning how to hit a pitch shot — where you have a short distance to the pin and need to hit the golf ball high and soft? No worries! I am here to help you with insights on some of the things that you should know, making it easy to master the fundamentals. As it is both a science and an art — you should know the right techniques, not only in perspective, but also in terms of their applications. As with any other golf skill, practice makes perfect!
 The first thing that you have to do is to make sure that you are using the right wedge. This may seem to be too technical for some people, especially for beginners who have no idea how one wedge is different from the other. The key takeaway here is that not all wedges are the same. For hitting a pitch shot, I highly recommend that you use a pitching or sand wedge, which are both beneficial because they can provide you with generous loft.
 Emilia Clarke offers quick and simple golf lessons and equipment guides through her website,





